Response periods represent the group of people the survey is sent to and the timeframe the survey is open to collect data. Recipients of a survey can be selected based on their course enrollment, their role within the Blackboard system, or their email address.
The type of recipients you select determines the type of reporting you can perform. Recipients enrolled in courses or who have a role in Learn most likely have other demographic information stored in the system which can be used in reports to analyze responses. Recipients uploaded from an email list won't have the information for demographic comparisons.
Response periods are set to collect anonymous survey responses by default.
The most efficient way to send a single survey to different groups of people and during different times is to create different response periods. You can compare the results of different response periods when you analyze the survey results.
Examples
Create an undergraduate course evaluation with response periods for the fall term and the spring term. While the questions are the same, results from students enrolled in different terms can be analyzed by different criteria, such as their courses or the department they are affiliated with.
If a student is enrolled in more than one course that is part of the deployment for a survey, that student will receive a notification for EACH course and will need to respond to the survey individually for each course. Each response will be associated with the course to which it applies.
- Create a post graduation survey for all alumni and distribute it by email. Create response periods for each graduation year by using different email lists. Results can be analyzed based on graduation year and by question.
Create response periods
- Open an existing enterprise survey's menu.
- Select Response Period.
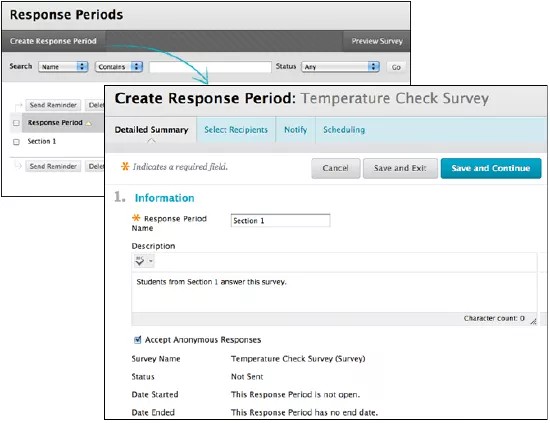
- On the Response Periods page, select Create Response Period.
- Enter information on the Detailed Summary tab.
- Surveys collect anonymous responses by default. To require demographic information from recipients, clear Accept Anonymous Responses.
- Select Save and Continue. You continue to the Select Recipients, Notify, and Scheduling tabs described below.
- Select Save and Exit when you are done setting the response period parameters.
To update a response period, from the Response Periods page, open an the response period's menu, and select Edit Response Period.
Select recipients
On the Select Recipients tab, you select survey recipients by place, by role, or by uploading email addresses. Response periods can have only one set of recipients based on their enrollment, role, email addresses.
You cannot combine a list of uploaded email addresses with a set of students enrolled in a course in one response period. Instead, use the same survey and create two response periods, one for the email addresses and one for the enrolled users.
By places
Places refer to course and organization enrollments. You can send surveys to all the users who are enrolled in courses, organizations, or both. You can narrow the pool of recipients by including only specific course roles, courses within a term, and courses within a department or business unit if your institution has licensed community engagement.
Using this option allows you to release the results of the survey to instructors from the Scheduling tab.
This example illustrates how to send a course evaluation to students enrolled in all biology department courses in the Spring 2024 term. It assumes that locations have been created at the institution and terms added.
- On the Choose Places tab, select Send to Location.
- Select Find Location and then search for Biology Department.
- Select Find Terms and then select Spring 2024.
- Select Student under Course Roles.
- Select Calculate or the refresh button to view the approximate number of recipients.
- Select Save and Exit.
By users
You can send surveys to all users based on their institutional role. You can narrow the pool of recipients by including only specific institutional roles, or institutional roles within a place such as a department or business unit if your institution has licensed community engagement and created locations.
Selecting recipients using this method limits report access to survey authors and administrators. If you need to release survey results to teachers, select recipients using the Places option. Reports can always be saved and manually distributed.
This example shows how to send an employee satisfaction survey to faculty and staff in the College of Arts and Sciences:
- On the Choose Users tab, select Send to Users by Location.
- Select Find Location and then search for College of Arts and Sciences.
- Select Faculty and Staff from Available Roles select the arrow to move them to Selected Roles.
- Select Calculate or the refresh button to see the approximate number of recipients.
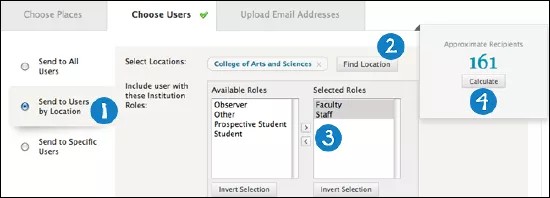
- Select Save and Exit.
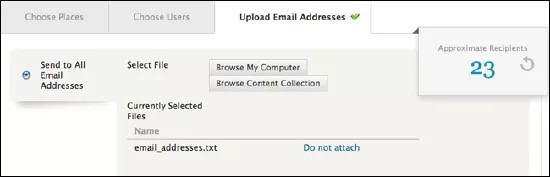
By uploading email addresses
Email addresses are uploaded to the system in a text file. You can upload the file from your computer or from the Content Collection if your institution licenses content management. Each email address must be on a separate line in the text file.
Notify recipients of survey availability
On the Notify tab, select how to notify recipients and edit the message they receive. Recipients are notified about an available survey by course alerts, My Blackboard alerts, or email. The notification methods available depend on the type of recipients you have selected. For example, recipients selected from an uploaded email list do not receive course alerts or My Blackboard alerts.
- Course notifications appear to users at the top of every page in their course. These only appear to users enrolled in the course whose course role meets the selected criteria. NOTE: Surveys sent to users based on their institution role or from an uploaded email list do not appear in courses.
- My Blackboard is a centralized location where users receive alerts, announcements, and other types of information about their participation. Users receive notification of a survey in My Blackboard when they have a role in the system. NOTE: Surveys sent to users from an uploaded email list do not appear in My Blackboard.
- Email notifications are available for all types of survey recipients. Email can also be selected as an additional notification method for course and My Blackboard notifications. NOTE: Surveys sent to users from an uploaded email list always appear in Email notifications.
Edit survey notifications
Use the text editor to personalize the notification and submission messages the recipients receive to generate timely responses. Notifications are text only and cannot include images, links, or media. The text editor includes variables to automatically populate text, such as the survey name, institution name, and the date the survey closes.
- On the Edit Response Period page, select the Notify tab.
- Under Notification Method, select Edit to open the text editor. Enter a subject.
- You can use variables to personalize the message for the recipient. For example, you can use a variable to show the specific course name.
- To add a variable, enter or paste the whole variable including the brackets. A list of variables is provided under Enterprise Survey Template Variables.
- Enter a message. You can also enter variables in this text box.
- Select Preview to view how the message will appear to recipients.
Edit automated system responses
Automated system response are text-only messages sent to survey recipients after they have taken an action.
- Submission Message — Sent when the survey is submitted.
- Duplicate Submission Message — Sent when the recipient attempts to submit a survey more than once.
- Duplicate Submission Message — Sent when a recipient attempts to respond to a survey after the response period has ended.
Edit an automated response:
- On the Edit Response Period page, access the Notify tab.
- Under Automated System Responses, select Edit to open the text editor for a message.
- Enter a subject.
- You can use variables to personalize the message for the recipient. For example, you can use a variable to show the specific course name.
- To add a variable, enter or paste the whole variable including the brackets. A list of variables is provided on this topic, under Enterprise Survey Template Variables.
- Enter a message. You can also enter variables in this text box.
- Select Preview to view how the message will appear to recipients.
Enterprise survey template variables
To use variables, enter or paste them into the editor. Variables appear as placeholders in the editor, but a variable dynamically displays its relevant value when the notification is sent.
Institution Name variable: [__SYSTEM.REGISTER_NAME__]
Survey Name variable: [__INSTRUMENT.NAME__]
Response Period Name variable: [__DEPLOYMENT.NAME__]
Response Period End Date variable: [__DEPLOYMENT.ENDDATE__]
Course Name variable: [__RESPONSE.COURSENAME__]
Course/Organization Role variable: [__RESPONSE.COURSEORGROLE__]
Instructor Names variable: [__RESPONSE.INSTRUCTORNAMES__]
Example of variables in a message
In the editor:
Schedule survey delivery and set reminders
On the Scheduling tab, you can send or close an enterprise survey immediately or schedule delivery or closing for a future date and time.
- On the Edit Response Period page, select the Scheduling tab.
- Choose the date and times the survey will be sent and closed.
- Select Add Reminder to send email reminders to recipients who have not responded to the survey.
- Select the time interval or pick a specific date to send the first reminder.
- Repeat the reminder at different intervals based on the date of the first reminder.
- Enter a subject, message, and edit the Survey Link Text.
- Select Save.