Add another dimension to video content with captions.
Add captions to your videos to engage all learners. Captioning video creates accessible content for individuals who are deaf or hearing impaired. Captions can help all students consume the video content. The uses for captions are limitless.
Examples
- Anyone working in a noisy environment can read captions.
- Non-native speakers can read captions in their own language.
- Students learning to read can follow along with the speaker.
- Students can see the spelling of terms that will be on a test.
- Anyone can search the session for key terms.
Caption types
The are different types of captioning. Not all types of captioning fulfill all accessibility requirements.
- Closed Captions: Video that has closed captions is denoted with a familiar CC icon
. Using closed captions is optional. Users can turn them on or off with their video player or other controls. Closed captions for video on television are read by a decoder that is part of the hardware of all television sets sold in the United States. Closed captions for video on the web are read by a media player, if it supports closed captions. Not all versions of media players support closed captions. Closed captions are not part of the actual video stream and exist in a separate text stream.

Users who want to access closed captions need to understand how to turn them on from their televisions or media players. Include instructions for users in your course.
- Open Captions: Video that is accessed on the web can use open captions to provide on-screen text. Open captions are always displayed because they are part of the video stream. Open captions are not subject to different media player features. Users do not have to know how to turn the captions on. A disadvantage of open captions is that if the video is compressed, there can be a loss of quality and readability. They can also be distracting to some users.
- Audio Description: Adding a written description of sound effects such as "floor creaking" or "glass shattering" provides a richer experience for viewers. Audio descriptions are part of open or closed captions. They can fill in missing information a narrator fails to provide. For example, if a narrator says, "As you can see, the three main points support the conclusion," but doesn't say what those three main points are, audio description provides the missing information in the captions.
The easiest way to avoid requiring audio description in the example is to have a storyboard that the narrator follows that details visual information out loud.
- Real-time Captions: Taking place during a synchronous event such as streaming video or a Blackboard Collaborate session, real-time captioning, sometimes referred to as real-time text, is a transcription service similar to TDD/TTY for telephones. Transcription services are separate from Blackboard Learn. There is usually a cost for the service and the service needs to be arranged in advance of the event.
- Subtitles: Translating just dialog and not including sound effects or other description, subtitles assume that viewers can see and hear. Only spoken dialog is captioned and often translated into a different language.
Finding captioned content
The easiest and fastest way to add captioned content to your course is to locate videos that already have captions. A relatively small percentage of videos are captioned, but you can locate them by filtering your search. In YouTubeTM, type your search term and then add a comma followed by "cc". For example, searching for captioned videos on MOOCs, type "MOOC, cc" in the search box.
iTunes® and Hulu® both have filters to help you locate videos that have captions. Just because a video has captions doesn't make the actual content any better or worse than uncaptioned videos. Before adding a captioned video to your course, play it all the way through to ensure the captions are accurate and the content is what you are expecting.
How to caption a video with YouTube
You can caption any videos that you own and upload to your YouTubeTM account. YouTube's automatic captioning service provides a solid start to captioning your videos.
Having a storyboard is very important, even if you are making informal videos. Type out your outline and what you are going to say. This takes a little extra time up front, but it saves time in the long run. With a storyboard, you'll sound better in your video and you'll need fewer retakes. You'll also be able to copy and paste your narration into YouTube instead of retyping it into the caption editor.
Working from a video transcript
- Go to your Video Manager.
- Next to the video you want to add captions or subtitles to, click the drop-down menu next to the Edit button.
- Select Subtitles and CC. In the drop-down menu, choose the language that's spoken most in the video and click Set language.
- Click the Add subtitles or CC button.
- Choose the language for the subtitles or closed captions you want to create. You can use the search bar to find languages that don't automatically show in the list.
- Click Transcribe and set timings.
- Copy and paste your all of the spoken audio in the text field. If you're creating closed captions, make sure to incorporate sound cues like [music] or [applause] to identify background sounds.
- Click Set timings to sync your transcript with the video.
Setting the timings can take a few minutes. While you wait, you'll be brought back to the video tracklist. Once it's ready, your transcription will automatically be published on your video.
Manually adding captions
Sometimes the Transcribe and auto-sync function will fail. If so, you can still add the captions manually.
- Navigate to Subtitles and CC, select the language of the video, and then click Create new subtitles or CC.
- Click play, and let the narration run 4 to 8 seconds and then click pause. Generally, try to start and stop at natural pauses in the narration, if possible.
- Copy the narration text from the transcript, and paste the narration spoken during that time frame into the text box.
- Click the add subtitle button (+). Drag the edges (as needed) of the narration box to align better with the spoken narration.
- Repeat 2-4 for remaining narration.
- When you have finished adding the narration text, click Publish.
Working with automatic captions
- Upload the video to YouTube.
- Wait two to six hours.
- Log back into YouTube and go to your Video Manager.
- Next to the video you want to edit captions or subtitles to, click the drop-down menu next to the Edit button.
- Select Subtitles and CC.
- Click Automatic Captions.
- Edit the existing captions (sometimes the automatic approximations are hilarious so this is fun).
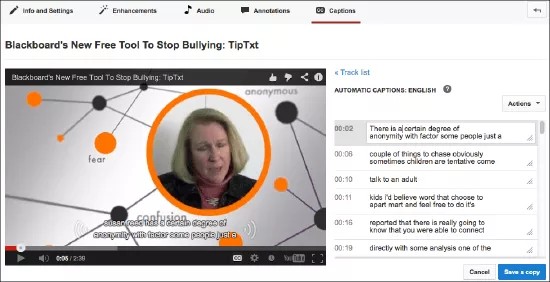
Although YouTube's automatic captioning is far from perfect, it will get you 80% of the way there. The clearer your speaking voice and diction, the better results you'll get. The best part of the automatic captioning tool is that the time codes are synched to your content. All you need to do is edit the existing text in each frame.