Communicate effectively.
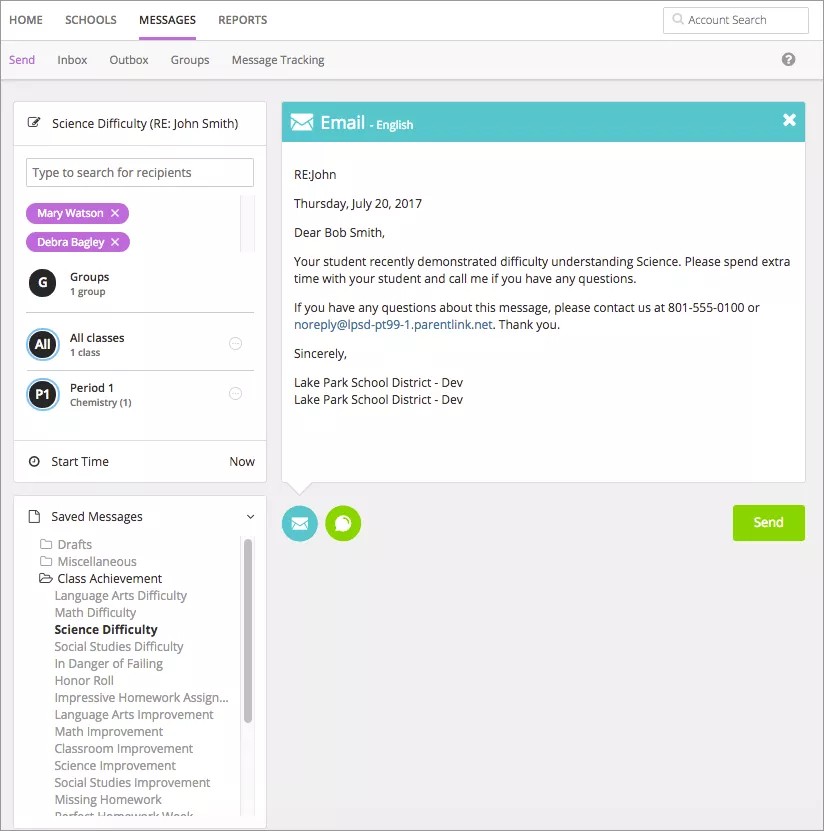
Your school's website includes a simple-to-use notification system that is designed for teachers — Teacher Communications. You can send messages to any of your students, the entire class, all your classes, or just to parents. Plus, Teacher Communications allows you to send pre-made messages. These messages are categorized into teacher specific categories and can be targeted to select students based on the message subject. You can also create your own message.
Check it out!
Send my own message
If you want to create your own message instead of sending a pre-made message, you can type your own content in Send Message page. You can then select to send it as an email, text/SMS message, or if set by your school, as a phone message.
- Select Messages.
Each teacher's students are separated into classes.
- Select the class or a user group.
Is there a group of students or parents that you contact on a regular basis? Create a special user group!
- To send a message to one or a few members, select the specific users. You can select all parents or all students, or use the list icon to select individual users. You can also search for specific users by name.
- Type the Subject.
- Select one or more delivery methods from the main send message page to send to the recipients:
- Emails - Type your text and add any images. To remove the email option, close out the tab from the upper right hand corner.
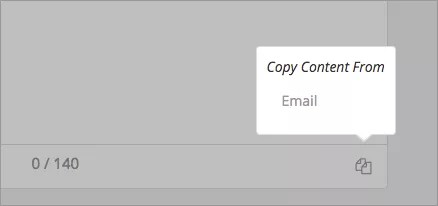
- Text/SMS - Content needs to be less than 160 characters. To copy content from the email message, select the Copy Content icon. To remove the text/SMS option, close out the tab from the upper right hand corner.
- Emails - Type your text and add any images. To remove the email option, close out the tab from the upper right hand corner.
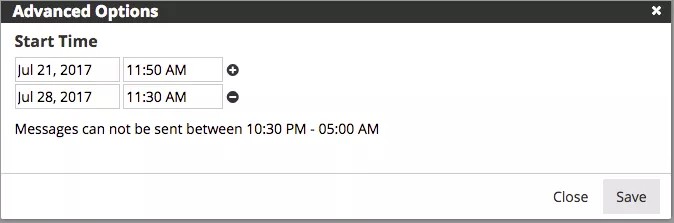
- Select Start Time to change the time to send the message. If you want to repeat message, you can also add more dates and times. You cannot send messages during your school's blackout times.
- Include language translations by selectingLanguage, and select each language needed.
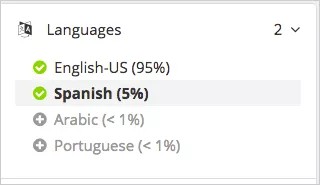
You can remove any language with the Delete icon.
Amheric language will not include translation or text-to-speech capabilities. Some Android devices and iOS do NOT support Amheric, and the message may not look correct on those devices. However, it is expected that those users requiring Amheric language will use phones that support the display.
If needed, check the text message option if over the character limit.
- Select Send when finished.
Send a pre-made message
Pre-made messages allow you to quickly send standard, student-type messages to students in your classes or specific user groups you created. There are several you can choose from.
- System created: Written and recorded in four supported languages: English, Spanish, Portuguese, and Haitian-Creole. Can't be edited, copied, or deleted. Identified by the Blackboard logo.
- Admin created: Created by your district administrator. Can be copied only. Identified by an image of a building.
- User created: Written and recorded by a user. Can be edited, copied, and deleted. Identified by an image of a person.
All of the system pre-made teacher messages are available in several languages including English, Spanish, French, German, Mandarin, and Cantonese. Any of these messages will send in the preferred language of the recipient if available.
Messages will deliver at the optimal start time set by the school or district, and will also adhere to the school or district call window. Contact the school administrator about the teacher message delivery times at each school.
-
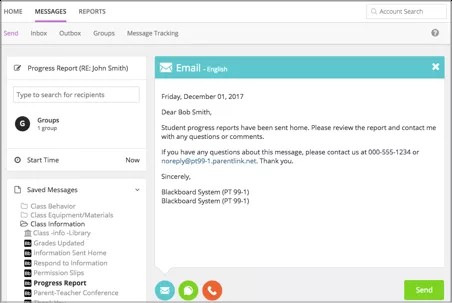
Select Messages.
Each teacher's students are separated into classes.
- Select the class or a user group.
- To send a message to one or a few members, select the specific users. You can select all parents or all students, or use the list icon to select individual users. You can also search for specific users by name.
- Select a message category from the Saved Messages list.
Category examples may include Class Achievements, Class Behavior, or Class Projects.
- Select the messages to use. The message will appear in the Send Message page.
- Type the Subject.
- Select one or more delivery methods from the main send message page to send to the recipients:
- Emails - You can update the text and add any images. To remove the email option, close out the tab from the upper right hand corner.
- Text/SMS - Content needs to be less than 160 characters. To remove the text/SMS option, close out the tab from the upper right hand corner.
- Select Send when finished.
What if I want to send a phone message?
By default, teachers cannot send phone messages unless the feature has been turned on by your district. If it is available, a phone icon will be available on the Send Message page. You can record audio to attach to your message. You can use your school's phone system to record the message, upload an audio file you created, or type text that will translate to speech. You select your recording option from the Phone list when creating a new message.
- If you select Call me to record, type your phone number and select Call me to record.
- If you select Call In to record, follow the on-screen instructions to record the message.
- Call the number listed.
- Immediately enter the unique four-digit code.
- Record the message after the prompt.
- Press pound # when finished.
- Select from the menu options:
- Press 1 to save the message.
- Press 2 to listen to the message.
- Press 3 to re-record the message.
- When satisfied with the message, press 1 and wait for the confirmation message before hanging up.
- If you select Upload Audio file, select Browse to find and upload your recorded audio file.
- If you select Text to Speech, type your message in the Text messages box. Select Play Audio to listen to the message, or type your phone number and select Call to hear your message.
Create accessible messages
إنشاء رسائل إمكانية وصول ذوي الاحتياجات الخاصة
هل تعلم أن هناك مليار شخص حول العالم يعانون من إعاقة عقلية أو جسدية؟ أو أن 12.9% من الطلاب المتواجدين في "أمريكا الشمالية" يعانون من أحد أشكال الإعاقة؟ من المهم أن تتأكد من فهم جميع طلابك وأعضاء جماعتك لمراسلاتك.
المزيد حول إمكانية وصول ذوي الاحتياجات الخاصة في العملية التعليمية
أفضل ممارسات إمكانية وصول ذوي الاحتياجات الخاصة لجميع المراسلات
لا توجد مشكلة إذا كان بريد إلكتروني أو Facebook، فإن جعل رسائلك قابلة للوصول أمر يسير بواسطة أفضل ممارسات إمكانية الوصول هذه.
- اكتب بأسلوب بسيط. حافظ على استخدامك للجمل القصيرة. استخدم كلمات، أو تركيبة من الكلمات، مكونة من مقطع أو مقطعين إن أمكن. استخدم الكتابة المختصرة. استخدم أدوات مثل Hemmingway Editor لقياس سلاسة القراءة للنص الخاص بك.
- لا تستخدم أنماط الخطوط أو اللون بمفرده للإشارة إلى الأهمية! عندما ترغب في تقديم تلميح مرئي، تأكد من استخدامك تلميح بديل قابل للوصول إليه. استخدم علامة التعجب في نهاية الجملة إذا اقتضى الأمر. تقوم برامج قراءة الشاشة بتغيير نبرة الصوت عند علامتي التعجب والاستفهام. ويعني ذلك عدم قيام الأداة بقراءة "علامة الاستفهام"-ولكنها بدلاً من ذلك، ستعمد إلى استخدام لهجة استفهامية أثناء قراءة السؤال بصوت عالٍ.
- قم بتضمين نص بديل في صورك. لا تحتاج إلى التفوه بـ "صورة لـ" حيث إن الأدوات المساعدة يمكنها معرفة أنها صورة بالفعل. واحرص أن تكون موجزًا، وواضحًا، وعلى تقديم نص وصفي. لا تستخدم نفس النص البديل لكل صورة، مثل "صورة توضح النص المرتبط"، فإنها بلا معنى ولا ينتج عنها إلا التشويش.
- أضف تعليقات للصورة عندما يتعذر عليك إضافة نص بديل. إذا تعذر عليك إضافة نص بديل لصورك، فتأكد من تقديم النص لجميع المعلومات دون الاعتماد على الصورة.
- اجعل الروابط وصفية. ينبغي أن يقوم كل رابط بوصف المحتوى المتوقع العثور عليه عند النقر فوقه. تجنب استخدام العبارات العامة مثل "انقر هنا" أو "راجع المزيد". لا يُفترض أن تكون عناوين الويب وعناوين URL غنية بالمعلومات ولا ينبغي استخدامها. لذا قم بدلًا من ذلك بجعل النص وصفي.
- اجعل مرفقاتك قابلة للوصول. اتبع نفس أفضل الممارسات لجعل مرفقاتك قابلة للوصول. لمعرفة المزيد، راجع إمكانية وصول ذوي الاحتياجات الخاصة في Blackboard.
- قم بتضمين التعليقات المُغلقة أو النسخ المكتوبة مع مقاطع الفيديو الخاصة بك. قم بتوفير رابط للنسخ المكتوبة، إذا لم يكن الفيديو يتضمن تعليقات مغلقة.
- حاول الاستماع إلى رسالتك للتأكد من أنها مناسبة. استخدم أدوات نص إلى كلام المتاحة على معظم الأجهزة للاستماع إلى رسالتك قبل إرسالها.
إمكانية وصول ذوي الاحتياجات الخاصة في الوسائط الاجتماعية
لا تكون الوسائط الاجتماعية دومًا قابلة للوصول. ويصعُب على مستخدمي قارئ الشاشة التنقل كما أن المحتوى لا يستخدم دومًا عناوين، أو نص بديل للصور، أو تعليق للفيديو. ولكن ذلك لا يعني أنه ليس بإمكانك استخدام الوسائط الاجتماعية، فهي موجودة حيث يوجد جمهورك. تأكد من إمكانية الوصول إلى المحتوى الخاص بك قدر الإمكان للوصول إلى جمهورك بالكامل.
اتبع أفضل ممارسات إمكانية الوصول لمحتواك بالكامل وهذه النصائح عند استخدام Facebook أو Twitter.
- قم بتوفير نص بديل لجميع الصور الشخصية والصور التي تقوم بمشاركتها.
- قم بتوفير رابط للنسخ المكتوبة عند مشاركة مقاطع الفيديو.
- أخبر جمهورك بمحتوى التغريدة الخاصة بك. إذا كانت التغريدة الخاصة بك تتضمن صور، أو فيديو، أو صوت، فاستخدم هذه البادئات في بدية تغريدتك.
- الصور: [PIC]
- مقاطع الفيديو: [VIDEO]
- الصوت: [AUDIO]
- ضع هاشتاج وقم بالإشارة في نهاية تغريدتك.
- استخدم أسلوب الكتابة بدون مسافات وبتكبير الحرف الأول في الهاشتاج. اكتب الحرف الأول بحرف كبير لكل كلمة يتضمنها الهاشتاج. على سبيل المثال، #BlackboardAccessibility
- تجنب استخدام لغة غير مفهومة قد تبدو غريبة عند قراءتها بواسطة قارئ الشاشة.