Communicate effectively.
Your school's website includes a simple-to-use notification system that is designed for teachers — Teacher Communications. You can send messages to any of your students, the entire class, all your classes, or just to parents. Plus, Teacher Communications allows you to send pre-made messages. These messages are categorized into teacher specific categories and can be targeted to select students based on the message subject. You can also create your own message.
Check it out!
Send my own message
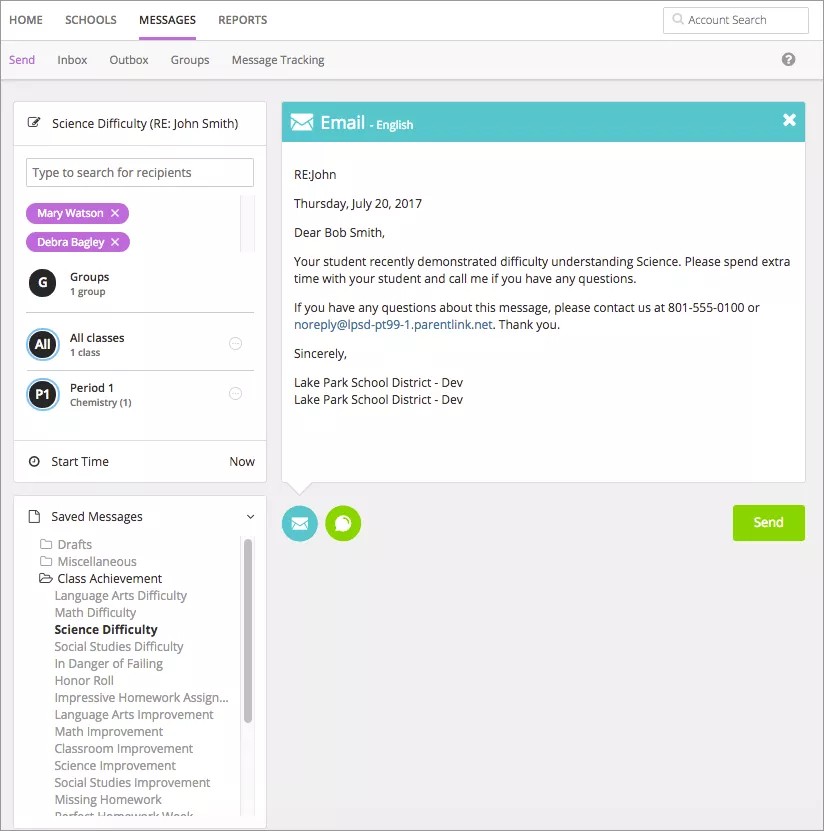
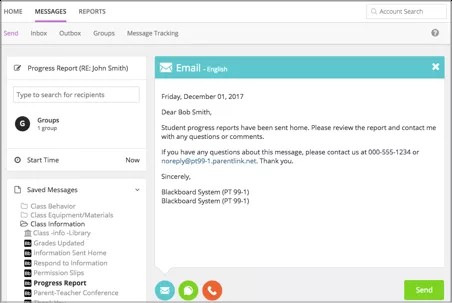
If you want to create your own message instead of sending a pre-made message, you can type your own content in Send Message page. You can then select to send it as an email, text/SMS message, or if set by your school, as a phone message.
- Select Messages.
Each teacher's students are separated into classes.
- Select the class or a user group.
Is there a group of students or parents that you contact on a regular basis? Create a special user group!
- To send a message to one or a few members, select the specific users. You can select all parents or all students, or use the list icon to select individual users. You can also search for specific users by name.
- Type the Subject.
- Select one or more delivery methods from the main send message page to send to the recipients:
- Emails - Type your text and add any images. To remove the email option, close out the tab from the upper right hand corner.
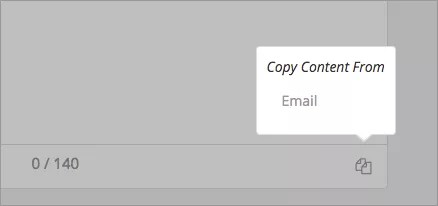
- Text/SMS - Content needs to be less than 160 characters. To copy content from the email message, select the Copy Content icon. To remove the text/SMS option, close out the tab from the upper right hand corner.
- Emails - Type your text and add any images. To remove the email option, close out the tab from the upper right hand corner.
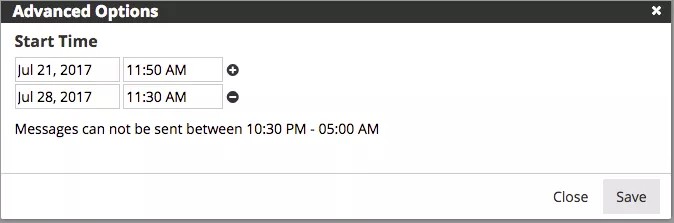
- Select Start Time to change the time to send the message. If you want to repeat message, you can also add more dates and times. You cannot send messages during your school's blackout times.
- Include language translations by selectingLanguage, and select each language needed.
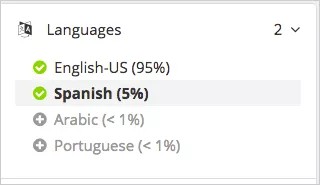
You can remove any language with the Delete icon.
Amheric language will not include translation or text-to-speech capabilities. Some Android devices and iOS do NOT support Amheric, and the message may not look correct on those devices. However, it is expected that those users requiring Amheric language will use phones that support the display.
If needed, check the text message option if over the character limit.
- Select Send when finished.
Send a pre-made message
Pre-made messages allow you to quickly send standard, student-type messages to students in your classes or specific user groups you created. There are several you can choose from.
- System created: Written and recorded in four supported languages: English, Spanish, Portuguese, and Haitian-Creole. Can't be edited, copied, or deleted. Identified by the Blackboard logo.
- Admin created: Created by your district administrator. Can be copied only. Identified by an image of a building.
- User created: Written and recorded by a user. Can be edited, copied, and deleted. Identified by an image of a person.
All of the system pre-made teacher messages are available in several languages including English, Spanish, French, German, Mandarin, and Cantonese. Any of these messages will send in the preferred language of the recipient if available.
Messages will deliver at the optimal start time set by the school or district, and will also adhere to the school or district call window. Contact the school administrator about the teacher message delivery times at each school.
-
Select Messages.
Each teacher's students are separated into classes.
- Select the class or a user group.
- To send a message to one or a few members, select the specific users. You can select all parents or all students, or use the list icon to select individual users. You can also search for specific users by name.
- Select a message category from the Saved Messages list.
Category examples may include Class Achievements, Class Behavior, or Class Projects.
- Select the messages to use. The message will appear in the Send Message page.
- Type the Subject.
- Select one or more delivery methods from the main send message page to send to the recipients:
- Emails - You can update the text and add any images. To remove the email option, close out the tab from the upper right hand corner.
- Text/SMS - Content needs to be less than 160 characters. To remove the text/SMS option, close out the tab from the upper right hand corner.
- Select Send when finished.
What if I want to send a phone message?
By default, teachers cannot send phone messages unless the feature has been turned on by your district. If it is available, a phone icon will be available on the Send Message page. You can record audio to attach to your message. You can use your school's phone system to record the message, upload an audio file you created, or type text that will translate to speech. You select your recording option from the Phone list when creating a new message.
- If you select Call me to record, type your phone number and select Call me to record.
- If you select Call In to record, follow the on-screen instructions to record the message.
- Call the number listed.
- Immediately enter the unique four-digit code.
- Record the message after the prompt.
- Press pound # when finished.
- Select from the menu options:
- Press 1 to save the message.
- Press 2 to listen to the message.
- Press 3 to re-record the message.
- When satisfied with the message, press 1 and wait for the confirmation message before hanging up.
- If you select Upload Audio file, select Browse to find and upload your recorded audio file.
- If you select Text to Speech, type your message in the Text messages box. Select Play Audio to listen to the message, or type your phone number and select Call to hear your message.
Create accessible messages
접근 가능한 메시지 생성
전 세계 수십억 명의 사람들이 정신적 또는 신체적 장애를 갖고 있다는 사실을 알고 계십니까? 또한 북아메리카의 모든 학생 중 12.9%가 몇 가지 형태의 장애를 가지고 있다는 사실은 알고 계십니까? 모든 학생과 커뮤니티 학습자가 커뮤니케이션을 이해하고 있는지 확인하는 것이 중요합니다.
모든 커뮤니케이션에 대한 접근성 모범 사례
이메일 또는 Facebook에서는 이러한 접근성 모범 사례를 사용하여 메시지를 접근 가능하게 만드는 것이 쉬우므로 문제가 없습니다.
- 분명하게 씁니다. 문장을 짧게 유지합니다. 가능한 경우 1~2음절의 단어 또는 단어 조합을 사용하십시오. 축약형을 사용합니다. Hemmingway Editor와 같은 도구를 사용하면 텍스트의 판독성을 측정할 수 있습니다.
- 중요성을 나타내기 위해 글꼴 스타일 또는 색상만 사용하지 마십시오. 강한 시각 신호를 제공해야 할 경우 접근 가능한 대안을 사용해야 합니다. 중요한 경우에는 문장 끝에 느낌표를 사용합니다. 화면 리더의 오디오가 재생될 때 느낌표와 물음표 부분에는 억양이 들어갑니다. 즉, '물음표'라고 읽는 대신 질문을 크게 읽으면서 의문문의 어조를 드러냅니다.
- 이미지에 대체 텍스트를 포함합니다. 보조 도구는 이미지인지 여부를 이미 알고 있으므로 "~의 이미지"라고 말할 필요가 없습니다. 간결하고 명확하며 설명이 포함된 텍스트를 사용하십시오. 모든 이미지에 대해 "관련 텍스트를 보여주는 이미지"와 같은 동일한 대체 텍스트를 사용하지 마십시오. 의미가 없으며 혼란만 줍니다.
- 대체 텍스트를 추가할 수 없는 경우 이미지 캡션을 추가합니다. 대체 텍스트를 이미지에 추가할 수 없는 경우, 텍스트가 이미지를 활용하지 않고도 모든 정보를 전달하는지 확인하십시오.
- 링크가 내용을 설명하도록 합니다. 모든 링크는 사용자가 링크를 클릭할 경우 찾을 수 있다고 기대하는 대상을 설명해야 합니다. "여기를 클릭" 또는 "항목 더 보기" 등의 일반 어구를 사용하지 않도록 합니다. 웹 주소 또는 URL은 정보를 제공하는 것으로 간주되지 않으며 사용해서는 안 됩니다. 그러므로 내용을 설명하는 텍스트를 사용하십시오.
- 첨부 파일을 접근 가능하게 만듭니다. 동일한 모범 사례에 따라 첨부 파일을 접근 가능하게 만듭니다. 자세한 내용을 알아보려면 Blackboard에서의 접근성을 참조하십시오.
- 비디오에 선택 캡션 또는 자막을 포함합니다. 비디오에 선택 캡션이 포함되지 않은 경우 자막에 링크를 설정합니다.
- 메시지 소리가 제대로 들리는지 들어봅니다. 대부분의 장치에서 사용 가능한 텍스트-음성 전환 도구를 사용하여 메시지를 보내기 전에 듣습니다.
소셜 미디어의 접근성
소셜 미디어에 접근할 수 없는 경우도 있습니다. 화면 리더 사용자는 탐색하는 데 어려움을 겪으며 컨텐츠에 머리글, 이미지에 대한 대체 텍스트 또는 비디오 캡션이 사용되지 않을 수 있습니다. 이 경우에도 소셜 미디어를 사용할 수 있습니다. 즉, 청중이 있는 장소에서는 소셜 미디어를 사용할 수 있습니다. 가능한 한 모든 청중에게 다가갈 수 있도록 컨텐츠를 접근 가능하게 만듭니다.
Facebook 또는 Twitter 사용 시 모든 컨텐츠에 대한 접근성 모범 사례와 이러한 팁을 따릅니다.
- 게시하는 모든 사진과 이미지에 텍스트 대안을 제공합니다.
- 비디오를 게시할 경우 자막에 링크를 설정합니다.
- 트윗에 있는 내용을 청중에게 말합니다. 트윗에 사진, 비디오 또는 오디오가 있는 경우, 트윗 시작 부분에 다음 접두사를 사용합니다.
- 사진: [PIC]
- 비디오: [VIDEO]
- 오디오: [AUDIO]
- 트윗의 끝부분에 해시태그와 멘션을 둡니다.
- 해시태그에 카멜 대/소문자를 사용합니다. 해시태그에서 각 단어의 첫 번째 글자를 대문자로 표시합니다. 예를 들어, #BlackboardAccessibility와 같이 표시합니다.
- 화면 리더에서 읽을 때 이상하게 들리는 텍스트 통상어는 사용하지 않습니다.