Communicate effectively.
Your school's website includes a simple-to-use notification system that is designed for teachers — Teacher Communications. You can send messages to any of your students, the entire class, all your classes, or just to parents. Plus, Teacher Communications allows you to send pre-made messages. These messages are categorized into teacher specific categories and can be targeted to select students based on the message subject. You can also create your own message.
Check it out!
Send my own message
If you want to create your own message instead of sending a pre-made message, you can type your own content in Send Message page. You can then select to send it as an email, text/SMS message, or if set by your school, as a phone message.
- Select Messages.
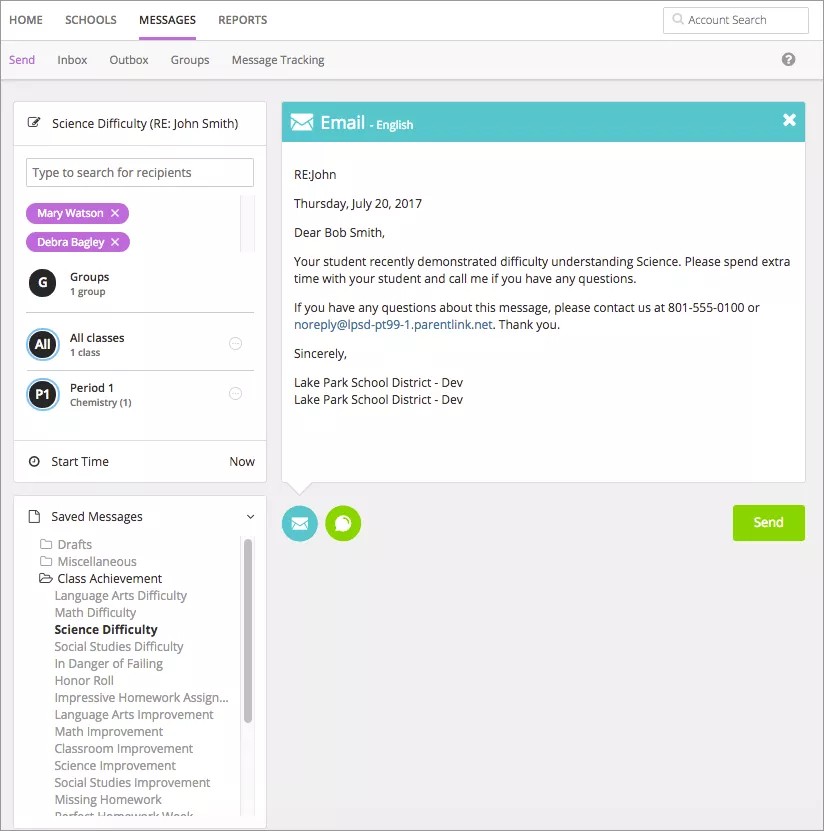
Each teacher's students are separated into classes.
- Select the class or a user group.
Is there a group of students or parents that you contact on a regular basis? Create a special user group!
- To send a message to one or a few members, select the specific users. You can select all parents or all students, or use the list icon to select individual users. You can also search for specific users by name.
- Type the Subject.
- Select one or more delivery methods from the main send message page to send to the recipients:
- Emails - Type your text and add any images. To remove the email option, close out the tab from the upper right hand corner.
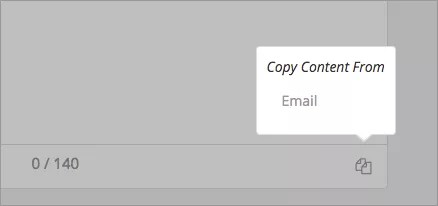
- Text/SMS - Content needs to be less than 160 characters. To copy content from the email message, select the Copy Content icon. To remove the text/SMS option, close out the tab from the upper right hand corner.
- Emails - Type your text and add any images. To remove the email option, close out the tab from the upper right hand corner.
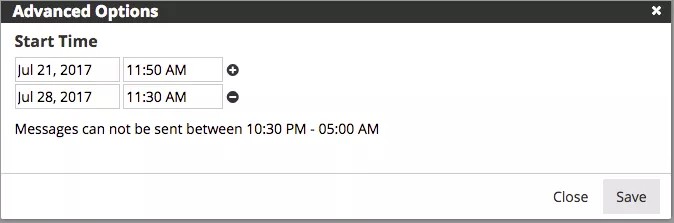
- Select Start Time to change the time to send the message. If you want to repeat message, you can also add more dates and times. You cannot send messages during your school's blackout times.
- Include language translations by selectingLanguage, and select each language needed.
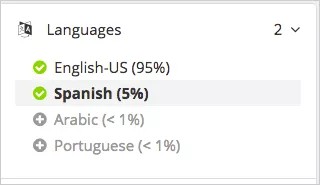
You can remove any language with the Delete icon.
Amheric language will not include translation or text-to-speech capabilities. Some Android devices and iOS do NOT support Amheric, and the message may not look correct on those devices. However, it is expected that those users requiring Amheric language will use phones that support the display.
If needed, check the text message option if over the character limit.
- Select Send when finished.
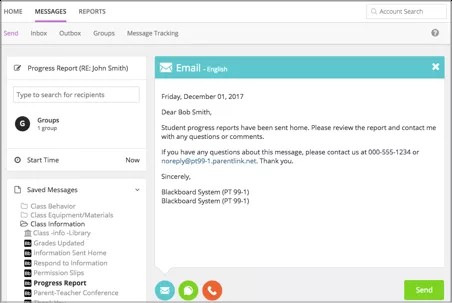
Send a pre-made message
Pre-made messages allow you to quickly send standard, student-type messages to students in your classes or specific user groups you created. There are several you can choose from.
- System created: Written and recorded in four supported languages: English, Spanish, Portuguese, and Haitian-Creole. Can't be edited, copied, or deleted. Identified by the Blackboard logo.
- Admin created: Created by your district administrator. Can be copied only. Identified by an image of a building.
- User created: Written and recorded by a user. Can be edited, copied, and deleted. Identified by an image of a person.
All of the system pre-made teacher messages are available in several languages including English, Spanish, French, German, Mandarin, and Cantonese. Any of these messages will send in the preferred language of the recipient if available.
Messages will deliver at the optimal start time set by the school or district, and will also adhere to the school or district call window. Contact the school administrator about the teacher message delivery times at each school.
-
Select Messages.
Each teacher's students are separated into classes.
- Select the class or a user group.
- To send a message to one or a few members, select the specific users. You can select all parents or all students, or use the list icon to select individual users. You can also search for specific users by name.
- Select a message category from the Saved Messages list.
Category examples may include Class Achievements, Class Behavior, or Class Projects.
- Select the messages to use. The message will appear in the Send Message page.
- Type the Subject.
- Select one or more delivery methods from the main send message page to send to the recipients:
- Emails - You can update the text and add any images. To remove the email option, close out the tab from the upper right hand corner.
- Text/SMS - Content needs to be less than 160 characters. To remove the text/SMS option, close out the tab from the upper right hand corner.
- Select Send when finished.
What if I want to send a phone message?
By default, teachers cannot send phone messages unless the feature has been turned on by your district. If it is available, a phone icon will be available on the Send Message page. You can record audio to attach to your message. You can use your school's phone system to record the message, upload an audio file you created, or type text that will translate to speech. You select your recording option from the Phone list when creating a new message.
- If you select Call me to record, type your phone number and select Call me to record.
- If you select Call In to record, follow the on-screen instructions to record the message.
- Call the number listed.
- Immediately enter the unique four-digit code.
- Record the message after the prompt.
- Press pound # when finished.
- Select from the menu options:
- Press 1 to save the message.
- Press 2 to listen to the message.
- Press 3 to re-record the message.
- When satisfied with the message, press 1 and wait for the confirmation message before hanging up.
- If you select Upload Audio file, select Browse to find and upload your recorded audio file.
- If you select Text to Speech, type your message in the Text messages box. Select Play Audio to listen to the message, or type your phone number and select Call to hear your message.
Create accessible messages
Создание сообщений со специальными возможностями
Знаете ли вы, что один миллиард человек в мире имеет ограниченные физические или умственные возможности? Или что 12,9 % всех учащихся в Северной Америке имеют какую-либо форму нарушений? Важно убедиться, что ваши сообщения понятны всем учащимся и участникам сообщества.
Дополнительные сведения о специальных возможностях в образовании
Рекомендации по обеспечению специальных возможностей для всех типов сообщений
С помощью этих рекомендаций обеспечить специальные возможности в электронных письмах или публикациях в Facebook совсем несложно.
- Пишите просто. Делайте предложения короткими. По возможности используйте слова или словосочетания с 1–2 слогами. Используйте сокращенные формы. Применяйте такие инструменты, как Hemmingway Editor, чтобы проанализировать читаемость текста.
- Для выделения важных моментов не используйте только шрифт или цвет. Визуально выделяя текст, примените альтернативный способ, который поможет сделать его более доступным для пользователей. Поставьте восклицательный знак в конце важного предложения. Программы чтения с экрана выделяют интонацией восклицательный и вопросительный знаки. Программа не прочитает «вопросительный знак», но повысит интонацию в конце.
- Добавляйте замещающий текст к изображениям. Нет необходимости писать «изображение», поскольку вспомогательные инструменты распознают его. Пишите кратко, четко и содержательно. Не используйте одинаковый замещающий текст для всех изображений, такой как «изображение, иллюстрирующее соответствующий текст». Это не имеет смысла и перегружает текст.
- Добавляйте к изображению субтитры при невозможности использовать замещающий текст. Если добавить замещающий текст к изображениям невозможно, убедитесь, что в тексте отражена вся необходимая информация даже без ссылки на изображение.
- Делайте ссылки информативными. Каждая ссылка должна описывать, что пользователь найдет, перейдя по ней. Избегайте общих фраз, таких как «нажмите здесь» или «узнайте больше». Не следует использовать веб- и URL-адреса, так как они не считаются информативными. Вместо этого сделайте текст описательным.
- Добавление специальных возможностей к прикрепленным файлам. Следуйте тем же рекомендациям, чтобы добавить специальные возможности к прикрепленным файлам. Дополнительные сведения см. в статье Специальные возможности в Blackboard.
- Добавьте субтитры или стенограммы к своим видеозаписям. Предоставьте ссылку на стенограммы, если ваша видеозапись не содержит субтитров.
- Попробуйте прослушать свое сообщение, чтобы убедиться, что все в порядке. Воспользуйтесь программами чтения с экрана, доступными на большинстве устройств, чтобы прослушать сообщение перед отправкой.
Специальные возможности в социальных сетях
Социальные сети не всегда поддерживают специальные возможности. Пользователи программы чтения с экрана могут испытывать трудности при навигации. Содержимое не всегда включает заголовки, замещающий текст для изображений и субтитры к видеозаписям. Однако это не означает, что вы не можете пользоваться социальными сетями. Именно там находится ваша целевая аудитория. Сделайте свое содержимое максимально доступным, чтобы охватить всю аудиторию.
Следуйте рекомендациям по обеспечению специальных возможностей для любого содержимого и данным советам для пользователей Facebook и Твиттера.
- Добавляйте замещающий текст ко всем фотографиям и изображениям, которые вы публикуете.
- Предоставляйте ссылку на стенограмму при размещении видеозаписей.
Твиттер
- Расскажите аудитории, что содержится в вашем твите. Если ваш твит содержит фотографии, видео- или аудиозапись, используйте в его начале указанные ниже префиксы.
- Фотографии: [PIC]
- Видео: [VIDEO]
- Аудио: [AUDIO]
- Размещайте хэштеги и упоминания в конце твита.
- В хэштегах используйте написание в «верблюжьем» стиле с первой прописной буквой. Для первой буквы каждого слова в хэштеге используйте верхний регистр. Например, #СпециальныеВозможностиBlackboard
- Избегайте жаргона, который может звучать странно при использовании программы чтения с экрана.