Communicate effectively.
Your school's website includes a simple-to-use notification system that is designed for teachers — Teacher Communications. You can send messages to any of your students, the entire class, all your classes, or just to parents. Plus, Teacher Communications allows you to send pre-made messages. These messages are categorized into teacher specific categories and can be targeted to select students based on the message subject. You can also create your own message.
Check it out!
Send my own message
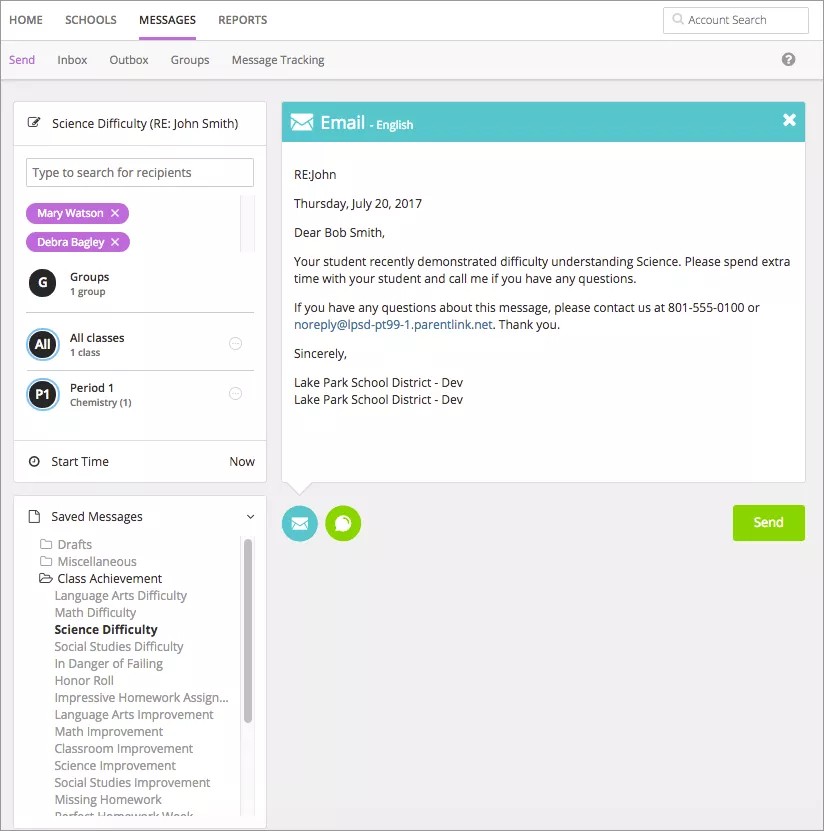
If you want to create your own message instead of sending a pre-made message, you can type your own content in Send Message page. You can then select to send it as an email, text/SMS message, or if set by your school, as a phone message.
- Select Messages.
Each teacher's students are separated into classes.
- Select the class or a user group.
Is there a group of students or parents that you contact on a regular basis? Create a special user group!
- To send a message to one or a few members, select the specific users. You can select all parents or all students, or use the list icon to select individual users. You can also search for specific users by name.
- Type the Subject.
- Select one or more delivery methods from the main send message page to send to the recipients:
- Emails - Type your text and add any images. To remove the email option, close out the tab from the upper right hand corner.
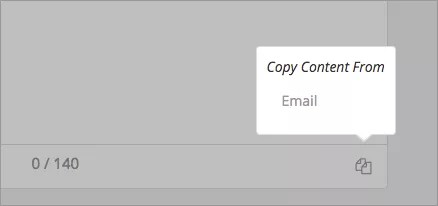
- Text/SMS - Content needs to be less than 160 characters. To copy content from the email message, select the Copy Content icon. To remove the text/SMS option, close out the tab from the upper right hand corner.
- Emails - Type your text and add any images. To remove the email option, close out the tab from the upper right hand corner.
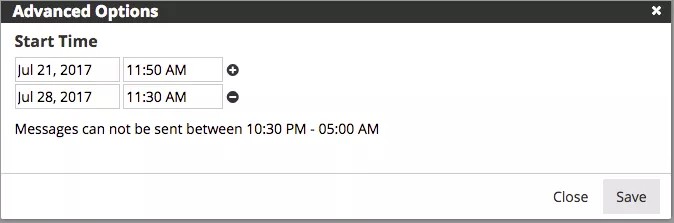
- Select Start Time to change the time to send the message. If you want to repeat message, you can also add more dates and times. You cannot send messages during your school's blackout times.
- Include language translations by selectingLanguage, and select each language needed.
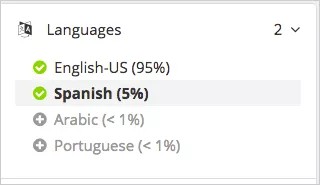
You can remove any language with the Delete icon.
Amheric language will not include translation or text-to-speech capabilities. Some Android devices and iOS do NOT support Amheric, and the message may not look correct on those devices. However, it is expected that those users requiring Amheric language will use phones that support the display.
If needed, check the text message option if over the character limit.
- Select Send when finished.
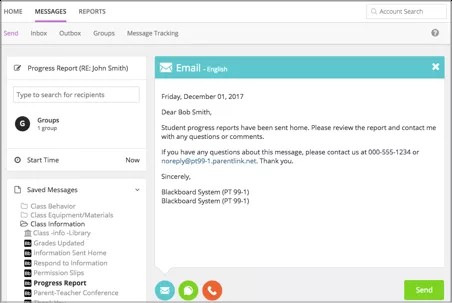
Send a pre-made message
Pre-made messages allow you to quickly send standard, student-type messages to students in your classes or specific user groups you created. There are several you can choose from.
- System created: Written and recorded in four supported languages: English, Spanish, Portuguese, and Haitian-Creole. Can't be edited, copied, or deleted. Identified by the Blackboard logo.
- Admin created: Created by your district administrator. Can be copied only. Identified by an image of a building.
- User created: Written and recorded by a user. Can be edited, copied, and deleted. Identified by an image of a person.
All of the system pre-made teacher messages are available in several languages including English, Spanish, French, German, Mandarin, and Cantonese. Any of these messages will send in the preferred language of the recipient if available.
Messages will deliver at the optimal start time set by the school or district, and will also adhere to the school or district call window. Contact the school administrator about the teacher message delivery times at each school.
-
Select Messages.
Each teacher's students are separated into classes.
- Select the class or a user group.
- To send a message to one or a few members, select the specific users. You can select all parents or all students, or use the list icon to select individual users. You can also search for specific users by name.
- Select a message category from the Saved Messages list.
Category examples may include Class Achievements, Class Behavior, or Class Projects.
- Select the messages to use. The message will appear in the Send Message page.
- Type the Subject.
- Select one or more delivery methods from the main send message page to send to the recipients:
- Emails - You can update the text and add any images. To remove the email option, close out the tab from the upper right hand corner.
- Text/SMS - Content needs to be less than 160 characters. To remove the text/SMS option, close out the tab from the upper right hand corner.
- Select Send when finished.
What if I want to send a phone message?
By default, teachers cannot send phone messages unless the feature has been turned on by your district. If it is available, a phone icon will be available on the Send Message page. You can record audio to attach to your message. You can use your school's phone system to record the message, upload an audio file you created, or type text that will translate to speech. You select your recording option from the Phone list when creating a new message.
- If you select Call me to record, type your phone number and select Call me to record.
- If you select Call In to record, follow the on-screen instructions to record the message.
- Call the number listed.
- Immediately enter the unique four-digit code.
- Record the message after the prompt.
- Press pound # when finished.
- Select from the menu options:
- Press 1 to save the message.
- Press 2 to listen to the message.
- Press 3 to re-record the message.
- When satisfied with the message, press 1 and wait for the confirmation message before hanging up.
- If you select Upload Audio file, select Browse to find and upload your recorded audio file.
- If you select Text to Speech, type your message in the Text messages box. Select Play Audio to listen to the message, or type your phone number and select Call to hear your message.
Create accessible messages
Lag tilgjengelige meldinger
Visste du at det finnes over en milliard mennesker i verden med en fysisk eller psykisk funksjonshemning? Eller at 12,9 % av alle studenter i Nord-Amerika har en eller annen form for funksjonshemning? Det er viktig å sørge for at kommunikasjon forstås av alle studenter og medlemmer av fellesskapet.
Mer om tilgjengelighet i utdanningssektoren
Gode fremgangsmåter for tilgjengelighet for all kommunikasjon
Uansett om det gjelder e-post eller Facebook, blir det lett å gjøre meldinger tilgjengelige for alle med disse anbefalte fremgangsmåtene.
- Skriv på en måte det er lett å forstå. Bruk korte setninger. Bruk ord eller ordkombinasjoner med 1–2 stavelser der det er mulig. Bruk sammentrekninger på engelsk. Bruk verktøy som Hemmingway Editor til å måle lesbarheten av teksten din.
- Ikke bare bruk skriftstiler til å vise hva som er viktig! Hvis du vil gjøre at noe skiller seg ut visuelt, bør du sørge for at du bruker et tilgjengelig alternativ. Bruk for eksempel et utropstegn i slutten av setninger med viktig informasjon. Skjermlesere tar med utropstegn og spørsmålstegn i beregningen. Dette betyr at verktøyet ikke vil lese «spørsmålstegn»—i stedet vil det ha en spørrende tone når det leser et spørsmål høyt.
- Ta med alternativ tekst for bilder. Du trenger ikke å skrive «bilde av», ettersom hjelpeverktøyene allerede vet at det er snakk om bilder. Legg inn en kortfattet, klar og beskrivende tekst. Ikke bruk samme alt-tekst for alle bilder, for eksempel «Bilde som illustrerer den tilknyttede teksten». Det er meningsløst og rotete.
- Legg til bildetekst når du ikke kan bruke alternativ tekst. Hvis du ikke kan legge til alternativ tekst for bilder, bør du sørge for at teksten inneholder all informasjon, og at bildene ikke er nødvendige for å forstå innholdet.
- Gjør lenker beskrivende. Alle lenker bør beskrive hva brukeren kan regne med å finne når han eller hun klikker på dem. Unngå generiske fraser som «klikk her» og «se mer». Nettadresser anses ikke for å være informative og bør ikke brukes. I stedet bør du gjøre slike lenker beskrivende.
- Gjør vedlegg tilgjengelige. Følg samme anbefalte fremgangsmåter for å gjøre vedlegg tilgjengelige. Du finner mer informasjon under Tilgjengelighet hos Blackboard.
- Ta med teksting eller transkripsjoner i videoer. Hvis du mangler teksting for en video, bør du ta med en lenke til en transkripsjon.
- Hør på meldinger for å sikre at de høres riktige ut. De fleste enheter har tekst-til-tale-funksjonalitet, så bruk den for å høre på meldingene dine før du sender dem.
Tilgjengelighet på sosiale medier
Sosiale medier er ikke alltid tilgjengelige for alle brukere. Det er en utfordring for brukere av skjermlesere å navigere i dem, og innhold har ikke alltid overskrifter, alternativ tekst for bilder eller videoteksting. Det betyr imidlertid ikke at du ikke kan bruke sosiale medier. Det er tross alt ofte der brukerne er. Sørg for at innholdet ditt er så tilgjengelig som mulig, for å nå alle brukerne.
Følg de gode fremgangsmåtene for tilgjengelighet for alt innhold, samt disse tipsene når du bruker Facebook eller Twitter.
- Legg inn et tekstalternativ for bilder du publiserer.
- Legg til en lenke til transkripsjoner når du publiserer videoer.
- Fortell brukerne hva Twitter-meldingene dine inneholder. Hvis du publiserer en Twitter-melding med bilder, videoer eller lyd, bør du bruke de følgende prefiksene i starten av meldingen.
- Bilder: [PIC]
- Videoer: [VIDEO]
- Lyd: [AUDIO]
- Plasser eventuelle emneknagger og nevninger i slutten av Twitter-meldingen.
- Bruk både store og små bokstaver i emneknagger. Bruk stor bokstav i starten av hvert ord i emneknaggene. Eksempel: #BlackboardAccessibility
- Unngå tekstsjargong som kan høres rar ut når den leses opp av skjermlesere.