Communicate effectively.
Your school's website includes a simple-to-use notification system that is designed for teachers — Teacher Communications. You can send messages to any of your students, the entire class, all your classes, or just to parents. Plus, Teacher Communications allows you to send pre-made messages. These messages are categorized into teacher specific categories and can be targeted to select students based on the message subject. You can also create your own message.
Check it out!
Send my own message
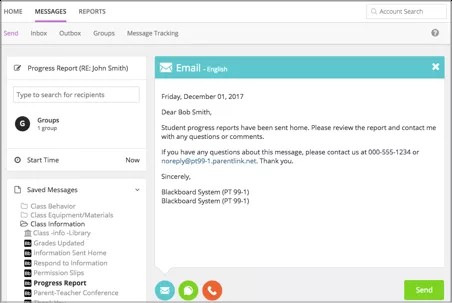
If you want to create your own message instead of sending a pre-made message, you can type your own content in Send Message page. You can then select to send it as an email, text/SMS message, or if set by your school, as a phone message.
- Select Messages.
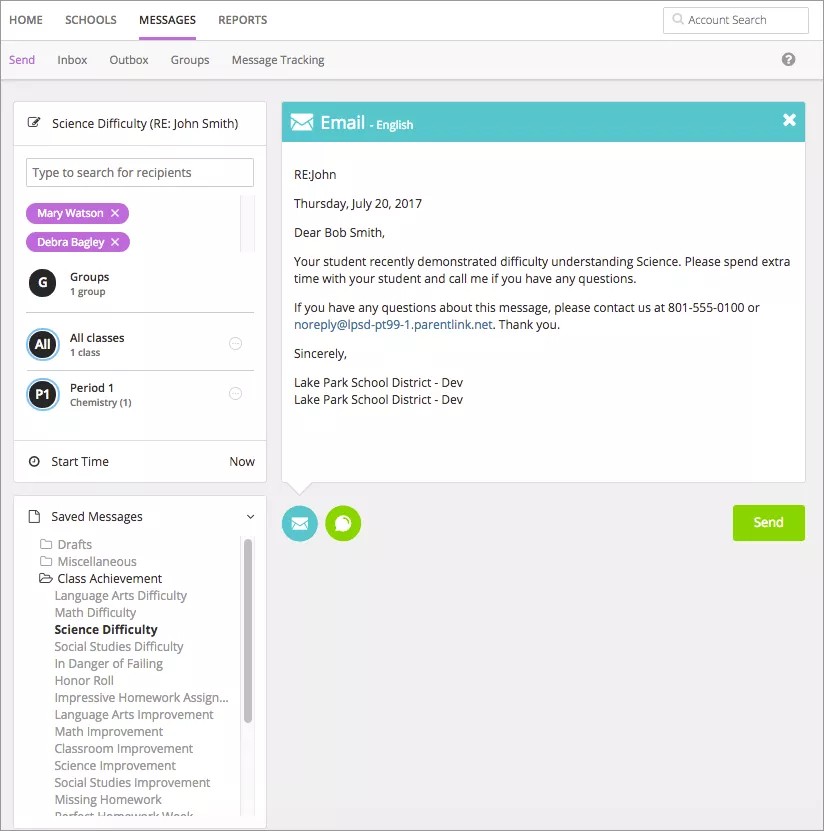
Each teacher's students are separated into classes.
- Select the class or a user group.
Is there a group of students or parents that you contact on a regular basis? Create a special user group!
- To send a message to one or a few members, select the specific users. You can select all parents or all students, or use the list icon to select individual users. You can also search for specific users by name.
- Type the Subject.
- Select one or more delivery methods from the main send message page to send to the recipients:
- Emails - Type your text and add any images. To remove the email option, close out the tab from the upper right hand corner.
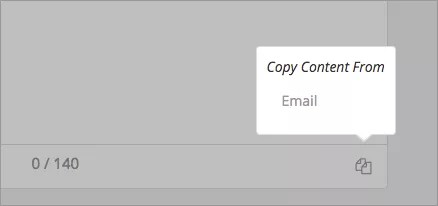
- Text/SMS - Content needs to be less than 160 characters. To copy content from the email message, select the Copy Content icon. To remove the text/SMS option, close out the tab from the upper right hand corner.
- Emails - Type your text and add any images. To remove the email option, close out the tab from the upper right hand corner.
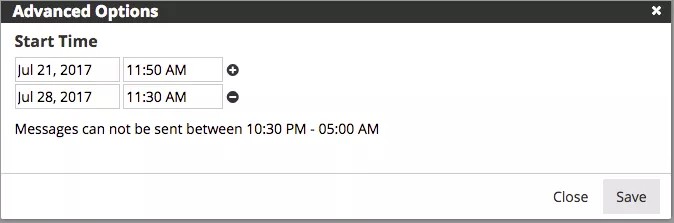
- Select Start Time to change the time to send the message. If you want to repeat message, you can also add more dates and times. You cannot send messages during your school's blackout times.
- Include language translations by selectingLanguage, and select each language needed.
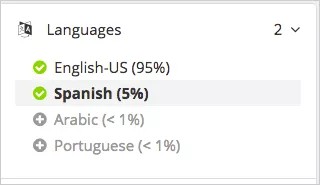
You can remove any language with the Delete icon.
Amheric language will not include translation or text-to-speech capabilities. Some Android devices and iOS do NOT support Amheric, and the message may not look correct on those devices. However, it is expected that those users requiring Amheric language will use phones that support the display.
If needed, check the text message option if over the character limit.
- Select Send when finished.
Send a pre-made message
Pre-made messages allow you to quickly send standard, student-type messages to students in your classes or specific user groups you created. There are several you can choose from.
- System created: Written and recorded in four supported languages: English, Spanish, Portuguese, and Haitian-Creole. Can't be edited, copied, or deleted. Identified by the Blackboard logo.
- Admin created: Created by your district administrator. Can be copied only. Identified by an image of a building.
- User created: Written and recorded by a user. Can be edited, copied, and deleted. Identified by an image of a person.
All of the system pre-made teacher messages are available in several languages including English, Spanish, French, German, Mandarin, and Cantonese. Any of these messages will send in the preferred language of the recipient if available.
Messages will deliver at the optimal start time set by the school or district, and will also adhere to the school or district call window. Contact the school administrator about the teacher message delivery times at each school.
-
Select Messages.
Each teacher's students are separated into classes.
- Select the class or a user group.
- To send a message to one or a few members, select the specific users. You can select all parents or all students, or use the list icon to select individual users. You can also search for specific users by name.
- Select a message category from the Saved Messages list.
Category examples may include Class Achievements, Class Behavior, or Class Projects.
- Select the messages to use. The message will appear in the Send Message page.
- Type the Subject.
- Select one or more delivery methods from the main send message page to send to the recipients:
- Emails - You can update the text and add any images. To remove the email option, close out the tab from the upper right hand corner.
- Text/SMS - Content needs to be less than 160 characters. To remove the text/SMS option, close out the tab from the upper right hand corner.
- Select Send when finished.
What if I want to send a phone message?
By default, teachers cannot send phone messages unless the feature has been turned on by your district. If it is available, a phone icon will be available on the Send Message page. You can record audio to attach to your message. You can use your school's phone system to record the message, upload an audio file you created, or type text that will translate to speech. You select your recording option from the Phone list when creating a new message.
- If you select Call me to record, type your phone number and select Call me to record.
- If you select Call In to record, follow the on-screen instructions to record the message.
- Call the number listed.
- Immediately enter the unique four-digit code.
- Record the message after the prompt.
- Press pound # when finished.
- Select from the menu options:
- Press 1 to save the message.
- Press 2 to listen to the message.
- Press 3 to re-record the message.
- When satisfied with the message, press 1 and wait for the confirmation message before hanging up.
- If you select Upload Audio file, select Browse to find and upload your recorded audio file.
- If you select Text to Speech, type your message in the Text messages box. Select Play Audio to listen to the message, or type your phone number and select Call to hear your message.
Create accessible messages
Erişilebilir İletiler Oluşturma
Dünyada bir milyar insanın zihinsel veya fiziksel engelli olduğunu biliyor muydunuz? Ya da Kuzey Amerika'daki tüm öğrencilerin %12,9'unun bir şekilde engelli olduğunu? İletilerinizin, tüm öğrencileriniz ve topluluk üyeleri tarafından anlaşıldığından emin olmak çok önemlidir.
Eğitimde erişilebilirlikle ilgili daha fazla bilgi
Tüm iletiler için erişilebilirlikle ilgili en iyi uygulamalar
İster e-posta ister Facebook yoluyla olsun, erişilebilirlikle ilgili bu en iyi uygulamalar sayesinde iletilerinizin erişilebilir olmasını sağlamak çok kolaydır.
- Açıkça yazın. Cümlelerinizi kısa tutun. Mümkün olduğu sürece 1-2 hecelik kelimeler veya ifadeler kullanın. Kısaltmalar kullanın. Hemmingway Editor gibi araçları kullanarak metninizin okunabilirliğini ölçün.
- İçeriğin önemli olduğunu belirtmek için yalnızca yazı tipi stillerinden veya renklerden yararlanmayın. Güçlü bir görsel ipucu sağlamanız gerektiğinde erişilebilir bir alternatifini kullanmayı unutmayın. Cümleniz önemliyse cümle sonunda bir ünlem işareti kullanın. Ekran okuyucular, ünlem ve soru ifadelerini farklı tonlar. Diğer bir deyişle araç, "soru işareti"nin kendisini okumaz, bunun yerine soruyu sesli bir şekilde okurken soru soruyormuş gibi tonlar.
- Görüntülerinize alternatif metinler ekleyin. Yardımcı araçlar bunun bir resim olduğunu zaten bildiği için "Şunun resmi" demeniz gerekmez. Sade, açık ve açıklayıcı olun. Her resimde "İlişkili metni gösteren resim" gibi aynı alternatif metni kullanmayın. Bu anlamsız olur ve karışıklığa neden olur.
- Alternatif metin ekleyemediğiniz durumlarda görüntü altyazıları ekleyin. Görüntülerinize alternatif metin ekleyemiyorsanız görüntüye güvenmeyin ve tüm bilgilerin altyazıda bulunduğundan emin olun.
- Bağlantılarınızı açıklayıcı hale getirin. Her bağlantı, kullanıcı onu tıkladığında ne olacağını açıklamalıdır. "Burayı tıklatın" veya "daha fazlasına bakın" gibi genel ifadeleri kullanmaktan kaçının. Bilgilendirici olarak değerlendirilmeyen web adresleri veya URL'ler kullanılmamalıdır. Bunun yerine metni açıklayıcı hale getirin.
- Eklerinizin erişilebilir olmasını sağlayın. Eklerinizin erişilebilir olması için aynı en iyi uygulamaları kullanın. Daha fazla bilgi için Blackboard'da Erişilebilirlik bölümüne bakın.
- Videolarınıza açıklamalı altyazı veya metin dökümü ekleyin. Videonuzda açıklamalı altyazı yoksa metin dökümlerinin bağlantısını sağlayın.
- İletilerinizi dinleyerek kulağa hoş gelip gelmediğine bakın. İletinizi göndermeden önce dinlemek için çoğu cihazda bulunan metin okuma araçlarını kullanın.
Sosyal medyada erişilebilirlik
Sosyal medyaya, her zaman erişmek mümkün değildir. Ekran okuyucu kullananların sosyal medyada gezinmesi zordur ve içerikte her zaman başlıklar, alternatif görüntü metinleri veya video altyazıları bulunmaz. Elbette bu, sosyal medyayı kullanamayacağınız anlamına gelmez. Sosyal medya, kitlenize ulaşmanıza imkan tanıyan bir yerdir. İçeriğinizin tüm kitleniz tarafından mümkün olduğunca erişilebilir olduğundan emin olun.
Tüm içeriklerinizde "erişilebilirlikle ilgili en iyi uygulamalar"ı takip edin ve Facebook veya Twitter kullanırken bu ipuçlarından yararlanın.
- Yayınladığınız tüm fotoğraflar ve görüntüler için alternatif metin sağlayın.
- Video yayınlayacağınız zaman metin dökümlerinin bağlantısını sağlayın.
- Tweet'inizde neler olduğunu kitlenize anlatın. Tweet'inizde fotoğraf, video veya ses içeriği varsa tweet'inizin başında önek olarak aşağıdaki ifadeleri kullanın.
- Fotoğraflar için: [GÖRÜNTÜ]
- Videolar için: [VİDEO]
- Ses: [SES]
- Tweet'inizin sonuna konu ve kişi etiketleri koyun.
- Bir etikette birden fazla kelime kullanacaksanız bunları ayrı olarak değil, bitişik şekilde yazın. Etiketinizde her kelimenin ilk harfi büyük olmalıdır. Örneğin, #BlackboardErişilebilirliği
- Ekran okuyucular tarafından okunduğunda tuhaf gelebilecek meslekî ifadeleri kullanmayın.