Communicate effectively.
Your school's website includes a simple-to-use notification system that is designed for teachers — Teacher Communications. You can send messages to any of your students, the entire class, all your classes, or just to parents. Plus, Teacher Communications allows you to send pre-made messages. These messages are categorized into teacher specific categories and can be targeted to select students based on the message subject. You can also create your own message.
Check it out!
Send my own message
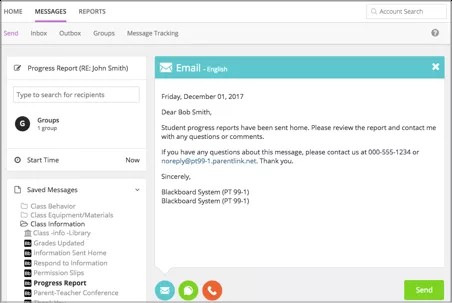
If you want to create your own message instead of sending a pre-made message, you can type your own content in Send Message page. You can then select to send it as an email, text/SMS message, or if set by your school, as a phone message.
- Select Messages.
Each teacher's students are separated into classes.
- Select the class or a user group.
Is there a group of students or parents that you contact on a regular basis? Create a special user group!
- To send a message to one or a few members, select the specific users. You can select all parents or all students, or use the list icon to select individual users. You can also search for specific users by name.
- Type the Subject.
- Select one or more delivery methods from the main send message page to send to the recipients:
- Emails - Type your text and add any images. To remove the email option, close out the tab from the upper right hand corner.
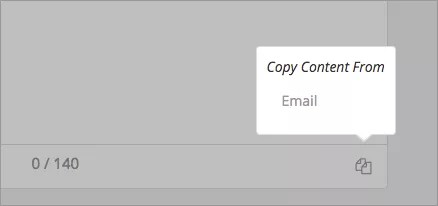
- Text/SMS - Content needs to be less than 160 characters. To copy content from the email message, select the Copy Content icon. To remove the text/SMS option, close out the tab from the upper right hand corner.
- Emails - Type your text and add any images. To remove the email option, close out the tab from the upper right hand corner.
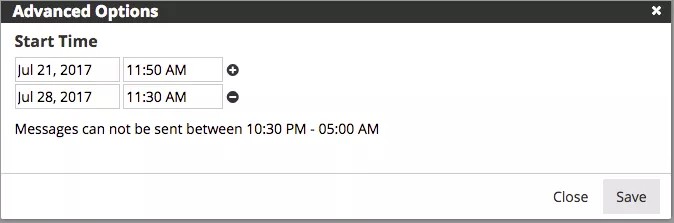
- Select Start Time to change the time to send the message. If you want to repeat message, you can also add more dates and times. You cannot send messages during your school's blackout times.
- Include language translations by selectingLanguage, and select each language needed.
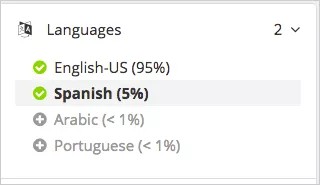
You can remove any language with the Delete icon.
Amheric language will not include translation or text-to-speech capabilities. Some Android devices and iOS do NOT support Amheric, and the message may not look correct on those devices. However, it is expected that those users requiring Amheric language will use phones that support the display.
If needed, check the text message option if over the character limit.
- Select Send when finished.
Send a pre-made message
Pre-made messages allow you to quickly send standard, student-type messages to students in your classes or specific user groups you created. There are several you can choose from.
- System created: Written and recorded in four supported languages: English, Spanish, Portuguese, and Haitian-Creole. Can't be edited, copied, or deleted. Identified by the Blackboard logo.
- Admin created: Created by your district administrator. Can be copied only. Identified by an image of a building.
- User created: Written and recorded by a user. Can be edited, copied, and deleted. Identified by an image of a person.
All of the system pre-made teacher messages are available in several languages including English, Spanish, French, German, Mandarin, and Cantonese. Any of these messages will send in the preferred language of the recipient if available.
Messages will deliver at the optimal start time set by the school or district, and will also adhere to the school or district call window. Contact the school administrator about the teacher message delivery times at each school.
-
Select Messages.
Each teacher's students are separated into classes.
- Select the class or a user group.
- To send a message to one or a few members, select the specific users. You can select all parents or all students, or use the list icon to select individual users. You can also search for specific users by name.
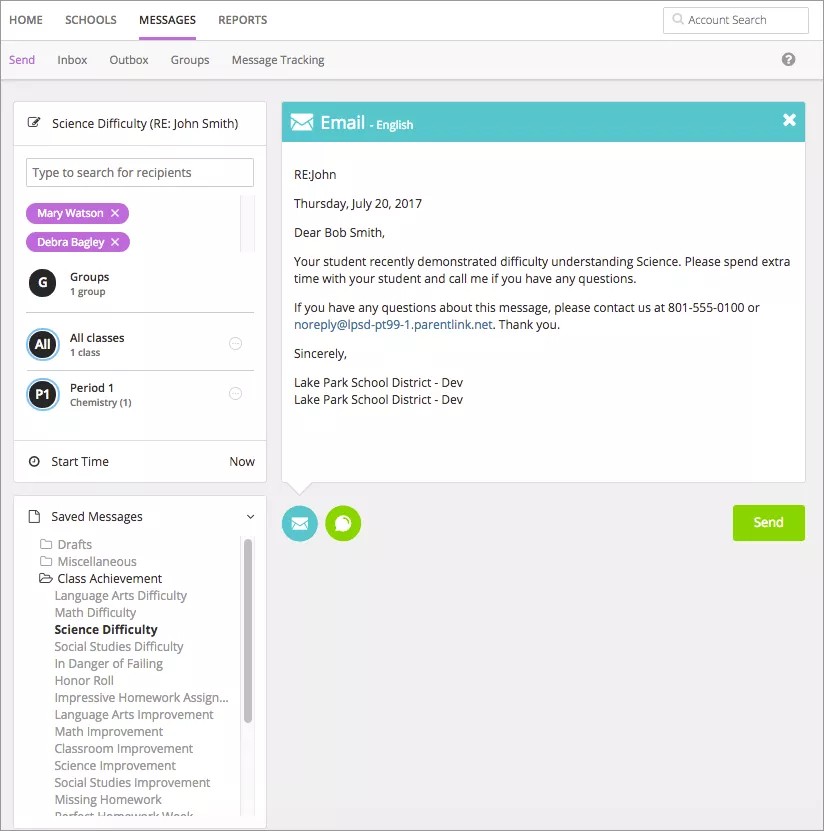
- Select a message category from the Saved Messages list.
Category examples may include Class Achievements, Class Behavior, or Class Projects.
- Select the messages to use. The message will appear in the Send Message page.
- Type the Subject.
- Select one or more delivery methods from the main send message page to send to the recipients:
- Emails - You can update the text and add any images. To remove the email option, close out the tab from the upper right hand corner.
- Text/SMS - Content needs to be less than 160 characters. To remove the text/SMS option, close out the tab from the upper right hand corner.
- Select Send when finished.
What if I want to send a phone message?
By default, teachers cannot send phone messages unless the feature has been turned on by your district. If it is available, a phone icon will be available on the Send Message page. You can record audio to attach to your message. You can use your school's phone system to record the message, upload an audio file you created, or type text that will translate to speech. You select your recording option from the Phone list when creating a new message.
- If you select Call me to record, type your phone number and select Call me to record.
- If you select Call In to record, follow the on-screen instructions to record the message.
- Call the number listed.
- Immediately enter the unique four-digit code.
- Record the message after the prompt.
- Press pound # when finished.
- Select from the menu options:
- Press 1 to save the message.
- Press 2 to listen to the message.
- Press 3 to re-record the message.
- When satisfied with the message, press 1 and wait for the confirmation message before hanging up.
- If you select Upload Audio file, select Browse to find and upload your recorded audio file.
- If you select Text to Speech, type your message in the Text messages box. Select Play Audio to listen to the message, or type your phone number and select Call to hear your message.
Create accessible messages
Barrierefreie Nachrichten erstellen
Wussten Sie, dass eine Milliarde Menschen auf der Welt über eine geistige oder körperliche Behinderung verfügen? Oder dass 12,9 % aller Studierenden in Nordamerika irgendeine Form von Behinderung aufweisen? Es ist besonders wichtig, dass Ihre Kommunikation von allen Studierenden und Communitymitgliedern verstanden wird.
Weitere Informationen zur Barrierefreiheit im Bildungswesen
Bewährte Vorgehensweisen für barrierefreie Kommunikation
Mit diesen bewährten Vorgehensweisen für eine barrierefreie Kommunikation können Sie problemlos Ihre Nachrichten barrierefrei zugänglich machen, unabhängig davon, ob es sich dabei um E-Mails oder Facebook handelt.
- Einfach schreiben Schreiben Sie kurze Sätze. Verwenden Sie, wenn möglich, Wörter oder Wortkombinationen mit 1 bis 2 Silben. Verwenden Sie Verkürzungen. Verwenden Sie Hilfsmittel wie den Hemingway Editor (Englisch), um die Lesbarkeit Ihres Textes zu bewerten.
- Nutzen Sie nicht nur Schriftarten oder Farben, um etwas hervorzuheben. Wenn Sie etwas stark visuell hervorheben möchten, sollten Sie auf eine zugängliche Alternative zurückgreifen. Verwenden Sie ein Ausrufezeichen am Ende Ihres Satzes, wenn dieser wichtig ist. Ausrufe- und Fragezeichen werden von Bildschirmlesern entsprechend intoniert. Das bedeutet, dass das Gerät nicht wörtlich „Fragezeichen“ vorliest. Stattdessen wird eine Fragebetonung verwendet, wenn eine Frage vorgelesen wird.
- Binden Sie Alternativtext in Ihre Bilder ein. Sie müssen nicht „Bild von“ einbinden, da die Hilfslesemittel bereits erkannt haben, dass es sich um ein Bild handelt. Schreiben Sie kurz, prägnant und anschaulich. Verwenden Sie nicht den gleichen Alternativtext in jedem Bild, wie z. B. „Bild zur Darstellung des dazugehörigen Textes“. Das ist bedeutungslos und trägt zu einem Durcheinander bei.
- Fügen Sie Bildunterschriften ein, wenn kein Alternativtext hinzugefügt werden kann. Wenn Sie keinen Alternativtext hinzufügen können, stellen Sie sicher, dass der Text alle Informationen vermittelt, ohne dass das Bild nötig ist.
- Erstellen Sie aussagekräftige Links. Jeder Link sollte beschreiben, was den Benutzer erwartet, wenn er darauf klickt. Vermeiden Sie die Verwendung von allgemeinen Phrasen wie „Klicken Sie hier“ oder „Weitere Infos“. Webadressen oder URLs werden nicht als informativ angesehen und sollten nicht verwendet werden. Schreiben Sie stattdessen einen aussagekräftigen Text.
- Erstellen Sie barrierefrei zugängliche Anhänge. Befolgen Sie die gleichen bewährten Vorgehensweisen, um barrierefrei zugängliche Anhänge zu erstellen. Weitere Informationen finden Sie unter Barrierefreiheit bei Blackboard.
- Binden Sie Untertitel oder Transkripte bei Videos ein. Stellen Sie einen Link zu Transkripten bereit, wenn Ihr Video keine Untertitel unterstützt.
- Hören Sie sich Ihre Nachricht an, um sicherzustellen, dass sie gut klingt. Verwenden Sie die auf den meisten Geräten verfügbaren Tools für Text-zu-Sprache, um sich Ihre Nachrichten anzuhören, bevor Sie diese senden.
Barrierefreiheit in den sozialen Medien
Soziale Medien sind nicht immer barrierefrei zugänglich. Für Benutzer von Bildschirmlesern stellt die Navigation durch die Inhalte eine Herausforderung dar. Hinzu kommt, dass die Inhalte nicht immer Überschriften, Alternativtext für Bilder oder Videountertitel aufweisen. Dies bedeutet jedoch nicht, dass Sie die sozialen Medien nicht nutzen sollten. Schließlich werden diese von Ihrer Zielgruppe genutzt. Stellen Sie sicher, dass die Inhalte möglichst für die gesamte Zielgruppe barrierefrei zugänglich sind.
Befolgen Sie bei allen Inhalten für Facebook oder Twitter die bewährten Vorgehensweisen für barrierefreie Inhalte sowie die aufgeführten Tipps.
- Stellen Sie für alle Fotos und Bilder, die Sie in einem Beitrag veröffentlichen, einen Alternativtext bereit.
- Stellen Sie einen Link zu Transkripten bereit, wenn Sie Videos in einem Beitrag veröffentlichen.
- Teilen Sie Ihrer Zielgruppe mit, was in Ihrem Tweet enthalten ist. Wenn Ihr Tweet Fotos, Video- oder Audioinhalte enthält, verwenden Sie diese Präfixe am Anfang Ihres Tweets.
- Fotos: [PIC]
- Videos: [VIDEO]
- Audio: [AUDIO]
- Platzieren Sie Hashtags und Erwähnungen am Ende des Tweets.
- Verwenden Sie Binnenmajuskeln in Hashtags. Schreiben Sie den Anfangsbuchstaben von jedem Wort in Ihrem Hashtag groß. Beispiel: #BlackboardBarrierefreiheit
- Verwenden Sie keine Fachsprache, die möglicherweise seltsam klingt, wenn sie von einem Bildschirmleser vorgelesen wird.