Create once - publish everywhere!
You can create and customize messages to send to recipients by phone, email, text, app, and social media. Depending on who you are trying to reach and what your message is, you can select different types of delivery methods (default delivery options can also be pre-set).
Watch the Send Message Interface https://player.vimeo.com/video/123036930 video for a tutorial of sending messages.
Create a message
Senders cannot cancel a message during its delivery, a message can only be canceled 5 minutes before the delivery is set to begin.
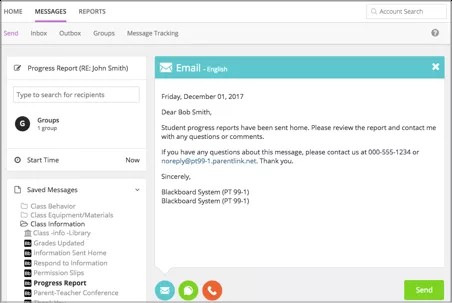
- From the Blackboard Communications HQ interface menu, select Messages > Send.
- Type the Subject for the topic of the message.
- Add Recipients, use a Saved Message to resend common messages, change the start time, or adjust many other options.
- Select one or more delivery methods from the main send message page to send to the recipients:
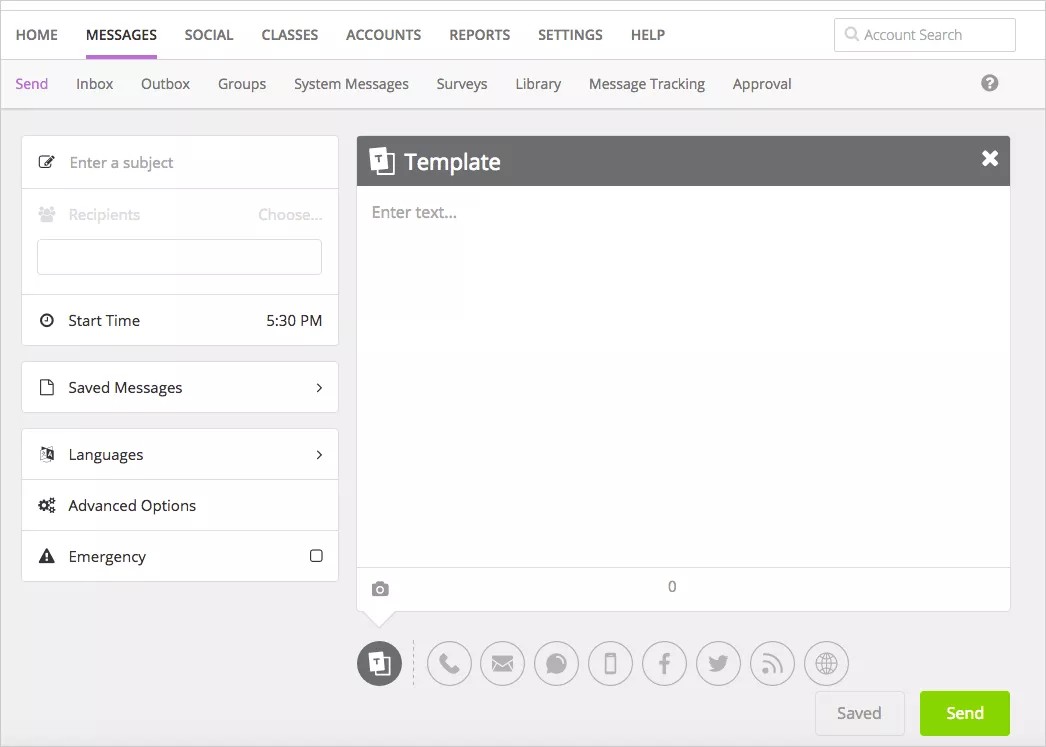
- Template option - Create a template message to be used on all of the delivery types and modified later in each one to customize them. Type the body of the message here. You can also add images for the template option. Not all messages types will post images.
- Phone messages - If you created a template message, the content will be added here for phone calls. You can update the text and select how to make the recording - Call me to record, Call in to record, Upload audio file, Text to speech, or Use microphone. To remove the phone call option, close out the tab from the upper right hand corner.
- Emails - If you created a template message, the content will be added here for emails. You can update the text and add any images. To remove the email option, close out the tab from the upper right hand corner.
- Text/SMS - If you created a template message, the content will be added here for text/SMS messages, but you may need to edit the content to be less than 160 characters. To remove the text/SMS option, close out the tab from the upper right hand corner.
- Mobile App Notifications - For districts and schools that subscribe to Blackboard Mobile Communication app, the content will be added here for the app notifications. You can update the text and add any images. You can also mark the notification to appear only to known recipients and not to the general public of your mobile app. To remove the app notification option, close out the tab from the upper right hand corner.
- Facebook - For districts and schools that subscribe to Blackboard Mass Notifications, Blackboard Mobile Communication app, or Blackboard Social Media Manager, the content will be added here for Facebook messages, but you may need to edit the content to be less than 160 characters. You can update the text and add any images. To remove the Facebook option, close out the tab from the upper right hand corner.
- Twitter - For districts and schools that subscribe to Blackboard Mass Notifications, Blackboard Mobile Communication app, or Blackboard Social Media Manager, the content will be added here for text/SMS messages, but you may need to edit the content to be less than 140 characters. You can update the text and add an image. To remove the Twitter option, close out the tab from the upper right hand corner.
- RSS - For districts and schools that send messages to a third party website, the content will be added here for RSS feeds.
- District/School Websites - For districts and schools that subscribe to Blackboard Web Community Manager and have implemented the Universal Navigation bar, the content will be added here for your district or school websites. You can update the text and add any images. To remove the website option, close out the tab from the upper right hand corner.
- Alerts - For districts and schools that subscribe to Blackboard Web Community Manager and have implemented the Universal Navigation bar, the content will be added here for your district or school website on-screen alerts. You can update the text and select which sites will display the on-screen pop-up alert message. To remove the alert option, close out the tab from the upper right hand corner.
- Include language translations by selecting Add Language, and select each language needed.
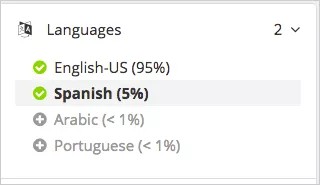
You can remove any language with the Delete icon.
Amheric language will not include translation or text-to-speech capabilities. Some Android devices and iOS do NOT support Amheric, and the message may not look correct on those devices. However, it is expected that those users requiring Amheric language will use phones that support the display.
- Set the message as an Emergency if needing to send out immediately.
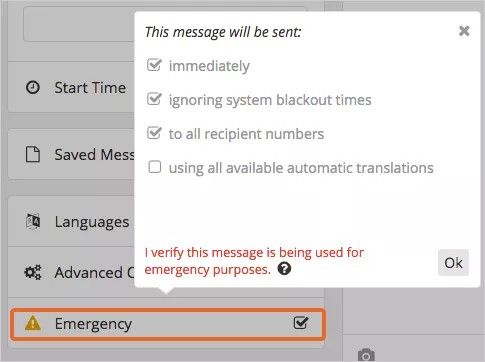
You can set the message to be sent immediately with the proper language translations.
- Select Send when ready to send the message.
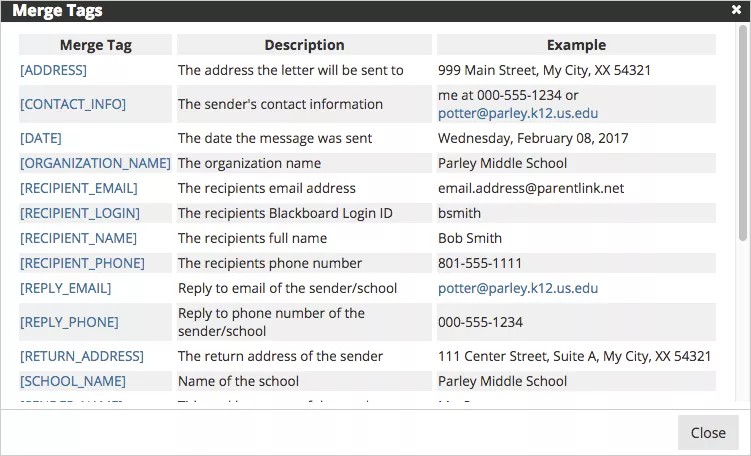
Merge tags with recorded messages
You can use merge tags for recorded phone messages. The tag will record the information available in the database for the specific information.
For example, if you want parents to confirm that their specific child is absent with a phone message, you can record the message, insert a merge tag for the name of the student, and the student's name will be inserted into the generalized recording. Then the message will be sent to all parents of absentee students with the information for their own child.
Merge tags help you to send personalized messages with only one recording.
- In the Advanced Options section, select Use merge tags with recorded audio.
- From the Phone area of the Send Message interface, select Call me to record or Call in to record.
- When typing your script, select your merge tags through the Merge Tags feature. To avoid errors, do NOT copy and paste merge tags into the text.
- Read the script and when you see a merge tag, press the Star (*) button on your phone. Wait for the beep to continue reading your script.
- Press Pound (#) when finished recording, and press 1 to save the message.
Send a saved message
There are several pre-written, standard messages you can use.
- System created: Written and recorded in four supported languages: English, Spanish, Portuguese, and Haitian-Creole. Can't be edited, copied, or deleted. Identified by the Blackboard logo.
- Admin created: Created by your district administrator. Can be copied only. Identified by an image of a building.
- User created: Written and recorded by a user. Can be edited, copied, and deleted. Identified by an image of a person.
Create your own or use system and admin created ones to make common communications easier.
- Select any default or saved messages from the folders in the Saved Messages section. Open each folder to see what default and saved messages are in them.
- If you have permission, update the message or select other delivery methods - Phone, Email, Text/SMS, App Notifications, RSS, Facebook, Twitter, District/School Websites.
- Add Recipients, change the start time, or adjust many other options by using the menu to the left of the message area.
- Include language translations by selecting the Languages.
- Set the message as an Emergency if you need to send it immediately.
- Select Send when ready to send the message.
Search for recipients
Users are able to select recipients by groups, schools, grades, even individually. There are various ways to select recipients.
Use advanced message options
You can adjust how messages are sent — adjust the send time, recipient numbers, and change who is allowed to send this message at another time.
- Select Advanced Options.
- Select the specific district or school from the Sending Organization list.
- Adjust the Delivery Schedule by setting a start date/time, and an end date/time.
- To schedule messages to be sent multiple times, select the Add (+) icon to set multiple dates and times. Use this feature to send reminders to recipients multiple times for an upcoming event.
- Select or clear the remaining options:
- To send a message during blackout times, select Send messages during blackout times.
- To send a message to all numbers available for every user, select Deliver to ALL recipient delivery addresses.
Select Deliver to ALL recipient delivery addresses only during emergencies.
- To send to the parents of selected students, select Deliver to parents of students.
This doesn't send the message to the students, just to the parents of the selected students. If you want to send the message to both parents and students, you have to select both as recipients.
- If you want the header and footer information included in an audio message, clear the Do not play header/footer prompts during outbound calling option. This option is usually checked so that the header and footer information is not included.
- To save this message as public, select Allow other users to also send this message (public).
- If you want recipients respond by pressing 2 from their phones, select Allow message recipients to respond to this message via voice recording.
- If using merge codes for phone messages, select Use merge tags with recorded audio.
- Select Save when finished.
アクセシビリティ対応メッセージの作成
全世界で10億人にのぼる人が、身体的または精神的な障害を抱えていることを知っていましたか? 北米の全学生のうち、12.9%が何らかの障害を抱えていることは知っていましたか?学生とコミュニティメンバー全員があなたのコミュニケーションを確実に理解できるようにすることが重要です。
あらゆるコミュニケーションに対するアクセシビリティのベストプラクティス
EメールであろうとFacebookであろうと、以下のアクセシビリティのベストプラクティスに従うことで、メッセージを簡単にアクセシビリティ対応にできます。
- わかりやすく記述すること。文章は短くまとめます。できるだけ音節が1つか2つの単語または単語の組み合わせを使用してください。短縮形を使用しましょう。Hemmingway Editorなどのツールを使用してテキストの読みやすさを評価する。
- フォントのスタイルまたはカラーだけを使って重要ポイントを表わさないこと。視覚的に強調する必要がある場合、アクセシビリティの観点から、別の方法を使用してください。重要な文の最後には感嘆符 (!) を使いましょう。スクリーンリーダーは、感嘆符や疑問符を抑揚をつけて読み上げます。つまり、ツールは"疑問符"とは読まず、質問調で質問を読み上げます。
- 画像には代替テキストを含めること。支援ツールは画像だとわかっているので、"~の画像"のように説明する必要はありません。簡潔に、わかりやすく、説明的に記述します。"関連テキストを示す画像"など、すべての画像に同じ代替テキストを使用しないでください。意味がなく、混乱を招くだけです。
- 代替テキストを追加できない場合は、画像キャプションを追加すること。画像に代替テキストを追加できない場合は、画像に頼らず、テキストだけですべての情報を伝えられるようにしてください。
- リンクは説明的な内容にすること。リンクはすべて、ユーザがクリックすると何にたどり着くのかを説明する必要があります。"ここをクリック"や"詳細を参照"など、一般的なフレーズを使用しないようにします。WebアドレスやURLは、情報を提供するように考慮されていないため、使用しないでください。そうではなく、テキストを説明的なものにしてください。
- 添付ファイルをアクセシビリティ対応にすること。上記と同じベストプラクティスに従って、添付ファイルをアクセシビリティ対応にしてください。詳細については、「Blackboardのアクセシビリティ」を参照してください。
- 動画にはクローズドキャプションまたは字幕を入れること。動画にクローズドキャプションが入っていない場合は、字幕へのリンクを張ってください。
- メッセージを自分の耳で聞き、音声に問題がないことを確認すること。メッセージを送信する前に、ほとんどのデバイスに用意されているテキスト読み上げツールを使って、メッセージを自分の耳で確認してください。
ソーシャルメディアのアクセシビリティ
ソーシャルメディアは必ずしもアクセシビリティ対応ではありません。スクリーンリーダーのユーザにとってソーシャルメディアの操作はたやすいものではなく、コンテンツで見出し、画像の代替テキスト、動画キャプションが使用されているとは限りません。これはソーシャルメディアを使用できないという意味ではありません。オーディエンスが置かれている状況を理解していただきたいのです。コンテンツがオーディエンス全員に伝わるように、コンテンツをできる限りアクセシビリティ対応にしてください。
FacebookやTwitterを使用するときは、すべてのコンテンツについて「 アクセシビリティのベストプラクティス」に従うとともに、以下のヒントを参考にしてください。
- 投稿するすべての写真と画像に代替テキストを入れてください。
- 動画を投稿するときには、字幕へのリンクを張ってください。
- ツイートの内容をオーディエンスに伝えてください。ツイートに写真、動画、または音声が含まれている場合は、ツイートの最初に以下のプレフィックスを入れてください。
- 写真 : [PIC]
- 動画 : [VIDEO]
- 音声 : [AUDIO]
- ツイートの最後にはハッシュタグまたはメンションを入れてください。
- ハッシュタグではキャメルケースを使用してください。ハッシュタグの各単語の最初の文字は大文字にしてください。例 : #BlackboardAccessibility
- スクリーンリーダーで読み上げたときに奇妙に聞こえる専門用語や隠語は使用しないでください。