Create once - publish everywhere!
You can create and customize messages to send to recipients by phone, email, text, app, and social media. Depending on who you are trying to reach and what your message is, you can select different types of delivery methods (default delivery options can also be pre-set).
Watch the Send Message Interface https://player.vimeo.com/video/123036930 video for a tutorial of sending messages.
Create a message
Senders cannot cancel a message during its delivery, a message can only be canceled 5 minutes before the delivery is set to begin.
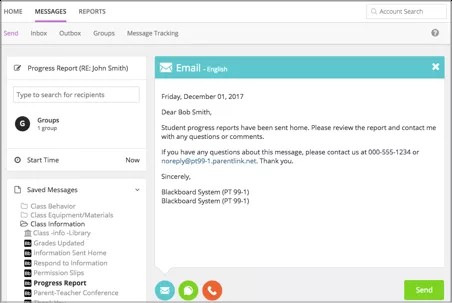
- From the Blackboard Communications HQ interface menu, select Messages > Send.
- Type the Subject for the topic of the message.
- Add Recipients, use a Saved Message to resend common messages, change the start time, or adjust many other options.
- Select one or more delivery methods from the main send message page to send to the recipients:
- Template option - Create a template message to be used on all of the delivery types and modified later in each one to customize them. Type the body of the message here. You can also add images for the template option. Not all messages types will post images.
- Phone messages - If you created a template message, the content will be added here for phone calls. You can update the text and select how to make the recording - Call me to record, Call in to record, Upload audio file, Text to speech, or Use microphone. To remove the phone call option, close out the tab from the upper right hand corner.
- Emails - If you created a template message, the content will be added here for emails. You can update the text and add any images. To remove the email option, close out the tab from the upper right hand corner.
- Text/SMS - If you created a template message, the content will be added here for text/SMS messages, but you may need to edit the content to be less than 160 characters. To remove the text/SMS option, close out the tab from the upper right hand corner.
- Mobile App Notifications - For districts and schools that subscribe to Blackboard Mobile Communication app, the content will be added here for the app notifications. You can update the text and add any images. You can also mark the notification to appear only to known recipients and not to the general public of your mobile app. To remove the app notification option, close out the tab from the upper right hand corner.
- Facebook - For districts and schools that subscribe to Blackboard Mass Notifications, Blackboard Mobile Communication app, or Blackboard Social Media Manager, the content will be added here for Facebook messages, but you may need to edit the content to be less than 160 characters. You can update the text and add any images. To remove the Facebook option, close out the tab from the upper right hand corner.
- Twitter - For districts and schools that subscribe to Blackboard Mass Notifications, Blackboard Mobile Communication app, or Blackboard Social Media Manager, the content will be added here for text/SMS messages, but you may need to edit the content to be less than 140 characters. You can update the text and add an image. To remove the Twitter option, close out the tab from the upper right hand corner.
- RSS - For districts and schools that send messages to a third party website, the content will be added here for RSS feeds.
- District/School Websites - For districts and schools that subscribe to Blackboard Web Community Manager and have implemented the Universal Navigation bar, the content will be added here for your district or school websites. You can update the text and add any images. To remove the website option, close out the tab from the upper right hand corner.
- Alerts - For districts and schools that subscribe to Blackboard Web Community Manager and have implemented the Universal Navigation bar, the content will be added here for your district or school website on-screen alerts. You can update the text and select which sites will display the on-screen pop-up alert message. To remove the alert option, close out the tab from the upper right hand corner.
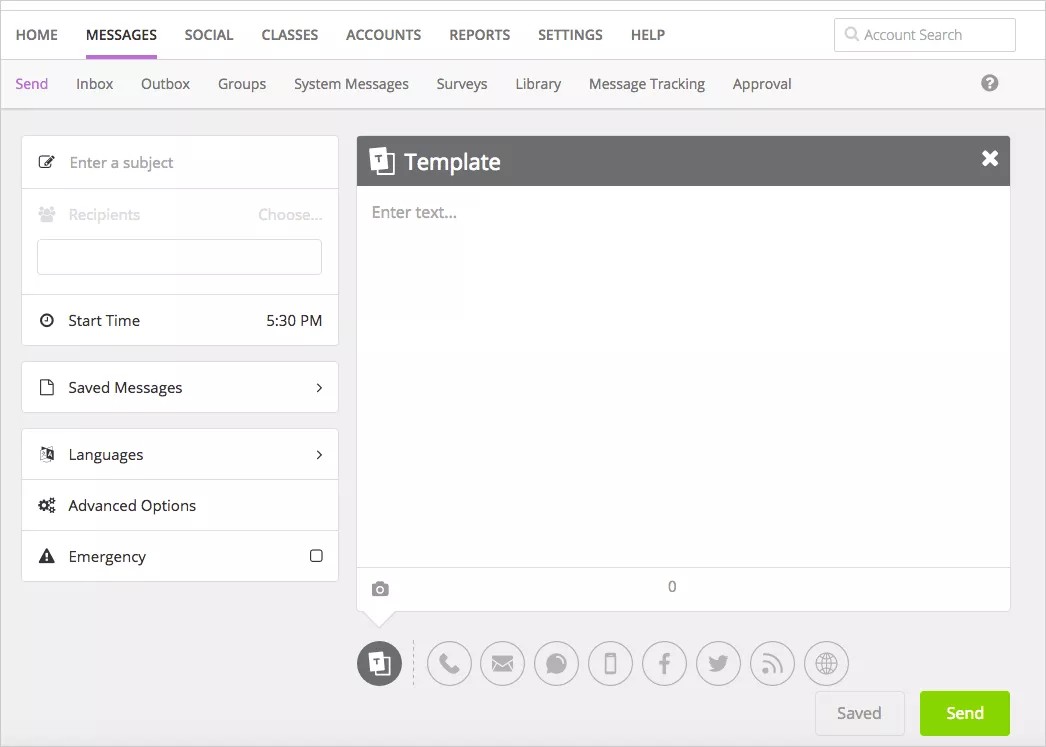
- Include language translations by selecting Add Language, and select each language needed.
You can remove any language with the Delete icon.
Amheric language will not include translation or text-to-speech capabilities. Some Android devices and iOS do NOT support Amheric, and the message may not look correct on those devices. However, it is expected that those users requiring Amheric language will use phones that support the display.
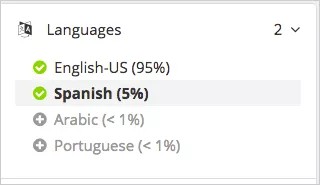
- Set the message as an Emergency if needing to send out immediately.
You can set the message to be sent immediately with the proper language translations.
- Select Send when ready to send the message.
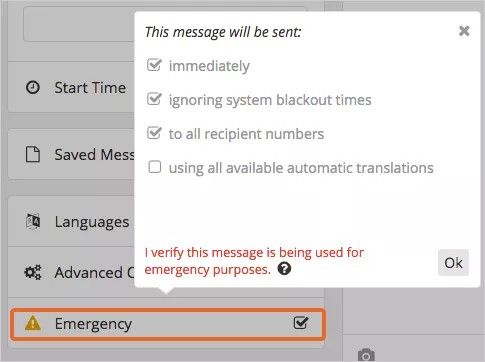
Merge tags with recorded messages
You can use merge tags for recorded phone messages. The tag will record the information available in the database for the specific information.
For example, if you want parents to confirm that their specific child is absent with a phone message, you can record the message, insert a merge tag for the name of the student, and the student's name will be inserted into the generalized recording. Then the message will be sent to all parents of absentee students with the information for their own child.
Merge tags help you to send personalized messages with only one recording.
- In the Advanced Options section, select Use merge tags with recorded audio.
- From the Phone area of the Send Message interface, select Call me to record or Call in to record.
- When typing your script, select your merge tags through the Merge Tags feature. To avoid errors, do NOT copy and paste merge tags into the text.
- Read the script and when you see a merge tag, press the Star (*) button on your phone. Wait for the beep to continue reading your script.
- Press Pound (#) when finished recording, and press 1 to save the message.
Send a saved message
There are several pre-written, standard messages you can use.
- System created: Written and recorded in four supported languages: English, Spanish, Portuguese, and Haitian-Creole. Can't be edited, copied, or deleted. Identified by the Blackboard logo.
- Admin created: Created by your district administrator. Can be copied only. Identified by an image of a building.
- User created: Written and recorded by a user. Can be edited, copied, and deleted. Identified by an image of a person.
Create your own or use system and admin created ones to make common communications easier.
- Select any default or saved messages from the folders in the Saved Messages section. Open each folder to see what default and saved messages are in them.
- If you have permission, update the message or select other delivery methods - Phone, Email, Text/SMS, App Notifications, RSS, Facebook, Twitter, District/School Websites.
- Add Recipients, change the start time, or adjust many other options by using the menu to the left of the message area.
- Include language translations by selecting the Languages.
- Set the message as an Emergency if you need to send it immediately.
- Select Send when ready to send the message.
Search for recipients
Users are able to select recipients by groups, schools, grades, even individually. There are various ways to select recipients.
Use advanced message options
You can adjust how messages are sent — adjust the send time, recipient numbers, and change who is allowed to send this message at another time.
- Select Advanced Options.
- Select the specific district or school from the Sending Organization list.
- Adjust the Delivery Schedule by setting a start date/time, and an end date/time.
- To schedule messages to be sent multiple times, select the Add (+) icon to set multiple dates and times. Use this feature to send reminders to recipients multiple times for an upcoming event.
- Select or clear the remaining options:
- To send a message during blackout times, select Send messages during blackout times.
- To send a message to all numbers available for every user, select Deliver to ALL recipient delivery addresses.
Select Deliver to ALL recipient delivery addresses only during emergencies.
- To send to the parents of selected students, select Deliver to parents of students.
This doesn't send the message to the students, just to the parents of the selected students. If you want to send the message to both parents and students, you have to select both as recipients.
- If you want the header and footer information included in an audio message, clear the Do not play header/footer prompts during outbound calling option. This option is usually checked so that the header and footer information is not included.
- To save this message as public, select Allow other users to also send this message (public).
- If you want recipients respond by pressing 2 from their phones, select Allow message recipients to respond to this message via voice recording.
- If using merge codes for phone messages, select Use merge tags with recorded audio.
- Select Save when finished.
创建可无障碍访问的消息
您知道吗,全球有 10 亿人具有精神或肢体方面的残疾。或者说,北美地区有 12.9% 的学生具有某种形式的残疾。确保所有学生和社区成员都理解交流信息非常重要。
适用于所有交流的无障碍访问最佳实践
无论是电子邮件还是 Facebook,利用这些无障碍访问最佳实践都可轻松访问消息。
- 简单写作。确保句子简短。尽可能使用 1-2 字节的字词或字词组合。使用缩写。使用 Hemmingway Editor 等工具确保文本的可读性。
- 请勿使用单独的字体样式或颜色来指示重要性!当您需要提供一个重要的视觉提示时,请确保使用无障碍替代方式。如果十分重要,则在句子末尾使用感叹号。屏幕阅读器会通过相应语调来表达感叹号和问号。这表示工具不会阅读“问号”,而是在大声阅读问题时发出询问语调。
- 在图像中提供替换文本。您无需描述“的图像”,因为辅助工具已经知道这是一张图像。尽量使用简洁、清楚的描述性文字。请勿为每张图像使用相同的替换文本,例如“说明相关文本的图像”。这毫无意义并且会导致杂乱。
- 无法添加替换文本时,添加图像标题。如果无法为图像添加替代文本,请确保您的文本不依靠图像便可传达所有信息。
- 使链接具有描述性。每个链接都应描述用户单击链接将找到的内容。避免使用通用语句,例如“单击此处”或“查看详情”。Web 地址或 URL 不会被视为信息,因此不得使用。而不是提供文本说明。
- 使附件可无障碍访问。遵循相同的最佳实践,使附件可无障碍访问。如需了解详细信息,请参阅 Blackboard 的无障碍访问。
- 为视频提供隐藏式字幕或脚本。如果您的视频不含隐藏式字幕,请提供指向脚本的链接。
- 尝试聆听消息,确保其听起来正确无误。使用大多数设备上提供的文字转语音工具聆听消息,然后再进行发送。
社交媒体中的无障碍访问
社交媒体不一定可无障碍访问。屏幕阅读器用户很难进行导航,而且内容不一定使用标题、图像替代文本或视频字幕。这并不意味着您无法使用社交媒体。这是您的受众面临的情况。确保您的内容尽可能实现无障碍访问,以适用于所有受众。
在使用 Facebook 或 Twitter 时,遵循适用于所有内容的 无障碍访问最佳实践及相关提示。
- 为您发布的所有照片和图像提供替代文本。
- 在发布视频时,提供指向脚本的链接。
- 向受众告知您的 Twitter 中的内容。如果您的 Twitter 中包含照片、视频或音频,请在 Twitter 的开始处使用以下前缀。
- 照片:[PIC]
- 视频:[VIDEO]
- 音频:[AUDIO]
- 在 Twitter 的结尾放置井号标记和说明。
- 在井号标记中使用驼峰字。对井号标记中的每个词采用首字母大写的形式。例如,#BlackboardAccessibility
- 避免使用在屏幕阅读器阅读时可能听起来奇怪的文字。