Create once - publish everywhere!
You can create and customize messages to send to recipients by phone, email, text, app, and social media. Depending on who you are trying to reach and what your message is, you can select different types of delivery methods (default delivery options can also be pre-set).
Watch the Send Message Interface https://player.vimeo.com/video/123036930 video for a tutorial of sending messages.
Create a message
Senders cannot cancel a message during its delivery, a message can only be canceled 5 minutes before the delivery is set to begin.
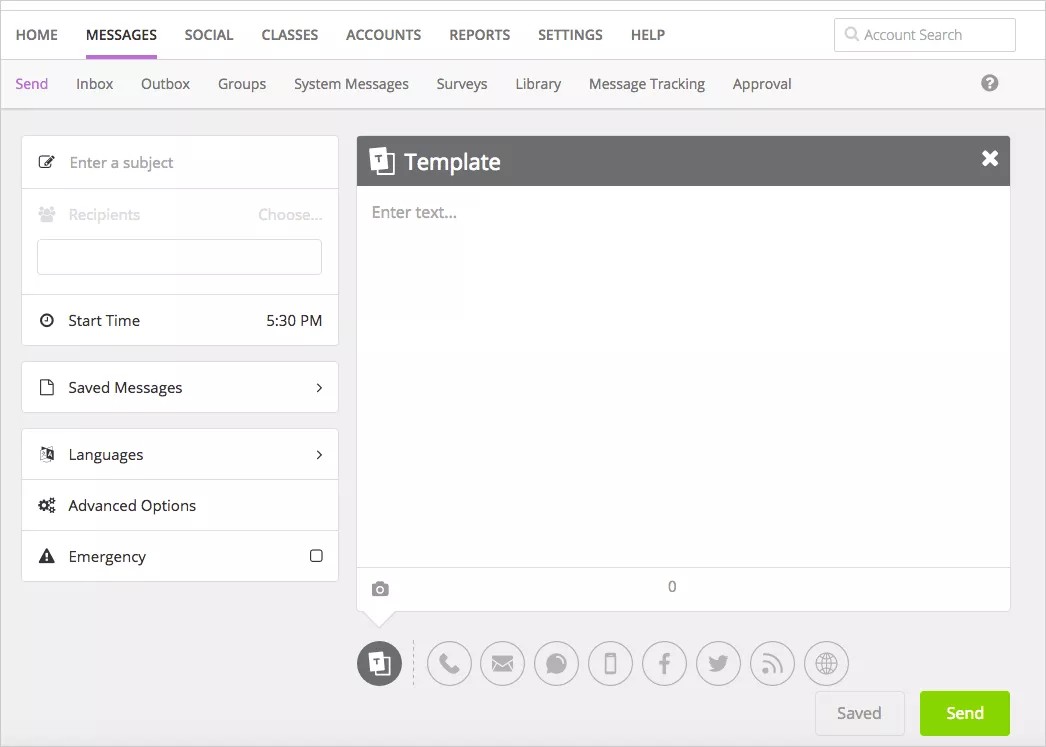
- From the Blackboard Communications HQ interface menu, select Messages > Send.
- Type the Subject for the topic of the message.
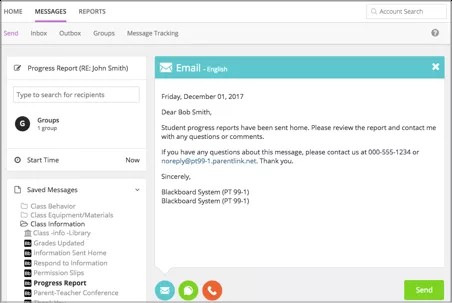
- Add Recipients, use a Saved Message to resend common messages, change the start time, or adjust many other options.
- Select one or more delivery methods from the main send message page to send to the recipients:
- Template option - Create a template message to be used on all of the delivery types and modified later in each one to customize them. Type the body of the message here. You can also add images for the template option. Not all messages types will post images.
- Phone messages - If you created a template message, the content will be added here for phone calls. You can update the text and select how to make the recording - Call me to record, Call in to record, Upload audio file, Text to speech, or Use microphone. To remove the phone call option, close out the tab from the upper right hand corner.
- Emails - If you created a template message, the content will be added here for emails. You can update the text and add any images. To remove the email option, close out the tab from the upper right hand corner.
- Text/SMS - If you created a template message, the content will be added here for text/SMS messages, but you may need to edit the content to be less than 160 characters. To remove the text/SMS option, close out the tab from the upper right hand corner.
- Mobile App Notifications - For districts and schools that subscribe to Blackboard Mobile Communication app, the content will be added here for the app notifications. You can update the text and add any images. You can also mark the notification to appear only to known recipients and not to the general public of your mobile app. To remove the app notification option, close out the tab from the upper right hand corner.
- Facebook - For districts and schools that subscribe to Blackboard Mass Notifications, Blackboard Mobile Communication app, or Blackboard Social Media Manager, the content will be added here for Facebook messages, but you may need to edit the content to be less than 160 characters. You can update the text and add any images. To remove the Facebook option, close out the tab from the upper right hand corner.
- Twitter - For districts and schools that subscribe to Blackboard Mass Notifications, Blackboard Mobile Communication app, or Blackboard Social Media Manager, the content will be added here for text/SMS messages, but you may need to edit the content to be less than 140 characters. You can update the text and add an image. To remove the Twitter option, close out the tab from the upper right hand corner.
- RSS - For districts and schools that send messages to a third party website, the content will be added here for RSS feeds.
- District/School Websites - For districts and schools that subscribe to Blackboard Web Community Manager and have implemented the Universal Navigation bar, the content will be added here for your district or school websites. You can update the text and add any images. To remove the website option, close out the tab from the upper right hand corner.
- Alerts - For districts and schools that subscribe to Blackboard Web Community Manager and have implemented the Universal Navigation bar, the content will be added here for your district or school website on-screen alerts. You can update the text and select which sites will display the on-screen pop-up alert message. To remove the alert option, close out the tab from the upper right hand corner.
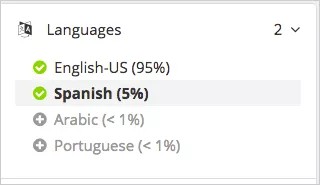
- Include language translations by selecting Add Language, and select each language needed.
You can remove any language with the Delete icon.
Amheric language will not include translation or text-to-speech capabilities. Some Android devices and iOS do NOT support Amheric, and the message may not look correct on those devices. However, it is expected that those users requiring Amheric language will use phones that support the display.
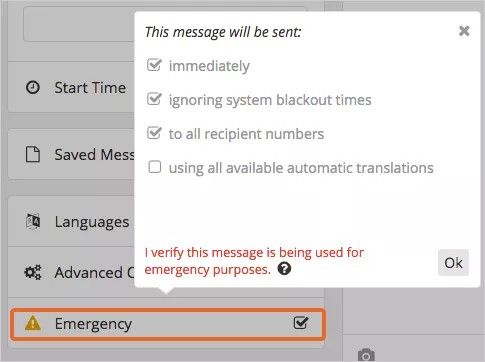
- Set the message as an Emergency if needing to send out immediately.
You can set the message to be sent immediately with the proper language translations.
- Select Send when ready to send the message.
Merge tags with recorded messages
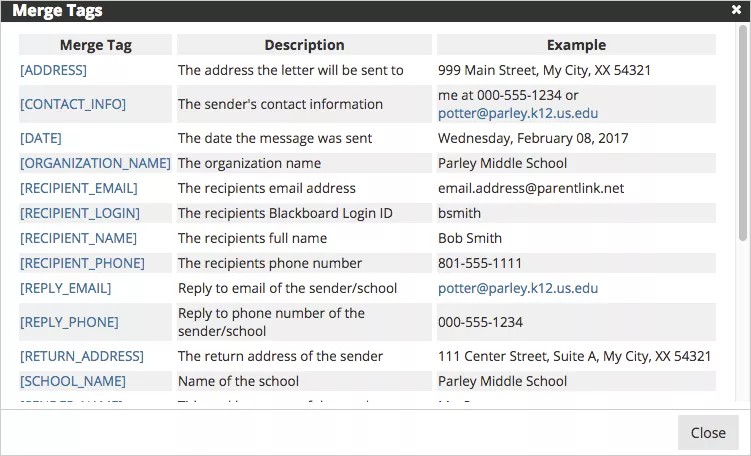
You can use merge tags for recorded phone messages. The tag will record the information available in the database for the specific information.
For example, if you want parents to confirm that their specific child is absent with a phone message, you can record the message, insert a merge tag for the name of the student, and the student's name will be inserted into the generalized recording. Then the message will be sent to all parents of absentee students with the information for their own child.
Merge tags help you to send personalized messages with only one recording.
- In the Advanced Options section, select Use merge tags with recorded audio.
- From the Phone area of the Send Message interface, select Call me to record or Call in to record.
- When typing your script, select your merge tags through the Merge Tags feature. To avoid errors, do NOT copy and paste merge tags into the text.
- Read the script and when you see a merge tag, press the Star (*) button on your phone. Wait for the beep to continue reading your script.
- Press Pound (#) when finished recording, and press 1 to save the message.
Send a saved message
There are several pre-written, standard messages you can use.
- System created: Written and recorded in four supported languages: English, Spanish, Portuguese, and Haitian-Creole. Can't be edited, copied, or deleted. Identified by the Blackboard logo.
- Admin created: Created by your district administrator. Can be copied only. Identified by an image of a building.
- User created: Written and recorded by a user. Can be edited, copied, and deleted. Identified by an image of a person.
Create your own or use system and admin created ones to make common communications easier.
- Select any default or saved messages from the folders in the Saved Messages section. Open each folder to see what default and saved messages are in them.
- If you have permission, update the message or select other delivery methods - Phone, Email, Text/SMS, App Notifications, RSS, Facebook, Twitter, District/School Websites.
- Add Recipients, change the start time, or adjust many other options by using the menu to the left of the message area.
- Include language translations by selecting the Languages.
- Set the message as an Emergency if you need to send it immediately.
- Select Send when ready to send the message.
Search for recipients
Users are able to select recipients by groups, schools, grades, even individually. There are various ways to select recipients.
Use advanced message options
You can adjust how messages are sent — adjust the send time, recipient numbers, and change who is allowed to send this message at another time.
- Select Advanced Options.
- Select the specific district or school from the Sending Organization list.
- Adjust the Delivery Schedule by setting a start date/time, and an end date/time.
- To schedule messages to be sent multiple times, select the Add (+) icon to set multiple dates and times. Use this feature to send reminders to recipients multiple times for an upcoming event.
- Select or clear the remaining options:
- To send a message during blackout times, select Send messages during blackout times.
- To send a message to all numbers available for every user, select Deliver to ALL recipient delivery addresses.
Select Deliver to ALL recipient delivery addresses only during emergencies.
- To send to the parents of selected students, select Deliver to parents of students.
This doesn't send the message to the students, just to the parents of the selected students. If you want to send the message to both parents and students, you have to select both as recipients.
- If you want the header and footer information included in an audio message, clear the Do not play header/footer prompts during outbound calling option. This option is usually checked so that the header and footer information is not included.
- To save this message as public, select Allow other users to also send this message (public).
- If you want recipients respond by pressing 2 from their phones, select Allow message recipients to respond to this message via voice recording.
- If using merge codes for phone messages, select Use merge tags with recorded audio.
- Select Save when finished.
Tillgänglighetsanpassa meddelanden
Visste du att en miljard människor globalt har en mental eller fysisk funktionsnedsättning? Eller att 12,9 procent av alla studenter i Nordamerika har någon form av funktionsnedsättning? Det är viktigt att säkerställa att alla dina kursdeltagare och andra du arbetar med förstår vad det är du vill förmedla.
Mer om tillgänglighet i utbildningssammanhang
De bästa metoderna för tillgänglighetsanpassning av all kommunikation
Oavsett om det gäller e-post eller Facebook kan du enkelt tillgänglighetsanpassa dina meddelanden med de här bästa metoderna för tillgänglighetsanpassning.
- Skriv enkelt. Håll meningarna korta. Använd om möjligt ord (eller sammansättningar) med högst 1–2 stavelser. Använd förkortningar. Använd verktyg som Hemmingway Editor för att mäta textens läsbarhet.
- Använd inte teckensnittsstilar eller färg som enda sätt att markera att något är viktigt. Försäkra dig om att du använder ett tillgängligt alternativ när du vill ge en tydlig visuell indikation. Använd ett utropstecken i slutet av en mening som är extra viktig. Utropstecken och frågetecken påverkar intonationen hos en skärmläsare. Detta innebär att verktyget inte kommer läsa ut ”frågetecken”, utan kommer istället läsa frågan i en ton som indikerar att det är en fråga.
- Beskriv bilder med alternativ text. Du behöver inte lägga till ”bild av” eftersom hjälpmedlen redan vet att det är en bild. Var kortfattad, tydlig och beskrivande. Använd inte samma alternativtext för alla bilder, till exempel ”bild som illustrerar texten”. Det är meningslöst och gör det rörigt.
- Skriv bildtexter om du inte kan lägga in alternativtext. Om du inte kan skriva alternativtext bör du se till att texten förmedlar all information så att bilden inte behövs för förståelsen.
- Se till att länkar beskriver länkmålet. Varje länk ska utgöra en beskrivning av det användaren kan förvänta sig att hitta när han eller hon klickar på länken. Undvik att använda ”klicka här” eller ”läs mer”. Webbadresser eller URL:er är inte informativa och bör inte användas som beskrivningar. Gör istället texten beskrivande.
- Tillgänglighetsanpassa bilagor. Du bör använda samma metoder för att tillgänglighetsanpassa bilagor. Mer information finns här: Tillgänglighet hos Blackboard.
- Lägg in undertexter eller transkribera talet i videoklipp. Lägg in en länk till den transkriberade texten om du inte kan lägga in undertexter.
- Lyssna på det meddelande du skrivit och kontrollera att det låter rätt. Använd text-till-tal-verktyg som finns på de flesta enheter och lyssna på meddelanden innan du skickar dem.
Tillgänglighet i sociala medier
Sociala medier är inte alltid tillgänglighetsanpassade. Det är svårt för skärmläsaranvändare att navigera i sociala medier, och det finns inte alltid rubriker, alternativtext till bilder och undertexter till filmer. Det innebär dock inte att du inte kan använda sociala medier. Det är där din målgrupp finns. Du bör se till att innehållet du skapar är så tillgängligt som möjligt så att du når hela målgruppen.
Använd de bästa metoderna för allt innehåll du skapar och tipsen du får här när du använder Facebook eller Twitter.
- Skriv in alternativa texter till alla bilder du lägger upp.
- Lägg upp länkar till transkriberingar av talet när du lägger upp filmer.
- Beskriv för målgruppen vad som finns i dina Twittermeddelanden. Om Twittermeddelandena innehåller bilder, film eller ljud bör du lägga in prefix för det i början av meddelandet.
- Bilder: [PIC]
- Film: [VIDEO]
- Ljud: [AUDIO]
- Lägg in hashtaggar och omnämningar i slutet av Twittermeddelanden.
- Använd kamelnotation i hashtaggar. Skriv varje ord i hashtaggar med inledande versal, till exempel #BlackboardTillgänglighet
- Undvik textjargong som kan låta konstigt i en skärmläsare.
