Create once - publish everywhere!
You can create and customize messages to send to recipients by phone, email, text, app, and social media. Depending on who you are trying to reach and what your message is, you can select different types of delivery methods (default delivery options can also be pre-set).
Watch the Send Message Interface https://player.vimeo.com/video/123036930 video for a tutorial of sending messages.
Create a message
Senders cannot cancel a message during its delivery, a message can only be canceled 5 minutes before the delivery is set to begin.
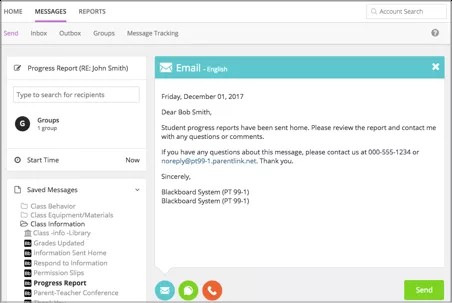
- From the Blackboard Communications HQ interface menu, select Messages > Send.
- Type the Subject for the topic of the message.
- Add Recipients, use a Saved Message to resend common messages, change the start time, or adjust many other options.
- Select one or more delivery methods from the main send message page to send to the recipients:
- Template option - Create a template message to be used on all of the delivery types and modified later in each one to customize them. Type the body of the message here. You can also add images for the template option. Not all messages types will post images.
- Phone messages - If you created a template message, the content will be added here for phone calls. You can update the text and select how to make the recording - Call me to record, Call in to record, Upload audio file, Text to speech, or Use microphone. To remove the phone call option, close out the tab from the upper right hand corner.
- Emails - If you created a template message, the content will be added here for emails. You can update the text and add any images. To remove the email option, close out the tab from the upper right hand corner.
- Text/SMS - If you created a template message, the content will be added here for text/SMS messages, but you may need to edit the content to be less than 160 characters. To remove the text/SMS option, close out the tab from the upper right hand corner.
- Mobile App Notifications - For districts and schools that subscribe to Blackboard Mobile Communication app, the content will be added here for the app notifications. You can update the text and add any images. You can also mark the notification to appear only to known recipients and not to the general public of your mobile app. To remove the app notification option, close out the tab from the upper right hand corner.
- Facebook - For districts and schools that subscribe to Blackboard Mass Notifications, Blackboard Mobile Communication app, or Blackboard Social Media Manager, the content will be added here for Facebook messages, but you may need to edit the content to be less than 160 characters. You can update the text and add any images. To remove the Facebook option, close out the tab from the upper right hand corner.
- Twitter - For districts and schools that subscribe to Blackboard Mass Notifications, Blackboard Mobile Communication app, or Blackboard Social Media Manager, the content will be added here for text/SMS messages, but you may need to edit the content to be less than 140 characters. You can update the text and add an image. To remove the Twitter option, close out the tab from the upper right hand corner.
- RSS - For districts and schools that send messages to a third party website, the content will be added here for RSS feeds.
- District/School Websites - For districts and schools that subscribe to Blackboard Web Community Manager and have implemented the Universal Navigation bar, the content will be added here for your district or school websites. You can update the text and add any images. To remove the website option, close out the tab from the upper right hand corner.
- Alerts - For districts and schools that subscribe to Blackboard Web Community Manager and have implemented the Universal Navigation bar, the content will be added here for your district or school website on-screen alerts. You can update the text and select which sites will display the on-screen pop-up alert message. To remove the alert option, close out the tab from the upper right hand corner.
- Include language translations by selecting Add Language, and select each language needed.
You can remove any language with the Delete icon.
Amheric language will not include translation or text-to-speech capabilities. Some Android devices and iOS do NOT support Amheric, and the message may not look correct on those devices. However, it is expected that those users requiring Amheric language will use phones that support the display.
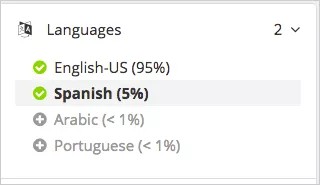
- Set the message as an Emergency if needing to send out immediately.
You can set the message to be sent immediately with the proper language translations.
- Select Send when ready to send the message.
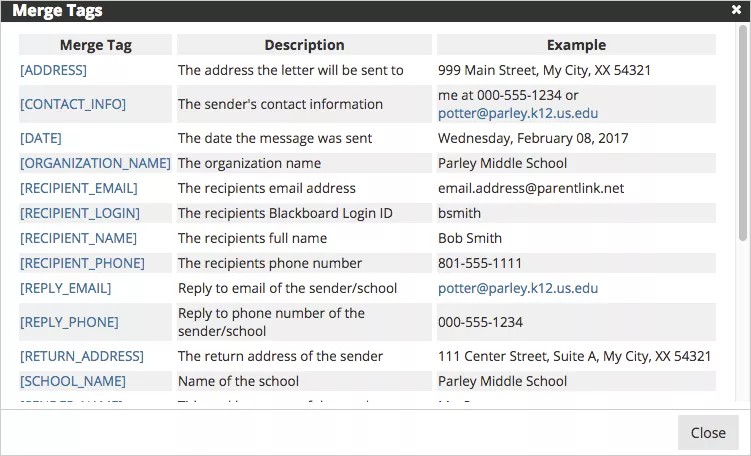
Merge tags with recorded messages
You can use merge tags for recorded phone messages. The tag will record the information available in the database for the specific information.
For example, if you want parents to confirm that their specific child is absent with a phone message, you can record the message, insert a merge tag for the name of the student, and the student's name will be inserted into the generalized recording. Then the message will be sent to all parents of absentee students with the information for their own child.
Merge tags help you to send personalized messages with only one recording.
- In the Advanced Options section, select Use merge tags with recorded audio.
- From the Phone area of the Send Message interface, select Call me to record or Call in to record.
- When typing your script, select your merge tags through the Merge Tags feature. To avoid errors, do NOT copy and paste merge tags into the text.
- Read the script and when you see a merge tag, press the Star (*) button on your phone. Wait for the beep to continue reading your script.
- Press Pound (#) when finished recording, and press 1 to save the message.
Send a saved message
There are several pre-written, standard messages you can use.
- System created: Written and recorded in four supported languages: English, Spanish, Portuguese, and Haitian-Creole. Can't be edited, copied, or deleted. Identified by the Blackboard logo.
- Admin created: Created by your district administrator. Can be copied only. Identified by an image of a building.
- User created: Written and recorded by a user. Can be edited, copied, and deleted. Identified by an image of a person.
Create your own or use system and admin created ones to make common communications easier.
- Select any default or saved messages from the folders in the Saved Messages section. Open each folder to see what default and saved messages are in them.
- If you have permission, update the message or select other delivery methods - Phone, Email, Text/SMS, App Notifications, RSS, Facebook, Twitter, District/School Websites.
- Add Recipients, change the start time, or adjust many other options by using the menu to the left of the message area.
- Include language translations by selecting the Languages.
- Set the message as an Emergency if you need to send it immediately.
- Select Send when ready to send the message.
Search for recipients
Users are able to select recipients by groups, schools, grades, even individually. There are various ways to select recipients.
Use advanced message options
You can adjust how messages are sent — adjust the send time, recipient numbers, and change who is allowed to send this message at another time.
- Select Advanced Options.
- Select the specific district or school from the Sending Organization list.
- Adjust the Delivery Schedule by setting a start date/time, and an end date/time.
- To schedule messages to be sent multiple times, select the Add (+) icon to set multiple dates and times. Use this feature to send reminders to recipients multiple times for an upcoming event.
- Select or clear the remaining options:
- To send a message during blackout times, select Send messages during blackout times.
- To send a message to all numbers available for every user, select Deliver to ALL recipient delivery addresses.
Select Deliver to ALL recipient delivery addresses only during emergencies.
- To send to the parents of selected students, select Deliver to parents of students.
This doesn't send the message to the students, just to the parents of the selected students. If you want to send the message to both parents and students, you have to select both as recipients.
- If you want the header and footer information included in an audio message, clear the Do not play header/footer prompts during outbound calling option. This option is usually checked so that the header and footer information is not included.
- To save this message as public, select Allow other users to also send this message (public).
- If you want recipients respond by pressing 2 from their phones, select Allow message recipients to respond to this message via voice recording.
- If using merge codes for phone messages, select Use merge tags with recorded audio.
- Select Save when finished.
Creació de missatges accessibles
Sabíeu que mil milions de persones a tot el món tenen una discapacitat física o mental? O que el 12,9 % dels estudiants d'Amèrica del Nord tenen algun tipus de discapacitat? És important assegurar-se que tots els estudiants i membres de la comunitat entenen les vostres comunicacions.
Més informació sobre l'accessibilitat en educació
Millors pràctiques d'accessibilitat per a tota la comunicació
Tant si és per al correu electrònic com per a Facebook, crear missatges accessibles us serà fàcil amb aquestes millors pràctiques d'accessibilitat.
- Redacció clara Utilitzeu frases curtes. Si és possible, feu servir paraules o combinacions de paraules amb 1-2 síl·labes. Feu servir contraccions. Utilitzeu eines com el Hemmingway Editor per mesurar la llegibilitat del vostre text.
- No feu servir només estils de lletra o colors per indicar la importància. Quan hàgiu d'afegir una indicació visual impactant, assegureu-vos d'utilitzar una alternativa accessible. Feu servir un signe d'exclamació al final de la frase si és important. Els lectors de pantalla entonen les exclamacions i els interrogants. Per tant, l'eina no llegirà "interrogant", sinó que ho entonarà com una pregunta en llegir-ho en veu alta.
- Incloeu text alternatiu a les imatges. No cal que digueu "Imatge de", perquè les eines de suport ja saben que és una imatge. Feu servir un llenguatge concís, clar i descriptiu. No utilitzeu el mateix text alternatiu per a totes les imatges, com ara "Imatge per il·lustrar el text associat". És irrellevant i afegeix interferències.
- Afegiu peus de foto quan no pugueu incloure text alternatiu. Si no podeu incloure text alternatiu a les imatges, assegureu-vos que el text transmet tota la informació sense que calgui la imatge.
- Utilitzeu enllaços descriptius. Cada enllaç ha de descriure què pot esperar trobar l'usuari en fer-hi clic. Eviteu fer servir frases genèriques com ara "feu clic aquí" o "més informació". Les adreces web o els URL no es consideren informatius i no s'han d'utilitzar. En lloc d'això, feu que el text sigui descriptiu.
- Els fitxers adjunts han de ser accessibles. Seguiu les mateixes millors pràctiques per crear fitxers adjunts accessibles. Per obtenir més informació, vegeu Accessibilitat a Blackboard.
- Incloeu subtítols o transcripcions als vídeos. Si el vídeo no inclou subtítols, proporcioneu un enllaç a les transcripcions.
- Proveu d'escoltar el missatge per assegurar-vos que soni bé. Utilitzeu les eines de conversió de text a parla que hi ha disponibles a la majoria dels dispositius per escoltar el missatge abans d'enviar-lo.
Accessibilitat a les xarxes socials
Les xarxes socials no sempre són accessibles. La navegació per als usuaris de lectors de pantalla és tot un repte i el contingut no sempre fa servir títols, text alternatiu per a les imatges o subtítols per als vídeos. Això no vol dir que no pugueu fer servir les xarxes socials. És on hi teniu el vostre públic. Assegureu-vos que el contingut sigui el màxim d'accessible per arribar a tot el vostre públic.
Seguiu les millors pràctiques d'accessibilitat per a tot el contingut i aquests consells quan feu servir Facebook o Twitter.
- Proporcioneu una alternativa de text a totes les fotos i imatges que publiqueu.
- Proporcioneu un enllaç a les transcripcions quan publiqueu vídeos.
- Informeu el públic sobre el contingut de la piulada. Si la piulada inclou fotos, vídeo o àudio, afegiu-hi aquests prefixos al començament.
- Fotos: [PIC]
- Vídeos: [VÍDEO]
- Àudio: [ÀUDIO]
- Poseu etiquetes i mencions al final de la piulada.
- Utilitzeu majúscules inicials a les etiquetes. Escriviu en majúscula la primera lletra de cada paraula de l'etiqueta. Per exemple, #AccessibilitatBlackboard
- Eviteu l'argot textual que pugui sonar estrany quan el llegeix un lector de pantalla.