Your institution controls which tools are available in the Original Course View. Rubrics are always available to instructors in the Ultra Course View.
Rubrics can help ensure consistent and impartial grading and help students focus on your expectations.
A rubric is a scoring tool you can use to evaluate graded work. When you create a rubric, you divide the assigned work into parts. You can provide clear descriptions of the characteristics of the work associated with each part, at varying levels of skill.
Students can use a rubric to organize their efforts to meet the requirements of the graded work. When you allow students access to rubrics before they complete their work, you provide transparency into your grading methods.
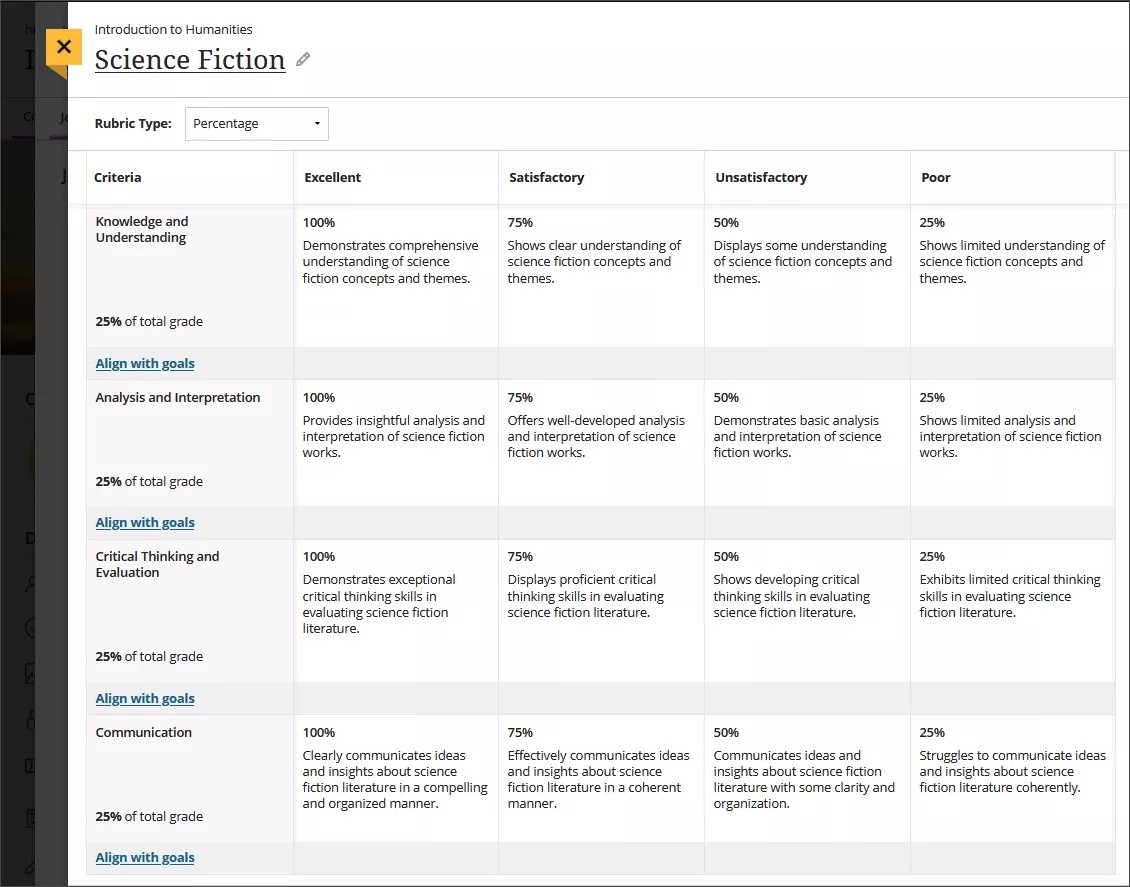
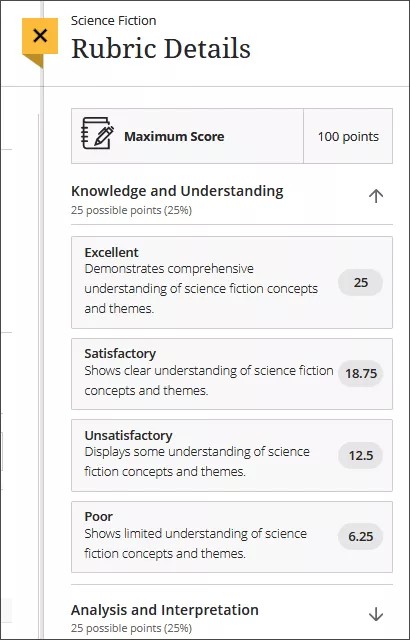
You can create multiple rubrics in your course. Rubrics consist of rows and columns. There are no limits to the number of rows and columns you can add to your rubrics. The rows correspond to the assessed criteria. The columns correspond to the level of achievement that describes each criterion. You can create four types of rubrics: percentage, percentage range, points, and points range. New rubrics have four rows and four columns. You can delete all but one row and one column. You can associate rubrics with assignments, discussions, and journals.
You can only associate rubrics with assignments. You can't create rubrics at small screen widths, such as mobile devices. Rubrics are read-only on mobile devices.
Topics on this page include:
The following narrated video provides a visual and auditory representation of some of the information included on this page. For a detailed description of what is portrayed in the video, open the video on YouTube, navigate to More actions, and s
Watch a video about creating rubrics
The following narrated video provides a visual and auditory representation of some of the information included on this page. For a detailed description of what is portrayed in the video, open the video on YouTube, navigate to More actions, and select Open transcript.
Video: Create rubrics shows how to create a rubric for assessing and grading student work.
Rubric types
You can create four types of rubrics in a course:
- Percentage-based rubrics
- Percentage-range rubrics
- Points-based rubrics
- Points-range rubrics
Percentage-based rubrics
For percentage-based rubrics, the criteria total percentage must equal 100%. You may only use whole numbers. You may add rows set to 0% as long as your total percentage amounts to 100.
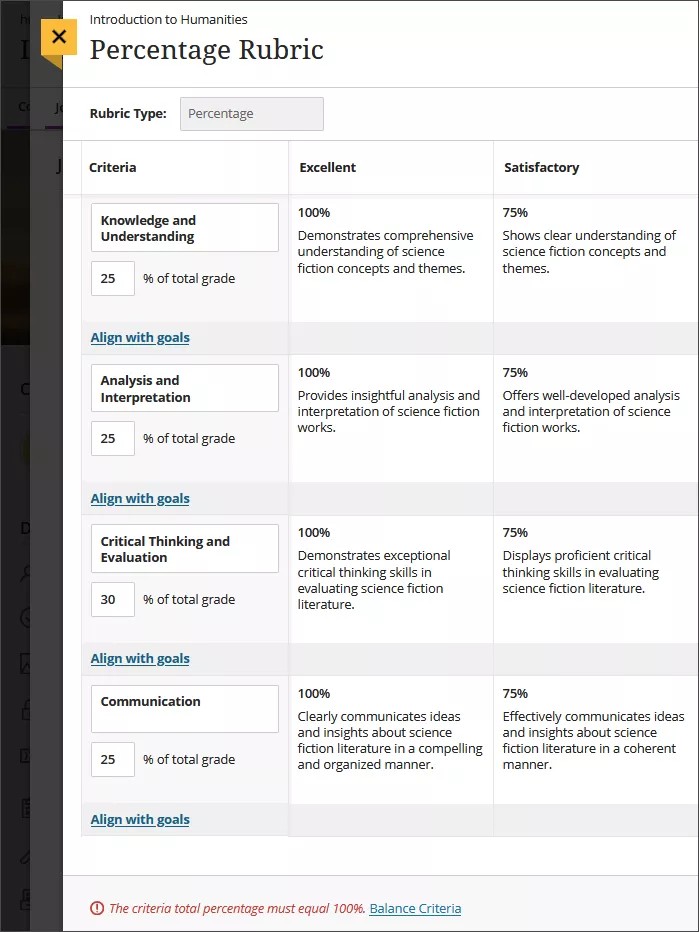
If the percentages don't equal 100, a warning message appears at the bottom of the screen. Select Balance Criteria next to the message to auto-adjust the percentages so that they equal 100. Or, you can manually update the percentages as needed.
For the levels of achievement, one column must have a value of 100%. You may only use whole numbers.
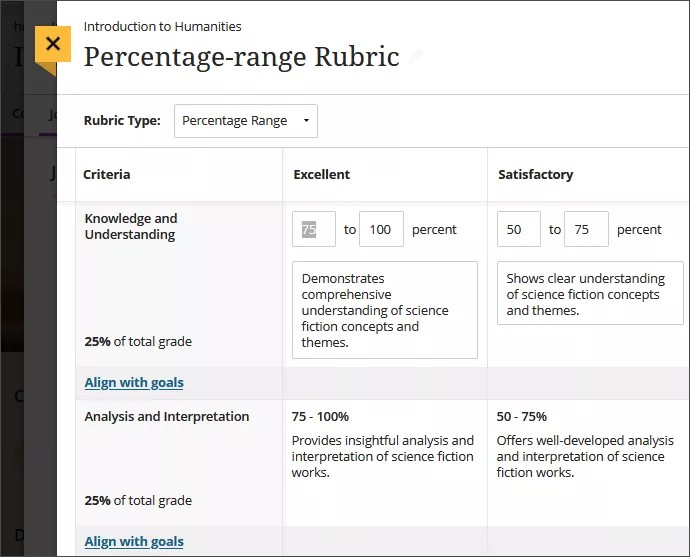
Percentage-range rubrics
For percentage-range rubrics, each level of achievement has a range of values. When you grade, you select the appropriate percentage level for a particular level of achievement. The system calculates the points earned by multiplying the weight times thee achievement percentage times the item points.
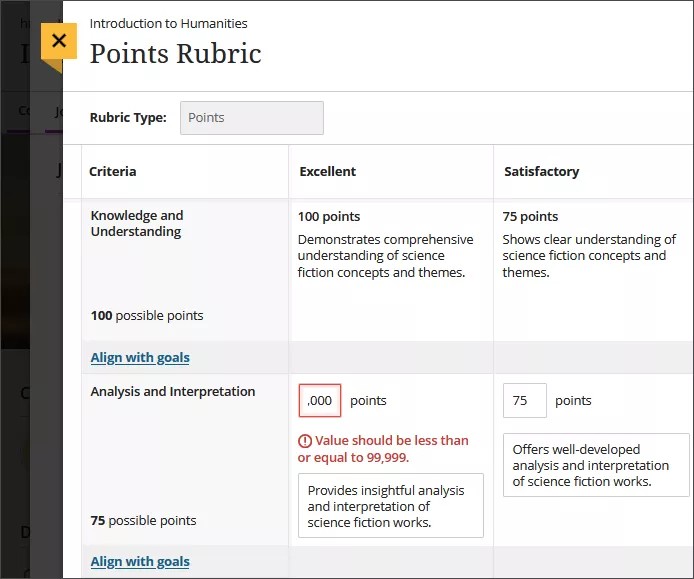
Points-based rubrics
For points-based rubrics, the maximum possible points should be less than or equal to 99,999. You may only use whole numbers. You may add rows set to 0 as long as your total points are less than or equal to 99,999.
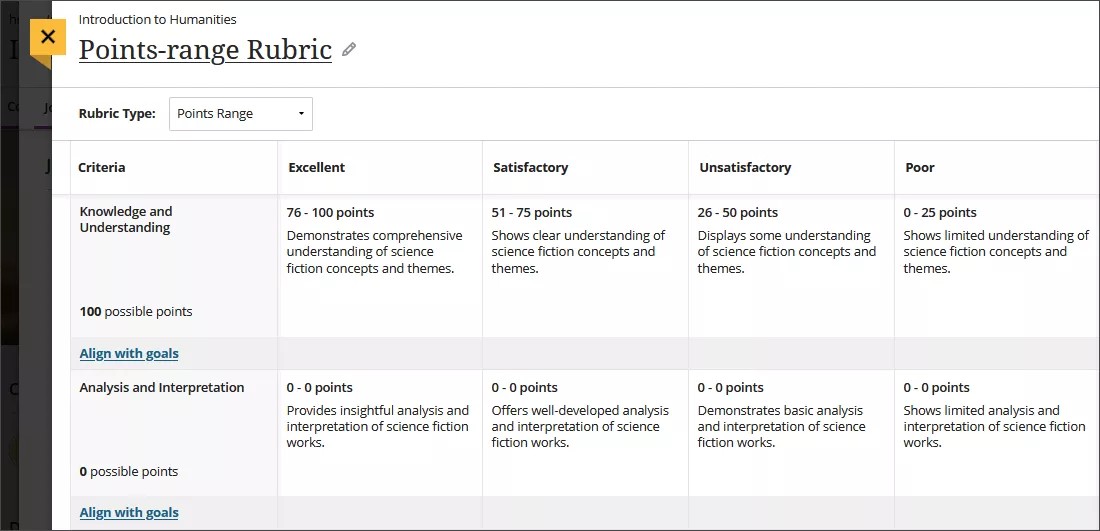
Points-range rubrics
For points-range rubrics, the maximum possible points should be less than or equal to 99,999. You may only use whole numbers. You may add rows set to 0 as long as your total points are less than or equal to 99,999. The point range for each criterion must go from a lower range to a higher range.
Create rubrics
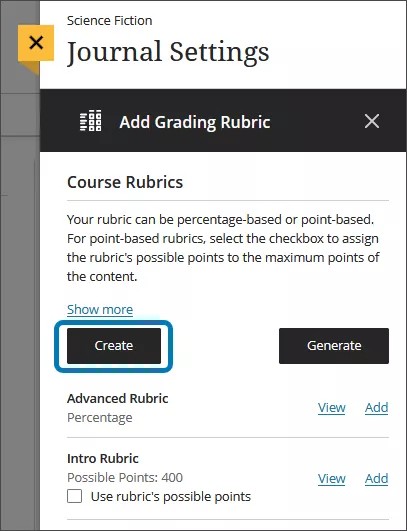
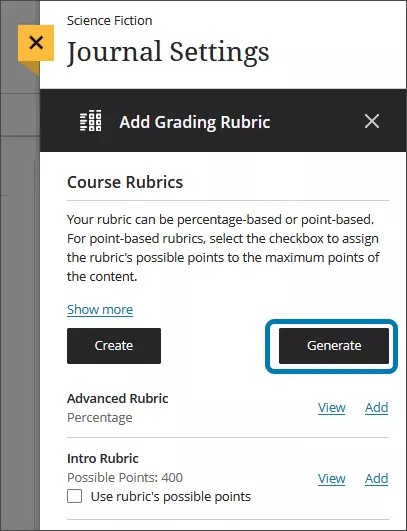
Only one rubric can be associated with an item. To create a rubric from an assignment, discussion, or journal, select the Settings button to open the Settings panel. In the Additional Tools section near the bottom, select Add grading rubric. Then, select Create New Rubric.
You can also create a rubric in your gradebook by selecting the Settings button. Then, select Create in the Course Rubrics section.
Titles are limited to 255 characters. If you don't add a title, "New Rubric" and the date appear as the title.
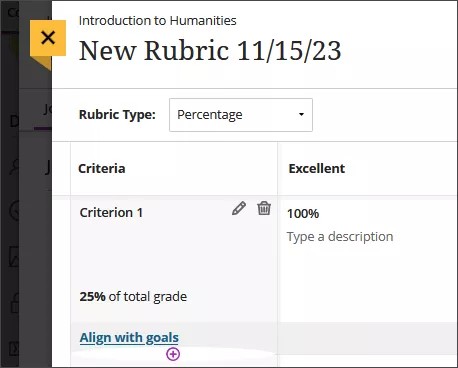
By default, four criteria rows and four achievement level columns appear. You can add, delete, and rename the rows and columns. Hover over a cell to access the edit and delete icons. Select the plus sign wherever you want to add a row or column and type a title. If you don't want the new row or column, you can delete it.
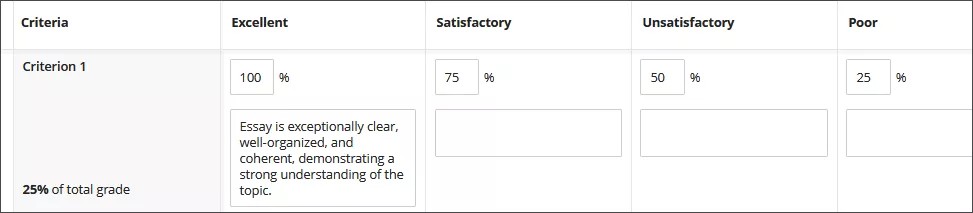
When you add an achievement level, a percentage is automatically added. For example, if you add an achievement level between two levels listed at 100% and 75%, your new level is assigned 88%. You can adjust the percentages as needed. Select anywhere on the rubric to save your changes.
For new and existing levels of achievement, you can add an optional description. Achievement titles have a 40 character limit. Criteria and description cells have a 1,000 character limit. Rubrics support plain text only. You can paste text from another document, but the formatting doesn't carry over.
When you press the Enter key, a new paragraph isn't started in a cell. The Enter key confirms you're finished. Your work is saved and you leave edit mode.
You can align goals with rubrics criteria if you want to measure achievement against goals set by your institution. Select Align with goals to get started. Students can't see the goals you align with criteria in a rubric.
Rubric columns range from highest to lowest scores. You can't change this order.
Generate rubrics
If your institution has turned on the AI Design Assistant feature, you can generate a rubric. From the Course Rubrics panel, select Generate to start.
You have several ways to customize the rubrics that the AI Design Assistant generates.
- Enter a description to narrow the focus of the rubric
- Select the rubric type: percentage, percentage range, points, or point range
- Adjust the complexity of the rubric
- Define the number of columns and rows
Once you’ve finalized your settings, select Generate. If the rubric meets your needs, select Continue to edit the rubric.
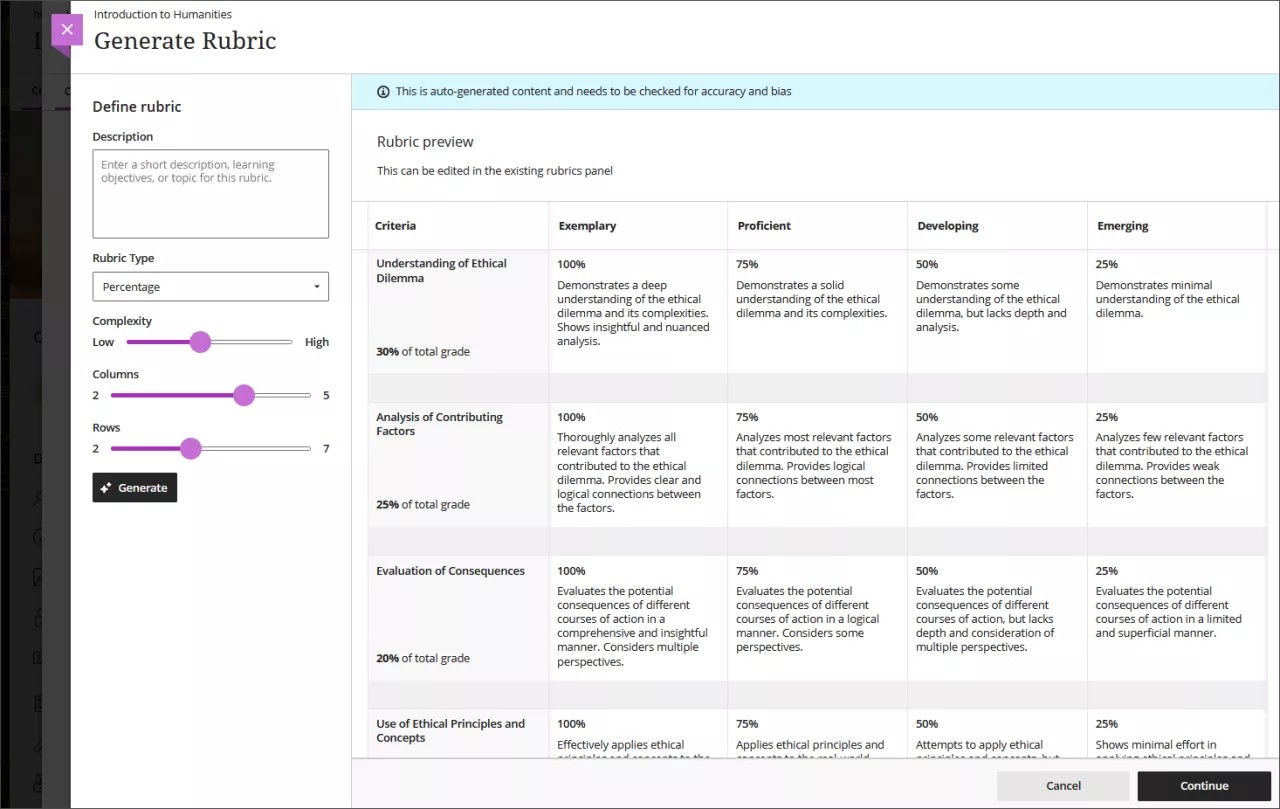
Review each cell of the rubric for accuracy. You can also further edit your rubric to better fit your teaching style and goals. Visit the "AI Design Assistant" topic to learn more about Learn's AI features.
Associate rubrics to assessments
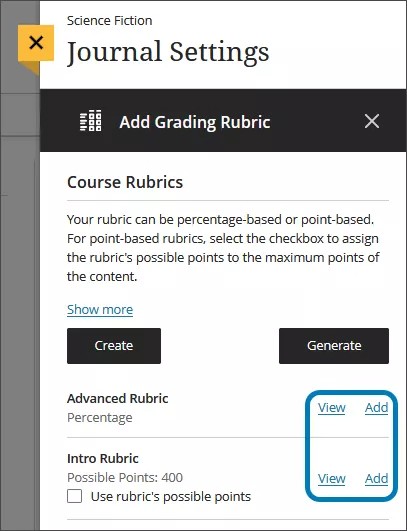
You can associate an existing rubric to an item unless you've already graded the item. You may associate only one rubric to each item. On the assignment, discussion, or journal page, select the Settings icon to open the Settings panel. In the Additional Tools section, select Add grading rubric.
If you want to create a new rubric, select Create. The rubric will be added to the list of rubrics on the Course Rubrics panel.
You can edit or view a rubric by selecting View. Select Add to associate the rubric with the item.
When you associate a rubric and view a student's assignment or test submission, the grade pill displays a rubric icon.
Watch a video about associating rubrics
The following narrated video provides a visual and auditory representation of some of the information included on this page. For a detailed description of what is portrayed in the video, open the video on YouTube, navigate to More actions, and select Open transcript.
Video: Associate rubrics shows how to associate an existing rubric to an assessment.
Remove associations
You can remove a rubric from an assessment you've graded and the grades will remain. The grades are no longer associated with the rubric, but now appear as grades you added manually.
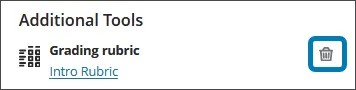
Return to the Settings panel and hover over the associated rubric's title to go to the Remove icon.
Student view of rubrics
Students can view a rubric before they open an assignment, test, and discussion and after they start the attempt. Students select This item is graded with a rubric in the Details & Information section of the item to view the rubric.
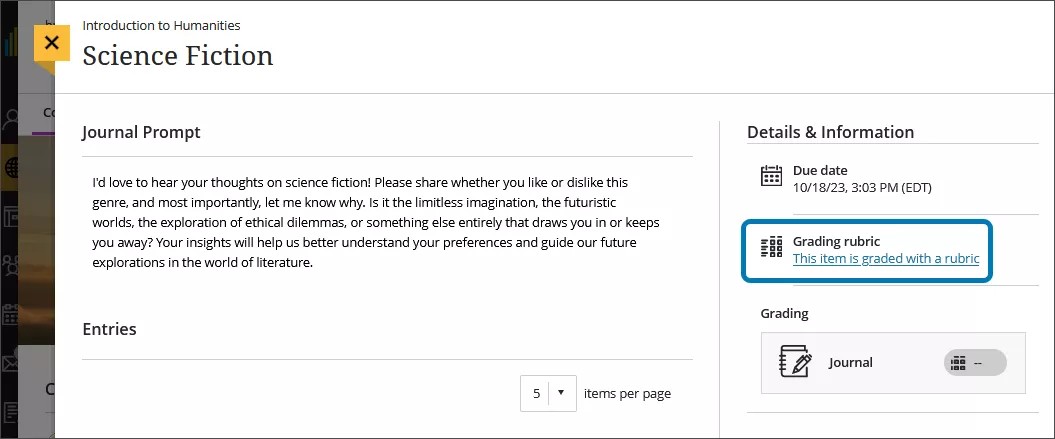
Students can view the rubric alongside the instructions. They can expand each rubric criterion to view the achievement levels and organize their efforts to meet the requirements of the graded work.
Manage rubrics
You can copy, delete, and export rubrics.
Copy rubric
After you use a rubric for grading, you can't edit it, but you can make a copy that you can edit and rename.
Go to your gradebook. Select the Settings icon to bring up the Gradebook Settings panel. Scroll down to the Course Rubrics section.

Access a rubric's menu by selecting the three-dot icon and then select Duplicate. The copied rubric opens with the date and "copy" added to the title. You can make edits as needed. Select Save to save the duplicate rubric.
Note: If you copy an existing percentage-based rubric and change it to a percentage-range rubric, all the descriptions are cleared.
If you've already used a rubric to grade an item, you can also copy the rubric and edit the duplicate version. From an item's Settings panel, open the rubric. Select Create a Copy at the bottom of the screen. When you create a copy of a rubric you used to grade a test or assignment, the new rubric is associated with the item. Any grades calculated with the original rubric are preserved, but these grades are converted to overrides. You can regrade these submissions with the new rubric.
You can't copy rubrics on small devices.
Delete rubrics
You can permanently delete a rubric from your course even if you used it in grading and the grades will remain. The grades are no longer associated with the rubric, but now appear as grades you added manually.
To permanently delete a rubric, open the Gradebook Settings panel in your gradebook.
Copy rubrics between courses
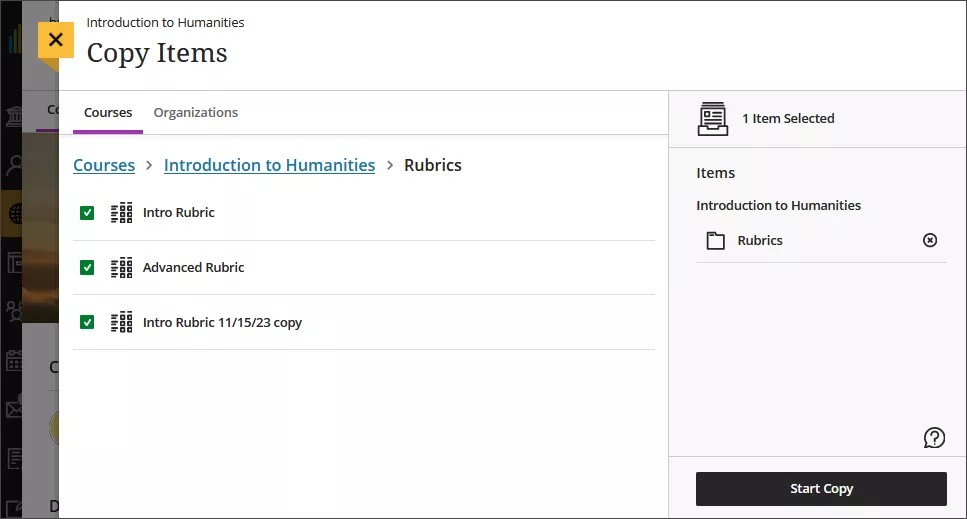
You can copy rubrics between your courses. On the Course Content page, select the plus sign to open the menu and select Copy Content. Or, open the More options menu above the content list. Select Copy Items. The Copy Items panel opens.
From the Copy Items panel, you can browse all the courses that you teach. Select the Rubrics folder for the course you want to copy rubrics from and select the rubrics you’d like to copy. When you’re done, select Start copy.
Visit the "Copy Content from Other Courses" topic for more information about copying rubrics.
Export and archive courses with rubrics in Original
Rubrics are saved in export and archive packages.
When you convert an Original course to Ultra, percentage-range and percentage rubrics are converted without descriptions.
All other rubric types are converted to percentage rubrics, such as points and point range. No-point rubrics are not supported. All Original rubric settings are now set to the Ultra rubric defaults, such as display to students.