Artificial Intelligence (AI) Design Assistant
Creating a new course from nothing can be a time-consuming task that involves a lot of repetitive work. Your institution may have limited resources for instructional design, or you may want help outlining your course. The AI Design Assistant helps you build your course and saves you time. You can use advanced AI to help create learning modules, make rubrics, create question banks, and design assessments.
At all steps in the creation process, you’re able to adjust the complexity of content and customize everything that the AI Design Assistant generates. You can even use the AI Design Assistant to give your course a unique look to better engage your students by generating keywords to search Unsplash's gallery of stock photos. Visit the “Course Banner” topic to learn more about adding banners to your course.
As we look to explore the benefits AI has to offer, we are prioritizing lawful, ethical, and responsible use. We have established our Trustworthy AI principles, where we commit to:
- humans in control,
- fairness,
- privacy,
- security, and
- safety.
We recommend reviewing the documents linked below as you consider using AI within Learn Ultra.
We chose to partner with Microsoft to provide this functionality for many reasons. A primary reason is that Microsoft has a long-standing commitment to the ethical use of AI. Please find helpful resources from Microsoft below:
- Microsoft’s Responsible AI page
- Microsoft’s Transparency Note for Azure Open AI Service
- Microsoft’s page on Data, privacy, and security for Azure OpenAI Service
Topics on this page include:
Watch a video about AI Module Generation
The following narrated video provides a visual and auditory representation of some of the information included on this page. For a detailed description of what is portrayed in the video, open the video on YouTube, navigate to More actions, and select Open transcript.
Course structure suggestions
If you need help designing your course and don’t know where to start, the AI Design Assistant can guide you through building the course’s structure. The AI Design Assistant draws insights from your course's title and description to generate learning modules. Learning modules can support a course objective, concept, or theme. Learning modules help you organize your content and guide how your students navigate through a topic.
In an empty course, select Auto-Generate Modules.
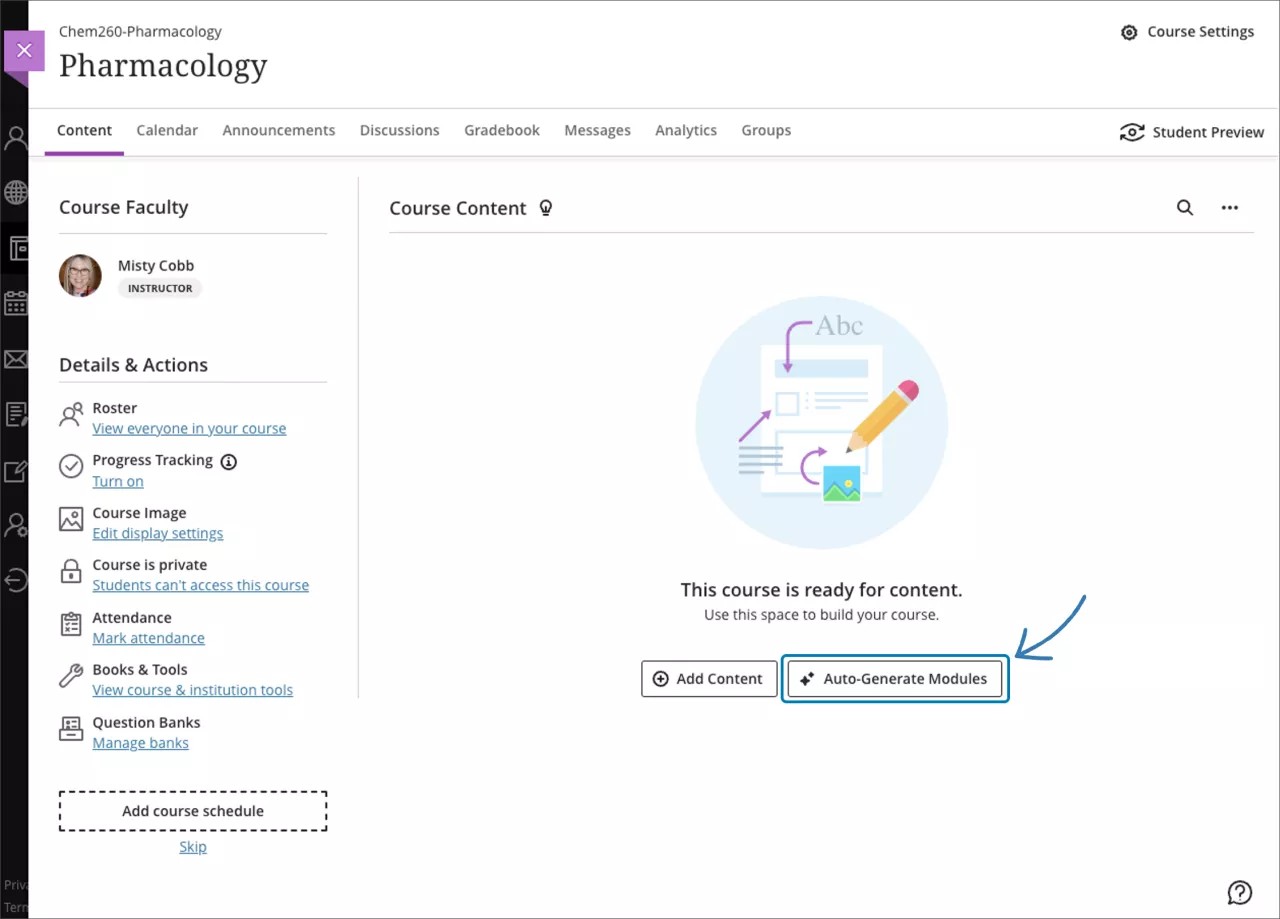
If you already have content in your course, Auto-Generate Modules is an option in the Create Item menu.
The Auto-Generate Modules panel appears. Each generated module comes with a name and description.
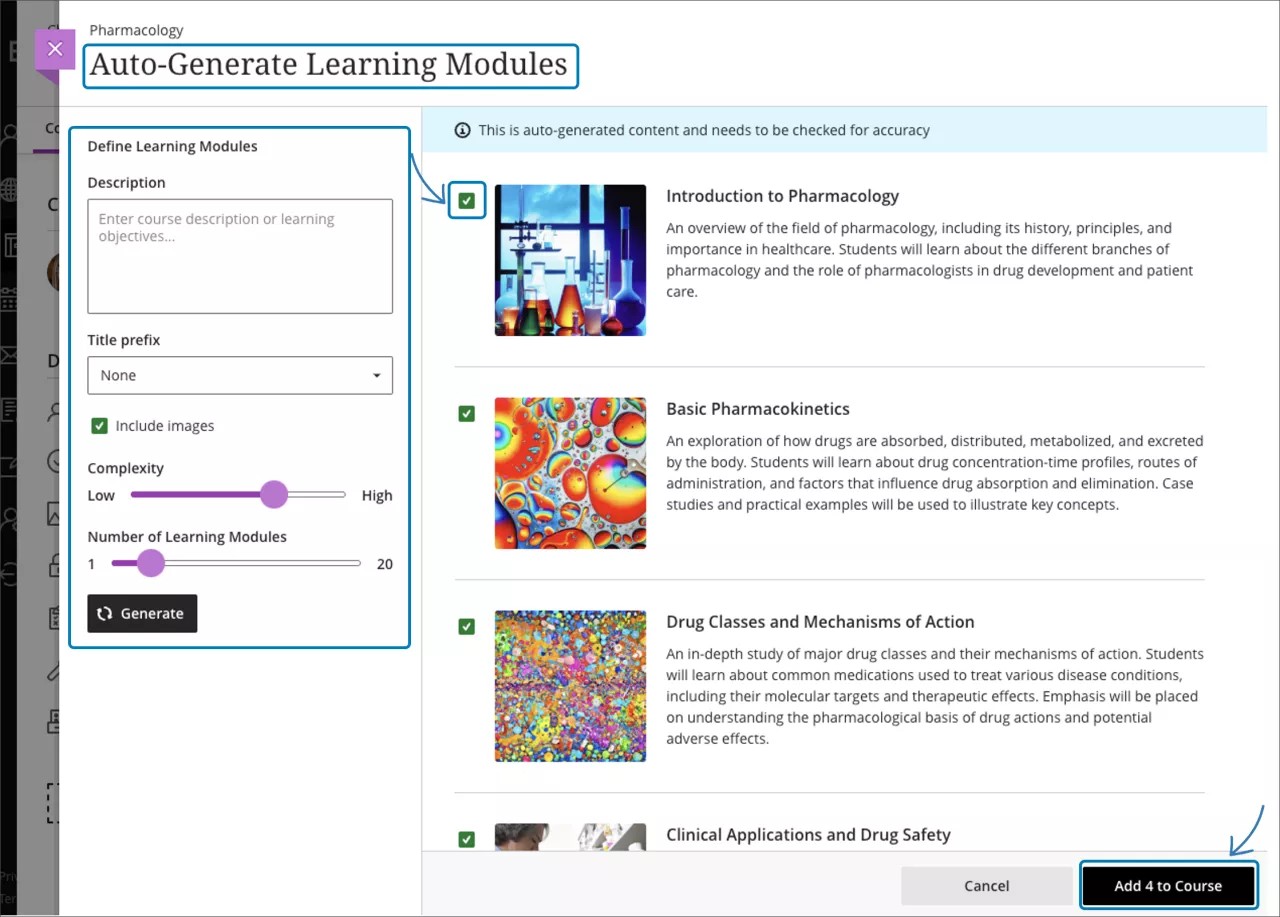
You have several ways to customize the learning modules that the AI Design Assistant generates.
- Enter a description (limited to 2000 characters) to narrow the focus of the modules
- Select a prefixes for the module titles
- Choose whether to include AI-generated images for the modules
- Adjust the complexity of the modules’ focus
- Select the number of modules to generate
Optionally, you can select which course items you’d like the AI Design Assistant to provide context for new learning modules. Select Select course items to start.
Select the box beside any course content item to include it in the context for your learning module.
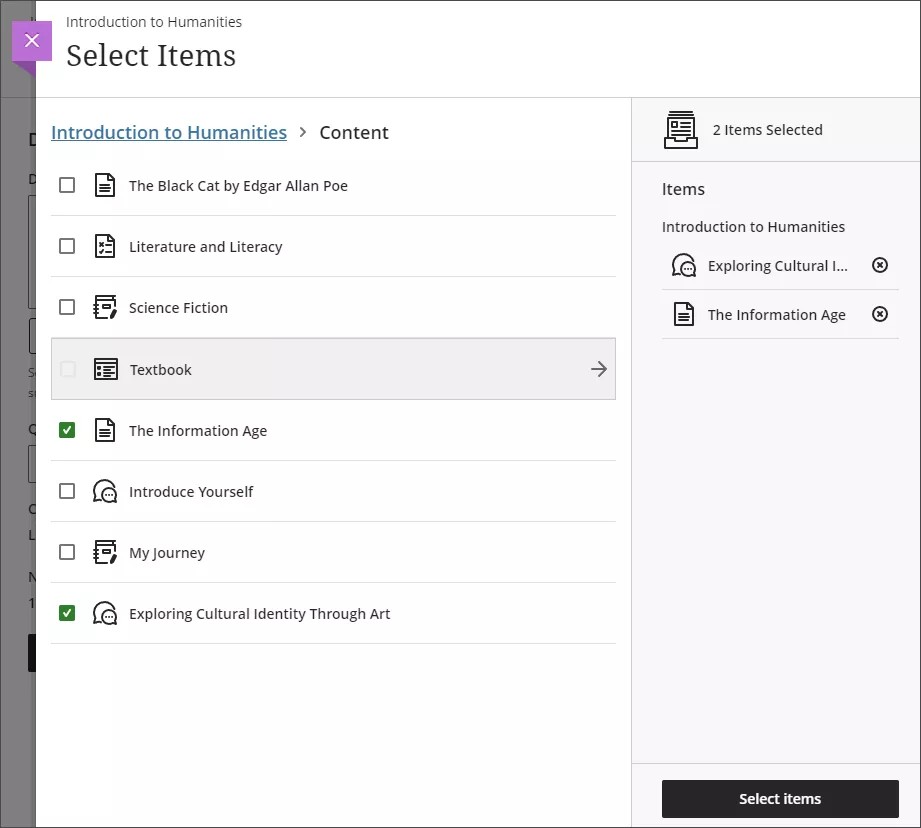
You can select the arrow beside a folder or learning module to include items from them. When you’ve finished choosing items for context, select Select items to return to module generation.
File types supported by the context picker include PDF, Word, PowerPoint, text, RTF, and HTML.
Once you’ve finalized your settings, select Generate. Choose the modules you’d like to add to your course, then select Add to Course.
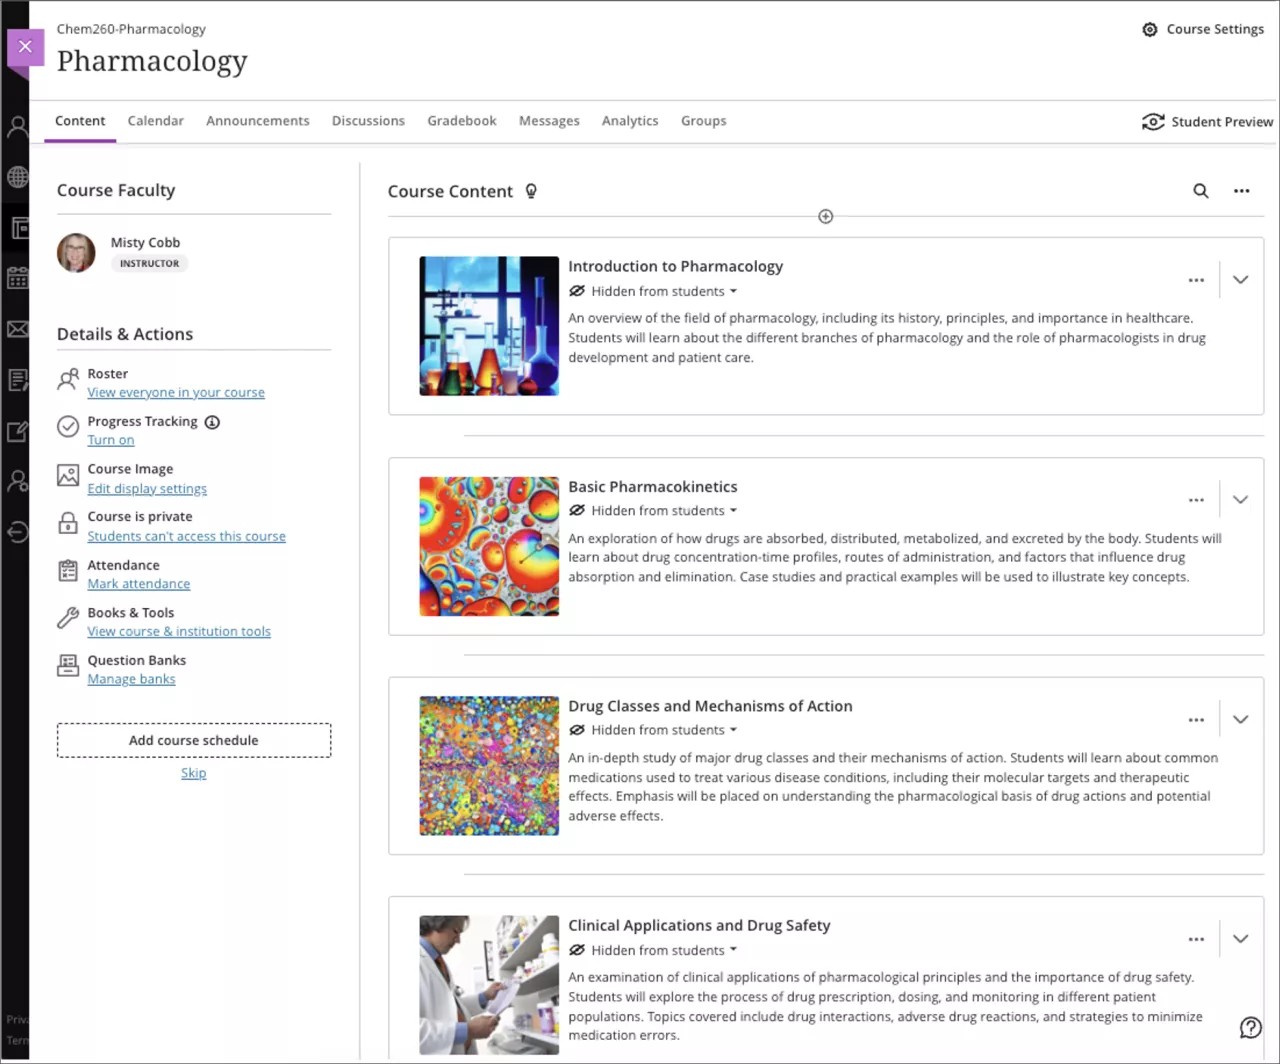
Review each learning module’s title and description for accuracy. You can also edit learning modules to better fit your teaching style and goals. Visit the “Create Learning Modules” topic to learn more about how to customize and navigate learning modules.
The AI Design Assistant can generate images for pre-existing learning modules. You can also upload your own images or select the built-in feature to include a stock photo from Unsplash.
Auto-generate discussions
Discussions will be generated based on your course's title and description.
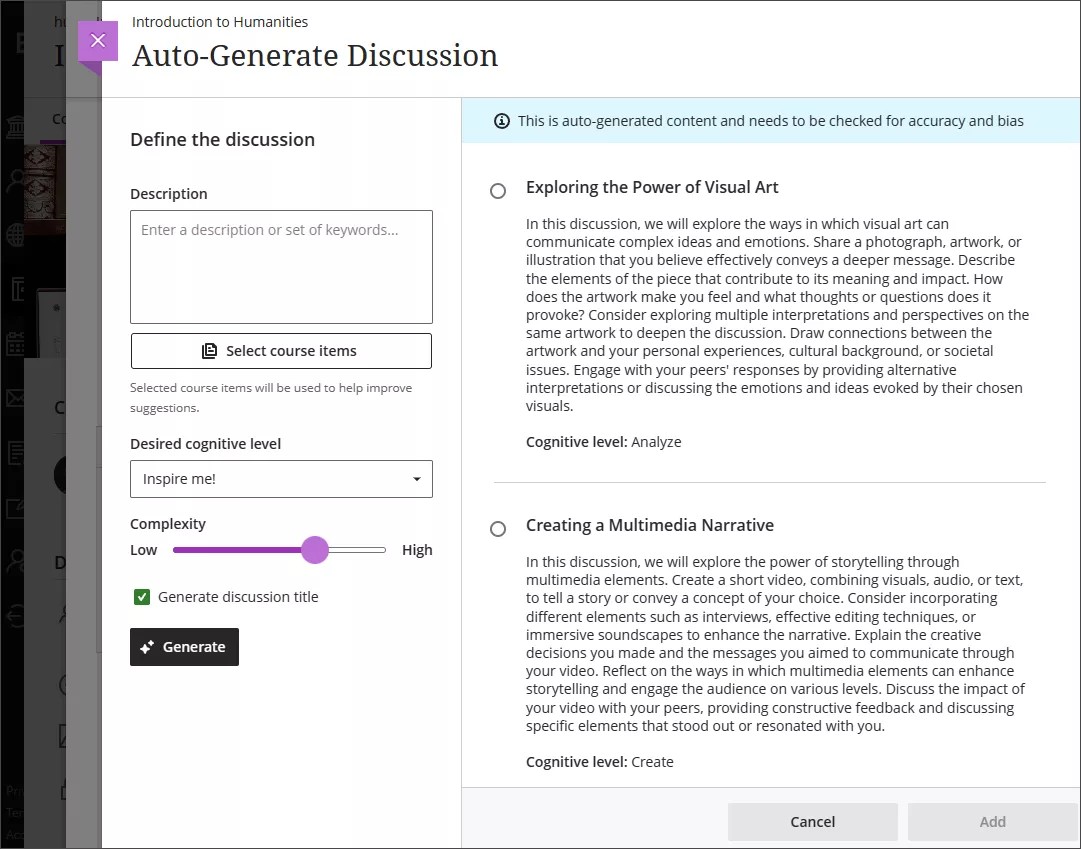
You have several ways to customize the discussions that the AI Design Assistant generates.
- Enter a description (limited to 2000 characters) to narrow the focus of the discussions
- Select the desired cognitive level
- Apply
- Analyze
- Evaluate
- Create
- Inspire me! provides you with a mix of levels
- Adjust the complexity of the discussions’ focus by moving the slider
- Select whether or not you want to generate a title for discussions
Cognitive levels are based on Bloom’s Taxonomy.
Optionally, you can select which course items you’d like the AI Design Assistant to provide context for discussions. Select Select course items to start.
Select the box beside any course content item to include it in the context for your discussion.
You can select the arrow beside a folder or learning module to include items from them. When you’ve finished choosing items for context, select Select items to return to question generation.
Once you’ve finalized your settings, select Generate. Review each discussion for accuracy and bias. Choose the discussion you’d like to add to your course, then select Add.
File types supported by the context picker include PDF, Word, PowerPoint, text, RTF, and HTML.
Journal generation
Journals will be generated based on your course's title and description.
You have several ways to customize the journals that the AI Design Assistant generates.
- Enter a description (limited to 2000 characters) to narrow the focus of the journals
- Select the desired cognitive level
- Apply
- Analyze
- Evaluate
- Create
- Inspire me! provides you with a mix of levels
- Adjust the complexity of the journals’ focus by moving the slider
- Select whether or not you want to generate a title for journals
Cognitive levels are based on Bloom’s Taxonomy.
Optionally, you can select which course items you’d like the AI Design Assistant to provide context for journals. Select Select course items to start.
Select the box beside any course content item to include it in the context for your journal.
You can select the arrow beside a folder or learning module to include items from them. When you’ve finished choosing items for context, select Select items to return to question generation.
File types supported by the context picker include PDF, Word, PowerPoint, text, RTF, and HTML.
Once you’ve finalized your settings, select Generate. Review each journal for accuracy and bias. Choose the journal you’d like to add to your course, then select Add.
Rubric generation
Grading rubrics offer a structured framework to assess student work. Rubrics ensure both fairness and consistency in grading. Moreover, rubrics give students clear directives to meet desired learning outcomes. However, creating rubrics can take a lot of time. The AI Design Assistant creates rubrics by drawing insights from course context.
Rubric generation is an option everywhere that you can create a rubric. Select Generate to start.
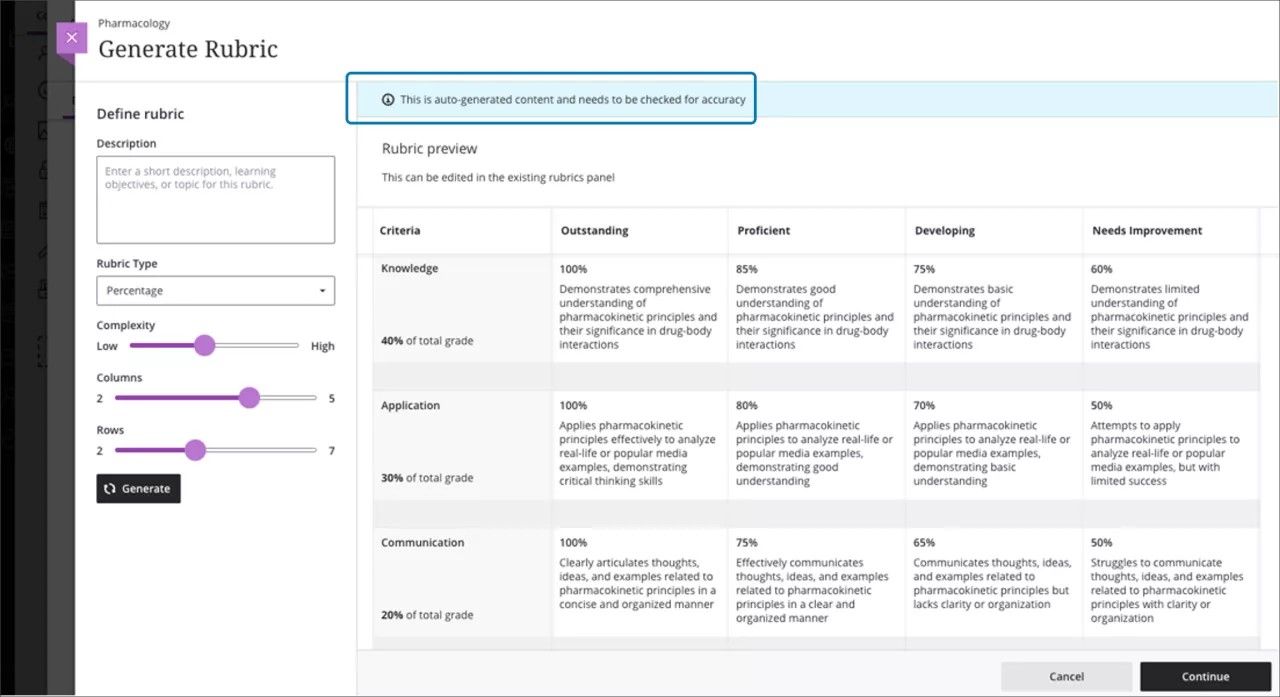
You have several ways to customize the rubrics that the AI Design Assistant generates.
- Enter a description (limited to 2000 characters) to narrow the focus of the rubric
- Select the rubric type: percentage, percentage range, points, or point range
- Adjust the complexity of the rubric
- Define the number of columns and rows
Once you’ve finalized your settings, select Generate. If the rubric meets your needs, select Continue to edit the rubric.
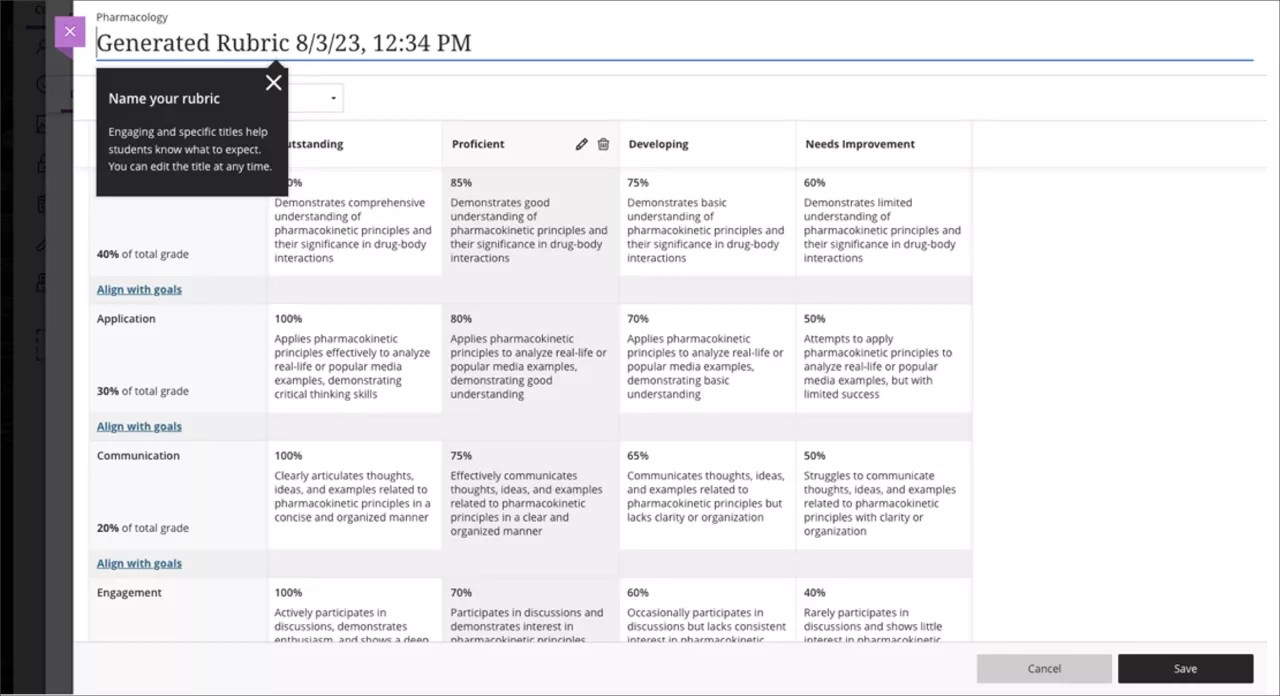
Review each cell of the rubric for accuracy. You can also further edit your rubric to better fit your teaching style and goals. Visit the “Rubrics” topic to learn more about how you can customize your rubric.
Watch a video about AI Rubric Generation
The following narrated video provides a visual and auditory representation of some of the information included on this page. For a detailed description of what is portrayed in the video, open the video on YouTube, navigate to More actions, and select Open transcript.
Assignment prompt generation
You can generate assignment prompts that encourage students to:
- engage in higher-order thinking
- apply knowledge gained from your class
- produce authentic submissions that are evidenced
- emulate real-world situations
Assignment prompts are generated based on course context. On the assignment creation page, select Auto-generate assignment.
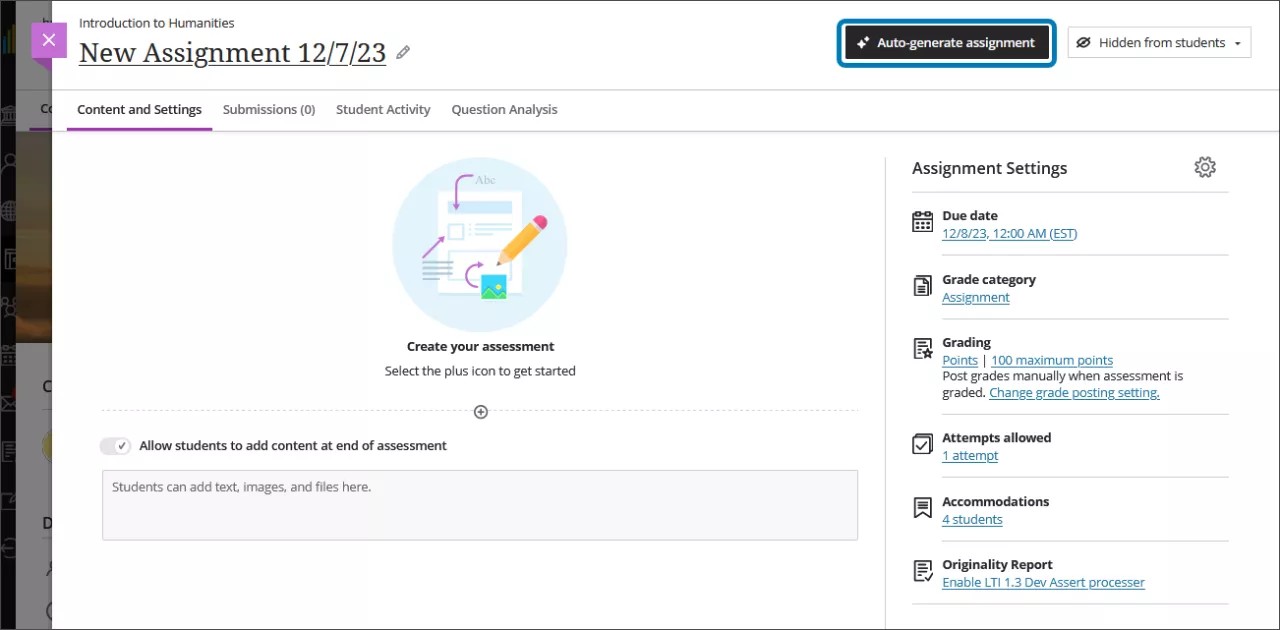
You’re brought to the Auto-Generate Assignment page.
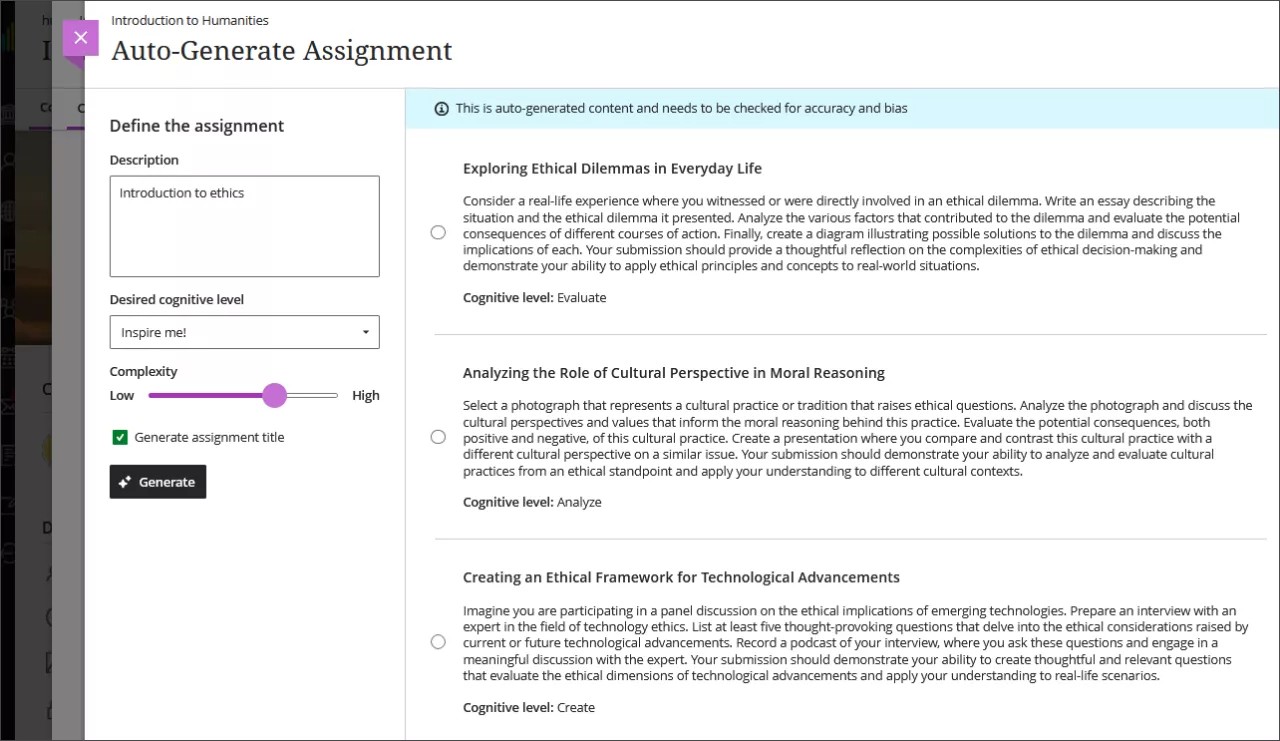
The AI Design Assistant generates three assignment prompts. You have several ways to define the prompts that the AI Design Assistant generates.
- Enter a description (limited to 2000 characters) to narrow the focus of the prompts
- Select the desired cognitive level
- Apply
- Analyze
- Evaluate
- Create
- Inspire me! provides you with a mix of levels
- Adjust the complexity of the prompts’ focus by moving the slider
- Select whether or not you want to generate a title for the prompts
Cognitive levels are based on Bloom’s Taxonomy.
Optionally, you can select which course items you’d like the AI Design Assistant to provide context for the assignment prompts. Select Select course items to start.
Select the box beside any course content item to include it in the context for your test.
You can select the arrow beside a folder or learning module to include items from them. When you’ve finished choosing items for context, select Select items to return to question generation.
File types supported by the context picker include PDF, Word, PowerPoint, text, RTF, and HTML.
Once you’ve finalized your settings, select Generate. Review each prompt for accuracy and bias. Choose the prompt you’d like to add to your assignment, then select Add.
Test question generation
Creating test questions takes a significant amount of time. The AI Design Assistant can offer suggestions for test questions, giving you extra time to focus on more complicated tasks. The AI Design Assistant is beneficial for both formative and summative assessments. Test questions are generated based on the course context that you select.
In the test creation panel, select Auto-generate question from the new question menu. You can reach the new question menu by pressing the plus button.
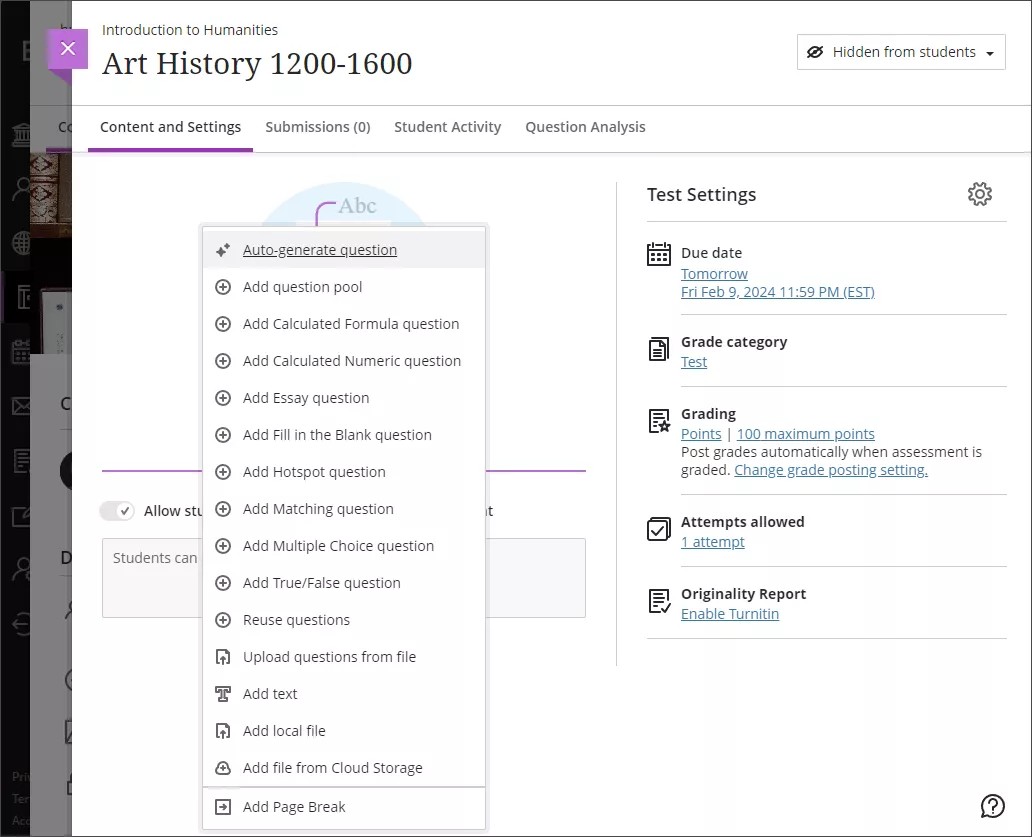
You have several ways to refine the test questions that the AI Design Assistant generates.
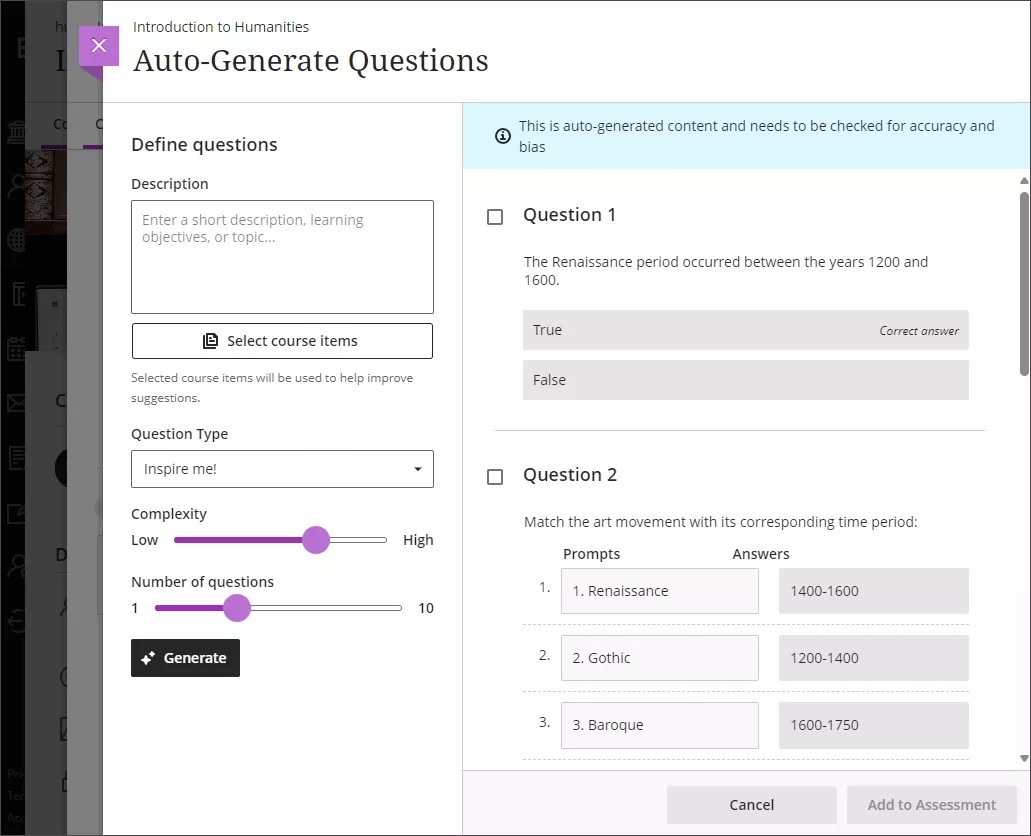
- Enter an optional description (limited to 2000 characters) to narrow the focus of the questions
- Adjust the complexity of the questions
- Select the number of questions
You can select from the following question types:
- Essay
- Fill in the blank
- Matching
- Multiple choice
- True/False
The "Inspire me!" question type suggests a variety of question types to give you more options. Visit the “Question Types” topic to learn more about different types of questions in Learn.
Optionally, you can select which course items you’d like the AI Design Assistant to provide context for test questions. Select Select course items to start.
Select the box beside any course content item to include it in the context for your test.
You can select the arrow beside a folder or learning module to include items from them. When you’ve finished choosing items for context, select Select items to return to question generation.
The context picker does not draw context from items that are attached to an Ultra document. Only items that appear on the context picker’s menu are used by the context picker.
Once you’ve finalized all of your settings, select Generate. Choose the questions that you’d like to add to your assessment, then select Add to Assessment.
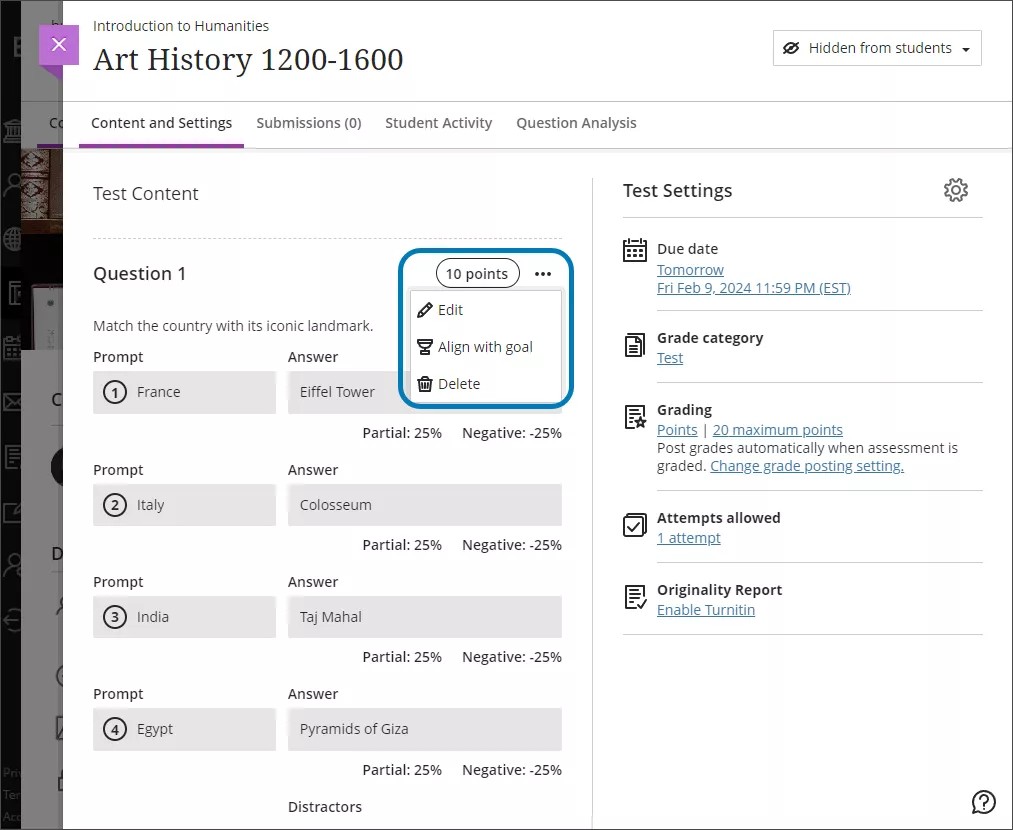
Review each question for accuracy and bias. You can also edit questions to better fit your learning goals. Visit the “Edit Tests and Questions” topic to learn more about editing test questions.
Watch a video about AI Question Generation
The following narrated video provides a visual and auditory representation of some of the information included on this page. For a detailed description of what is portrayed in the video, open the video on YouTube, navigate to More actions, and select Open transcript.
Question Bank generation from Ultra Documents
Ultra Documents blend text and media components, enriching content presentation. Visit the “Create Ultra Documents” topic to learn more about how to create Ultra Documents.
Question Banks are sets of questions you can use across multiple assessments. The AI Design Assistant can build question banks based on an Ultra Document to gauge your students’ comprehension of the document’s topic while saving yourself time. Visit the “Question Banks” topic to learn more about how to create and edit Question Banks.
Select Generate question bank in your Ultra Document.
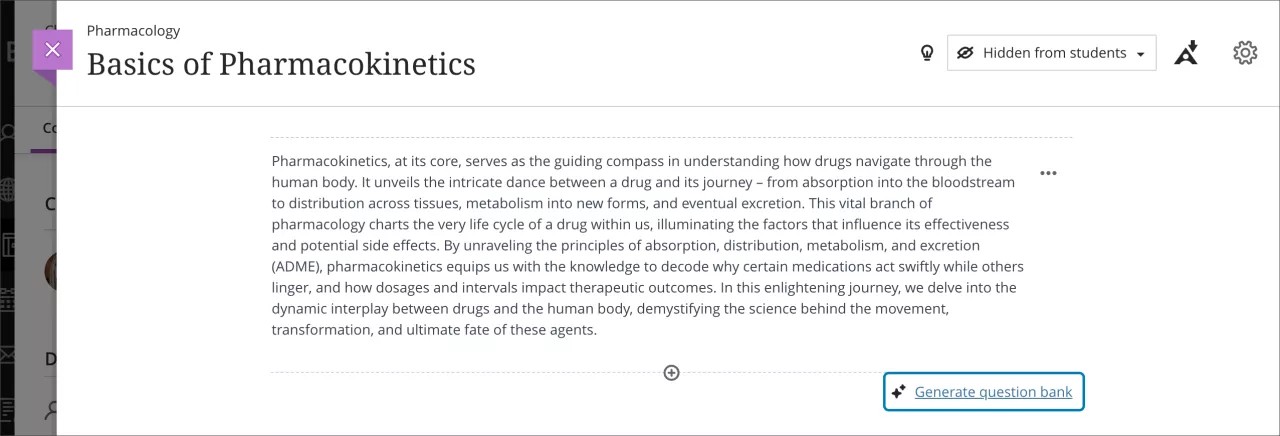
You have several ways to define the questions that the AI Design Assistant generates.
- Enter a description (limited to 2000 characters) to narrow the focus of the questions
- Adjust the complexity of the questions
- Select the number of questions
You can select from the following question types:
- Essay
- Fill in the blank
- Matching
- Multiple choice
- True/False
The "Inspire me!" question type suggests a variety of question types to give you more options. Visit the “Question Types” topic to learn more about different types of questions in Learn.
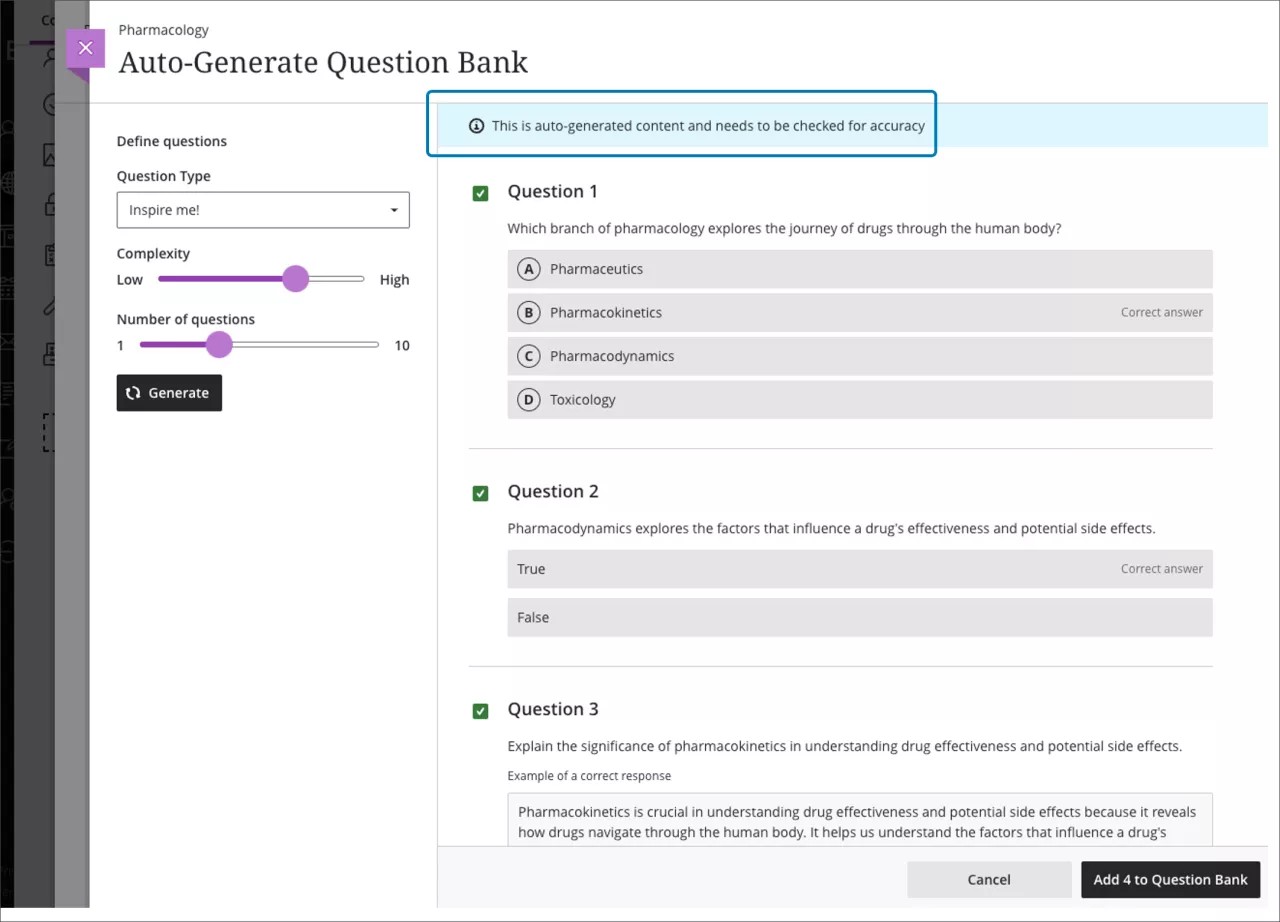
Once you’ve finalized your settings, select Generate. Choose the questions that you’d like to add to your Question Bank, then select Add to Question Bank.
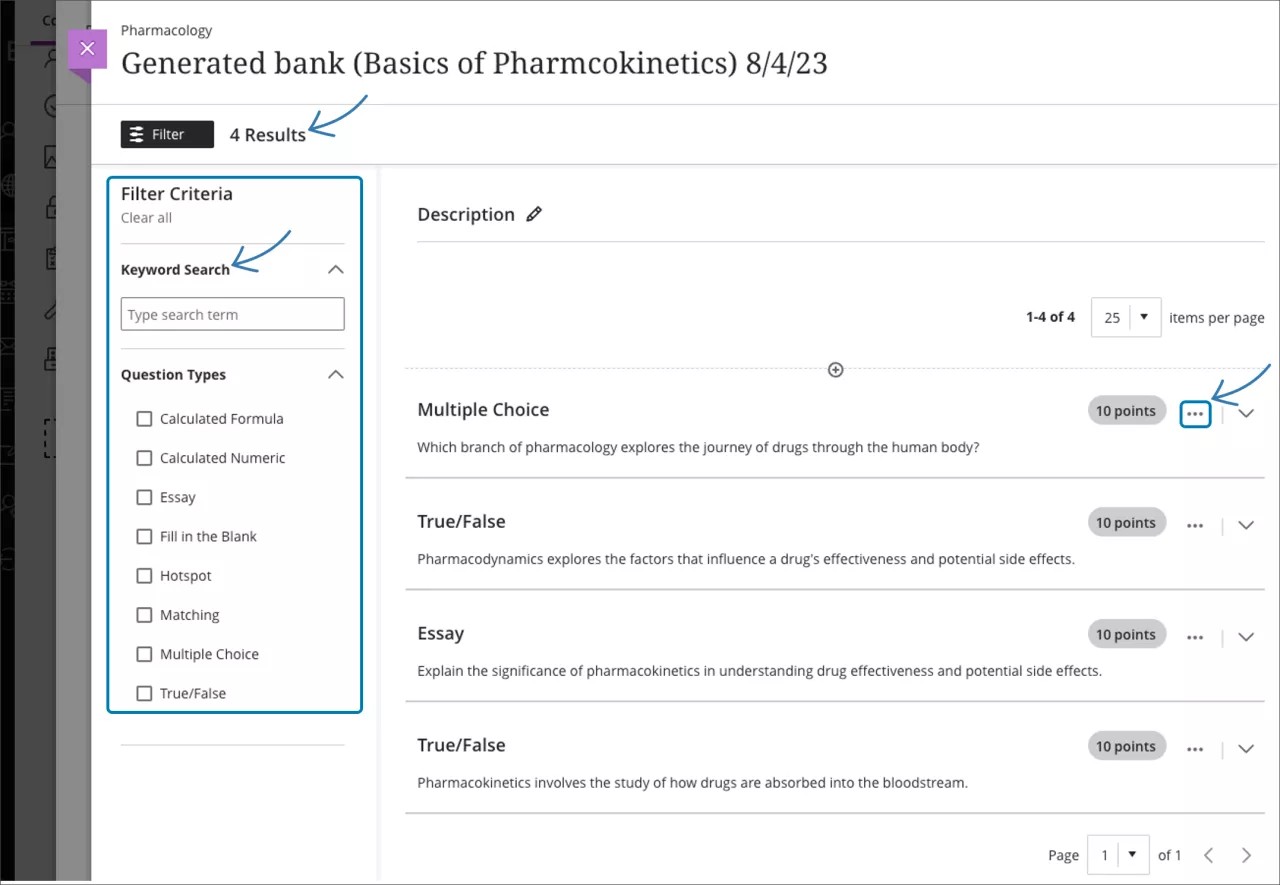
Review each question for accuracy. You can also edit questions to better fit your learning goals. Visit the “Edit Tests and Questions” topic to learn more about editing questions.
Generate images
You can directly insert AI-generated or stock images into the text editor by selecting the Image button.
When you use Unsplash, the search terms will be autopopulated from your text. You can select the X button and use your own search terms if you’d prefer.
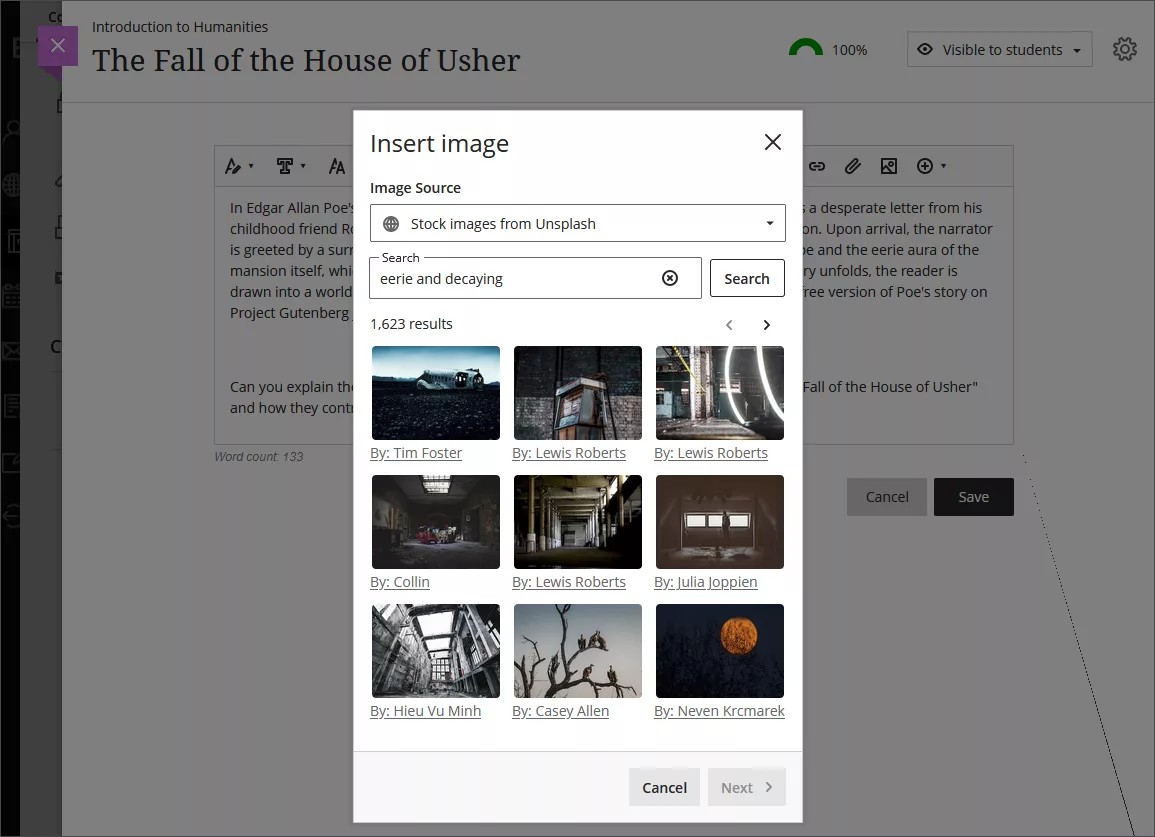
With the AI Design Assistant, you can generate an image to insert into your text. Enter a description for your image and then select Generate.
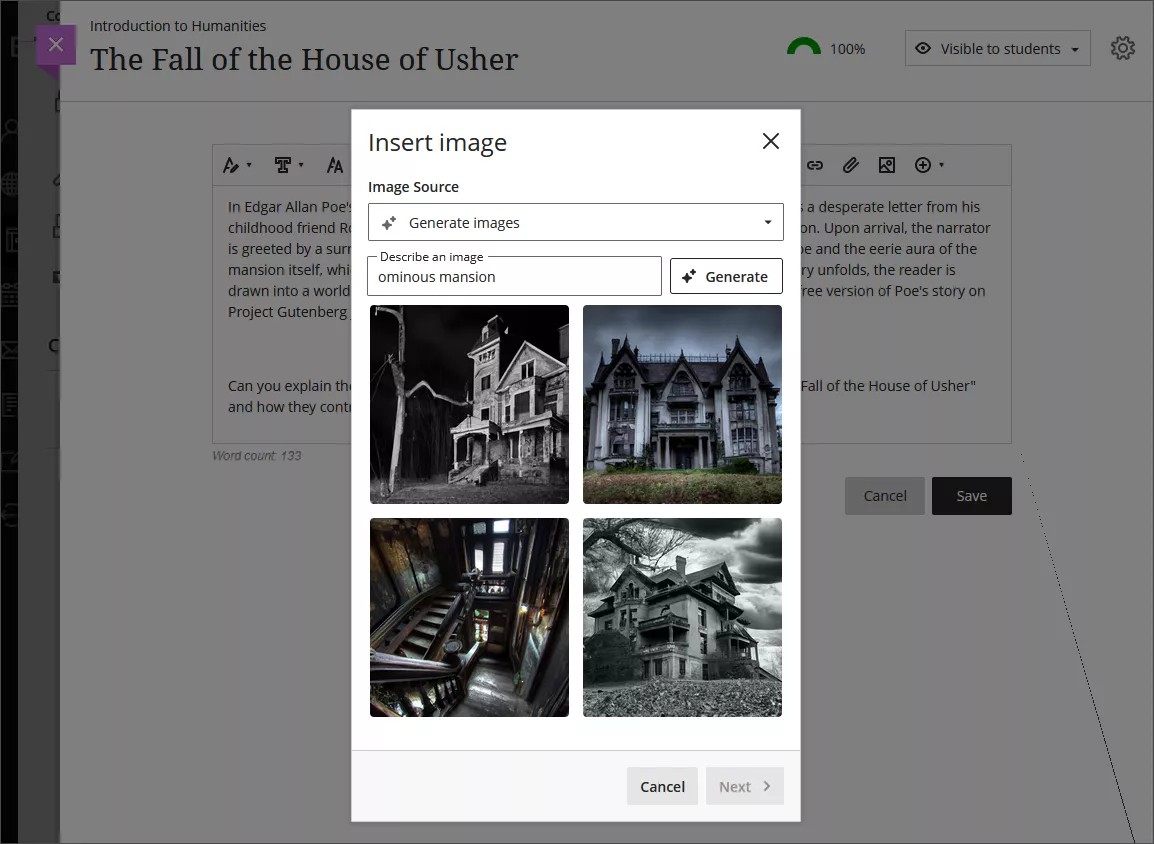
Students can only upload images and can’t generate images or use Unsplash.
Adjust image appearance
After you’ve chosen an image to insert, select Next. You can now customize how the image appears in the text.
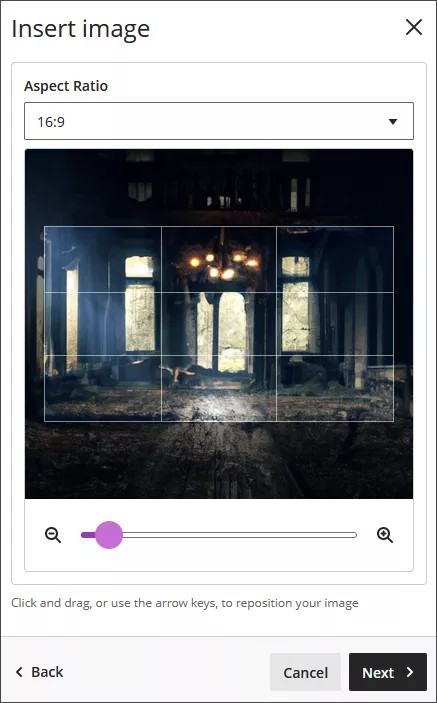
You can choose an aspect ratio for the image. You can keep the original aspect ratio, or convert it to a landscape or portrait display. The white grid lines show you what part of the original image will be displayed on screens.
You also have the option to adjust the slider to zoom in or out, and you can select and drag the grid lines to change the focus.
Select Next when you’re ready to insert the image.
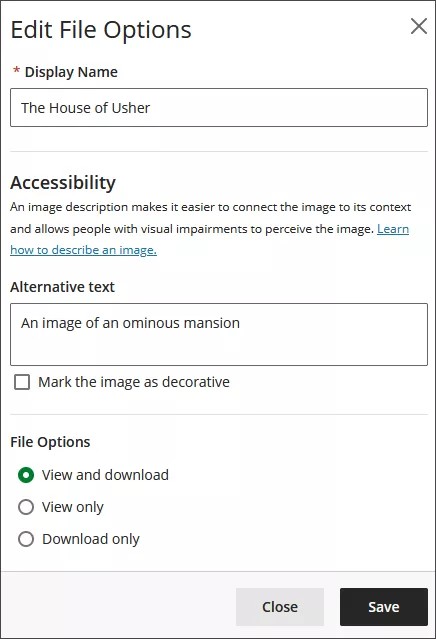
You’re required to enter a display name. We recommend also adding alt text, to make the image accessible to users with screen readers.
By default, users can view and download the image. If you select Download only for the image, a placeholder will display on user screens until users download the image.
