On this page, find information about managing Learning Tools Interoperability (LTI). Topics include:
- Managing tools by institutional hierarchy
- Multiple LTI Deployments
- LTI Role Mapping
- Automatic grades release for 3rd party tools using LTI Advantage
For introductory information and setting up a tool provider, visit our help page Learning Tools Interoperability (LTI).
To learn more about our integration partners, visit the Anthology App Catalog.
Managing tools by institutional hierarchy
If you’re familiar with the concept of institutional hierarchy for your institution, you can manage the availability of LTI tools by department or course.
- On the Administrator Panel, under Communities, select Institutional Hierarchy.
- On the left menu, select the institution’s node you want to configure.
- Select the Tools tab.
- Search for the tool you want to turn on or off for the institution’s node. You’ll see a list of internal tools, Building Block tools, and LTI tools that you can filter by type.
- In Availability, select ON or OFF.
- You can also apply changes to New Original courses and all Ultra courses or New and existing courses.
- Select Submit.
Multiple LTI Deployments
Multiple deployments are only available for LTI 1.3 tool providers
If you have registered an LTI tool provider version 1.3, you can create multiple deployments of this tool provider using Institutional Hierarchy. You can create unique deployment IDs for managing different access credentials. This allows institutions the ability to manage multiple credentials of the same third-party tool license and use them across different parts of your institution. Multiple deployments work for Deep Linking Content and Cloud Documents (such as Turnitin or OneDrive), and Asset Processors. You also have the ability to delete deployments, which allows you to remove tenants and integrations that are no longer active.
Multiple LTI Deployments are not available for institutions organized through Domains.
More on Institutional Hierarchy
Create multiple deployment IDs
If a node has been added to a course, the new LTI contents that instructors create in that course will take that node. In addition, some institutions merge courses (create parent and child courses). If a parent course has an LTI deployment ID associated with it, the child course inherits that deployment ID.
Deployment IDs are aligned with nodes in Learn’s Institutional Hierarchy. When planning multiple deployments, it is helpful to know how your Institutional Hierarchy is organized. You can view the hierarchy by going to Administrator Tools. In the Community module, select Institutional Hierarchy.
More on Institutional Hierarchy
To manage new or existing multiple LTI deployments:
1. See instructions for adding an LTI 1.3/Advantage Tool. This creates a Default Deployment ID. You can view it by selecting Edit in the dropdown menu next to the newly created tool listed on the LTI Tool Providers page. If you are using a previously registered tool, you can skip this step.
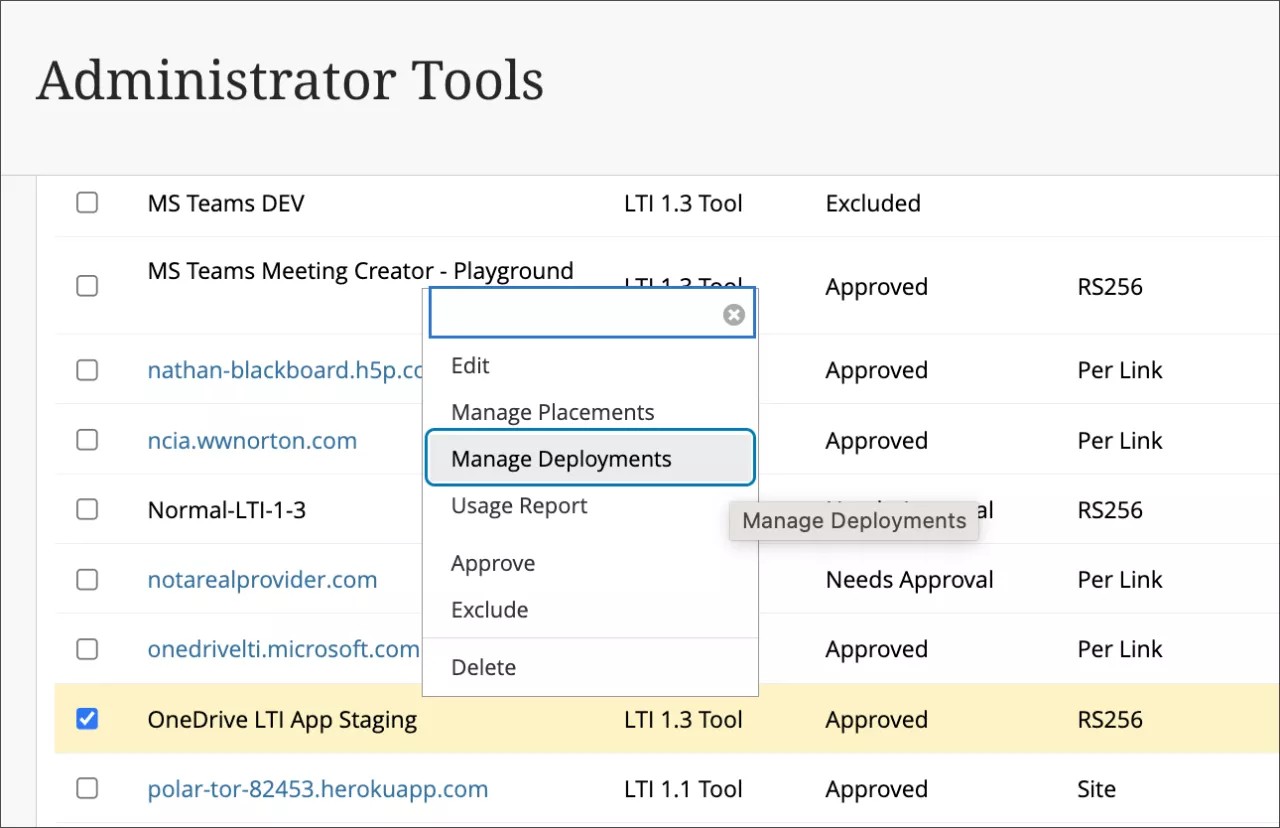
2. On the LTI Tool Providers page, select the dropdown menu next to the tool name and select Manage Deployments.
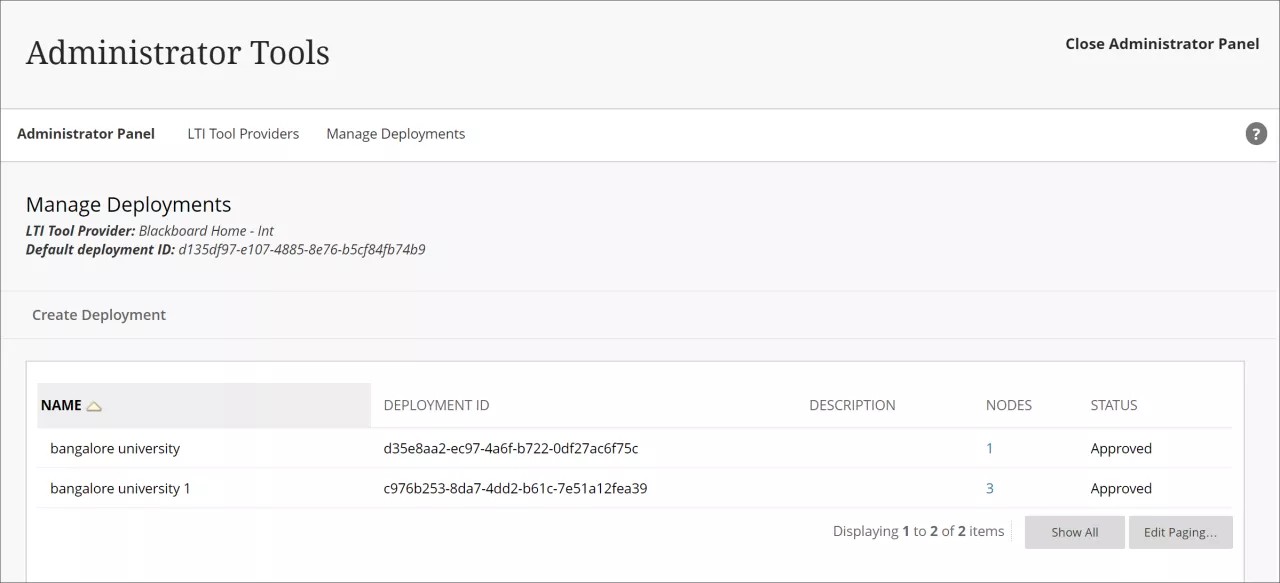
3. On the Manage Deployments page, you will see the LTI Tool Provider name and Default Deployment ID.
4. Select Create Deployment ID. All Deployment IDs that are created are associated with the selected LTI Tool Provider.
5. In Deployment ID Information, enter a deployment name in the Name field. This field is required. Create a name that best describes where the integration is used. “Downtown Campus,” “School of Arts and Sciences,” “Mechanical Engineering department,” are example use cases. The name should also align with the structure of your Institutional Hierarchy nodes.
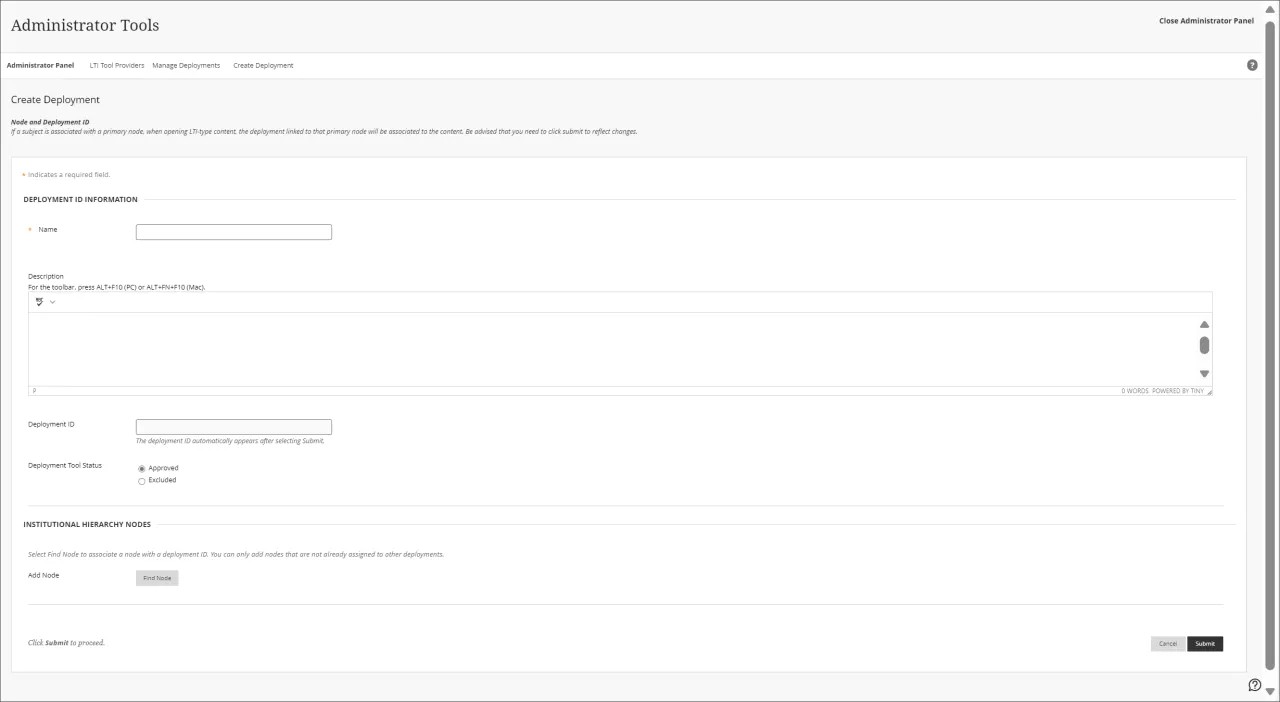
6. In Deployment Tool Status, the default for a new deployment is Approved, which means the deployment is active. You can set to Excluded at this point or after creation to deactivate the deployment without deleting it. However, if you select Excluded, any LTI content that is linked to this deployment is broken. An instructor is notified about broken content on the Course Content page.
7. While not required, we recommend that you enter the domain of this deployment in Description so that you can identify that that Deployment ID belongs to a specific integration or access credentials.
8. In the area Institutional Hierarchy Nodes, you can add an unlimited number of nodes. Use Find Node to add the node(s) you want the integration to be associated with. A node that is already assigned to a deployment ID is not available to be assigned again in another Deployment ID of the same LTI Tool Provider.
9. Select Submit.
10. The new Deployment ID appears on the Manage Deployments page with the associated node. To add more nodes or edit the Deployment ID, select Edit. When you add, edit, or delete the node, the changes are not saved until you select Submit.
If a node has been associated as a primary node to a course, the new LTI contents that instructors create in that course will use the associated LTI Deployment to that node.
For administrators: This feature is available for System Administrator and System Support. There are no configurations needed.
Delete a deployment
You have the ability to delete deployments. This capability allows you to remove tenants and integrations that are no longer active.
- In the Administrator Panel, select LTI Tool Providers in the Integrations module.
- Locate the tool you want to manage and select Manage Deployments in that tool's menu.
- Select the menu for the deployment you want to remove and select Delete.
LTI Role Mapping
You can set user roles for LTI tools that require launches outside of a course context.
- On the Administrator Panel, under Users, select Course/Organization Roles.
- Under the ROLE ID column, select the menu option that appears next to the role you want to configure.
- Select Edit.
- Scroll down to the ROLE CAPABILITIES section. In the LTI Spec Role dropdown menu, select one of the role mapping options.
Role mapping options
| Role Title | LTI 1.1 | LTI 1.3 |
|---|---|---|
| Teaching Assistant | TeachingAssistant | Instructor |
| Mentor | Mentor | Mentor |
| Member | Member | Member |
| Manager | Manager | Manager |
| Learning Facilitator | Mentor | Mentor |
| Learner | Learner | Learner |
| Instructor | Instructor | Instructor |
| Guest Learner | Learner | Learner |
| Grader | TeachingAssistant | Instructor |
| Content Developer | ContentDeveloper | ContentDeveloper |
| Administrator | Administrator | Administrator |
Some third-party integrated tools function better when users’ institution roles are more specific. This is especially true for tools accessed outside of courses. In the past, Learn did not send institution role information to LTI tools. Learn will now send to LTI tools users’ mapped primary institution role information. Secondary institution roles are not supported.
When administrators edit institution roles, they may select from a list LTI Institution Roles that their tools expect.
The mappings are supported for all deployment types. Mappings apply to both user experiences and course types. You can map the Learn default institution roles or any custom ones made by the institution. We support mapping for LTI 1.1 or 1.3/Advantage.
To prevent disruption for current users, the default role behavior remains unchanged. Administrators may edit each role configuration and choose the best LTI role for each. LTI institution role mapping applies to all LTI tools.
Automatic grades release for 3rd party tools using LTI Advantage
LTI Advantage / LTI v1.3 tools can define whether grades should auto-post to students.
- Ultra Course View: We default to auto-post grades for LTI Advantage tools. Instructors will not have to remember to post grades. One exception exists when a tool indicates that grades should not post to students.
- Original Course View: Grades auto-release when the tool sends scores. One exception exists when the Grade Center column is not visible.
LTI Advantage tools can also manage the release of grades. When appropriate, grades auto-post to students.
- Ultra Course View: If a tool sets that grades should not auto-post, scores sent to the Learn Gradebook only display to instructors. Instructors can choose to post grades for students, or the tool can auto-release grades later.
- Original Course View: If a tool sets that grades should not auto-post, scores sent to the Learn Grade Center appear behind a “Needs Grading” status indicator. Students and instructors see that students have submitted work but not the result. When the tool releases grades, all students will see their scores.
LTI Advantage has a new Line Item attribute - gradesReleased. You can specify it in a Deep Linking message or an Assignment and Grades service call. You only need to update your tool if you want to send scores to Learn but release them to students later.
The default value for gradesReleased is true, if you do not specify the attribute. When set to false, students will not see scores sent to the gradebook. When the attribute is true, students see current scores and future updates. If you use the gradesReleased=false attribute and want to maintain compatibility with Original Course View, you will need to manage the release of grades. Instructors do not have a post action in Original Course View to release grades. Instructors do have the post action in Ultra Course View.