You can create a new course in Blackboard Learn by defining just the course ID and the course name. However, courses have several other settings that control guest access, enrollment options, menu names, button styles, and other components. When you create a new course, Blackboard Learn uses default values for any settings that you do not define.
You can change the default course settings at any time. These changes apply to new courses created after the change. Existing courses do not update their settings when the default settings change.
Any changes made to course settings in an individual course override the default values for that course.
Set default availability, enrollment, duration, and linking to Course Files
- On the Administrator Panel in the Courses section, select Course Settings.
- On the Course Settings page, select Default Course Properties.
- On the Default Course Properties page, define the default settings. The following table describes the available fields. [r] indicates a required field.
| Field | Description |
|---|---|
| Default Settings | |
| Available by Default | Select Yes to make the course available. Select No to make the course unavailable. Users cannot see, access, or self-enroll in unavailable courses. |
| Allow Guests by Default | To allow unauthenticated users to enroll in the course, select Yes. Settings inside the course can limit what content and tools are available to guests. To prohibit unauthenticated users from enrolling in the course, select No. |
| Allow Observers by Default | To allow observers to follow users in the course, select Yes. To prohibit observers from following users in this course, select No. This value is set to No when Blackboard Learn is installed. |
| Default Enrollment Options | Select Instructor/System Administrator to require an instructor or administrator to handle all enrollments. Select the Allow Students to Email Enrollment Requests to the Instructor check box to enable students to email enrollment requests for approval. Clear the check box to disable email enrollment requests.
A link to email an instructor to request enrollment will appear next to the course entry in the course catalog. Self Enrollment: Select this option to allow users to enroll themselves in the course. An enroll function appears next to the course entry in the course catalog. To limit self-enrollment to a specific time period, select the Start Date and End Date check boxes and enter the dates and times between which users can enroll in the course. To limit enrollment to users with an access code, select the Require Access Code to Enroll check box. Provide the text to use for the access code. |
| Default Duration | Define the time period that the course will remain available. Available courses are open to students to see and access content or to self-enroll, if the course allows self-enrollment.
Select Continuous to keep the course constantly available, with no date restrictions. To limit the course availability to specific dates, select Select Dates and provide a Start Date and End Date. To limit the course availability to a specific number of days after a student enrolls, select Days from the Date of Enrollment and provide the number of days. |
Course files
Your institution has the control to set the default selection for the linking to course files. This setting only affects the course copy, export, and archive pages for institutions that have access to content management. Although a third option exists, only copy has the three options while export and archive have two. If you select either the second or third choice for the default, the second choice for export and archive is selected by default. To view examples of these selections listed, see Exporting, Archiving, and Restoring Courses and Copying Courses.
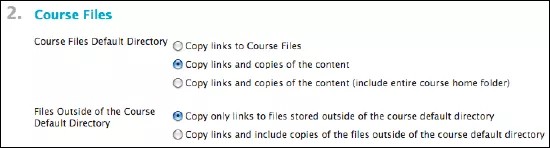
You have three options for the Course Files Default Directory.
- Copy links to Course Files: No copies of linked files are included in the copy. The copied course will have the same set of links and those links will point back to the original location of the link defined in the origin course.
- Copy links and copies of the content: This will make copies of linked files, but ONLY those files that are linked. Files within the course's home folder that are not linked to any content within the course are not included in the copy.
- Copy links and copies of the content (include the entire course home folder): This will make copies of ALL files in the course's home folder whether those files are linked to course content or not.
The new option is added to the course copy function for course files. Previously when users chose to include copies of course files, the entire course files directory was included in the package. With this new option, users can choose to take the entire folder of files or only those files that are actually linked to course content.
| Copy Links Choice | Copy Default | Export Default | Archive Default |
|---|---|---|---|
| Copy links to Course Files | Copy links to Course Files | Copy only links to course default directory files | Copy only links to course default directory files |
| Copy links and copies of the content | Copy links and copies of the content | Copy links and include copies of the files in course default directory | Copy links and include copies of the files in course default directory |
| Copy links and copies of the content (include entire course home folder) | Copy links and copies of the content (include entire course home folder) | Copy links and include copies of the files in course default directory | Copy links and include copies of the files in course default directory |
Set default course menus
The default course menu defines the course areas to include in a new course by default.
All tools and content areas included in the default course menu must have unique names. For example, you can create two links to the blogs tool, but each link must have its own menu name. This only applies to the default course menu. It does not apply to course menus for individual courses.
- On the Administrator Panel in the Courses section, select Course Settings.
- On the Course Settings page, select Course Menu and Structures.
- On the Course Menu and Structures page, use the menu creation tool to define menu items, names, and order.
- Select the Add function ( + ) to add content areas, pages, links, and dividers. You can make an item available to enrolled users by selecting the Available to Users check box. Make the item unavailable by clearing the check box.
- Open the menu item's menu and rename, hide, or delete the item. For some content types, you can also deny guest or observer access. If access is already denied, you can use the menu to allow access.
- Select and drag the item's sort button to move the item up or down in the list.
Set default course tools
You can set which course tools are included in new courses by default. You can also set whether tools are available to guests and observers.
- On the Administrator Panel in the Courses section, select Course Settings.
- On the Course Settings page, select Course Tools.
- Optionally, point to Filter by to access the drop-down list and select one of the following filters to view a subset of tools:
- All Tools: Displays tools provided by Blackboard Learn and tools that have been integrated through building blocks.
- Available Tools: Displays only the tools that are set to Default On in the Availability Default column.
- Guest Tools: Displays tools that you can make available to guests.
- Observer Tools: Displays tool that you can make available to observers.
- To make a tool available by default, select the check box. To make the tool unavailable by default, clear the check box.
If you make announcements unavailable, any announcements that instructors have previously created remain visible in their courses. However, instructors will not be able to delete these announcements, because the tool will no longer be available. - To allow guest access to tools, select the Allow Guest check box.
- To allow observer access to tools, select the Allow Observer check box.
Tools that have a circle with a diagonal line icon instead of a check box cannot be made available to guests or observers. - Select Submit.
Set default images
You can set three default images to appear in standard locations in courses. Images are not required for courses to display properly. If you do not set default images and no images are included when a course is created, the course ignores the images areas and displays only the course areas.
Images must be GIF, JPG/JPEG, or PNG files.
- On the Administrator Panel in the Courses section, select Course Settings.
- On the Course Settings page, select Course Images. For each image, perform the following steps.
- In the Banner URL box, provide the link that the image points to. Users who select the image will be taken to this URL. Provide the entire URL, including http protocol. For example: http://www.blackboard.com, not www.blackboard.com or blackboard.com
- In the Name of Link box, provide a text description of the link. This description appears when users place their mouse pointers over the image.
- Select Browse My Computer to upload the image.
- Select Submit.
Set the default icon theme
Icon themes are sets of icons that identify folders, documents, and other items within Blackboard Learn. Icons make it easy for users to navigate through Blackboard Learn and to identify important information quickly.
- On the Administrator Panel in the Courses section, select Course Settings.
- On the Course Settings page, select Icon Themes.
- Select the Icon Theme. To view the icons included in the theme, select the plus sign (+).
- Select Submit.
Add default content areas
Content areas are containers in a course that users can access from the course menu. Adding a default content area creates a blank content area and a corresponding item in the course menu. It does not include content or course materials.
- On the Administrator Panel in the Courses section, select Course Settings.
- On the Course Settings page, select Course Menu and Structures.
- On the Course Menu and Structures page, point to the Add function ( + ) and select Create Content Area.
- Type a Name.
- To make the new area available to users when a course is created, select the Available to Users check box.
- Select Submit.
Add default tool links
Tool links allow access to a tool directly through the course menu.
- On the Administrator Panel in the Courses section, select Course Settings.
- On the Course Settings page, select Course Menu and Structures.
- On the Course Menu and Structures page, point to the Add function ( + ) and select Create Tool Link.
- Type a Name.
- In the Type drop-down list, select the type of tool to link to.
- To make the new link available to users when a course is created, select the Available to Users check box.
- Select Submit.
Use the Course Tools page to set defaults for guest or observer access to course tools. To learn more, see the How to Set Default Course Tools section above.
Add default web links
Web links point to destinations outside of Blackboard Learn.
- On the Administrator Panel in the Courses section, select Course Settings.
- On the Course Settings page, select Course Menu and Structures.
- On the Course Menu and Structures page, point to the Add function ( + ) and select Create Web Link.
- Type a Name.
- Type the URL. Provide the entire URL, including http protocol. For example: http://www.blackboard.com, not www.blackboard.com or blackboard.com
- To make the new link available to users when a course is created, select the Available to Users check box.
- Select Submit.
Guests and observers have access to any web link displayed on the course menu.
Set the default course size limits
- In the Administrator Panel in the Courses section, select Course Settings.
- On the Course Settings page, select Default Course Size Limits.
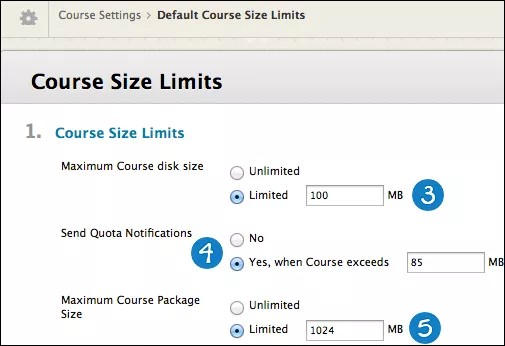
- On the Course Size Limits page, select the Maximum Course disk size.
- Unlimited
- Limited: Type a number in the MB in box
- If the course disk size is limited, choose whether to Send Quota Notifications to the course instructors. If notifications are sent, set the size the course exceeds in MB to trigger the notification.
- Select the Maximum Course Package Size.
- Unlimited
- Limited: Type a number in the MB in box
- Select Submit.
More on setting individual course quotas
Set default notifications
Blackboard Learn can deliver notifications by web, email, mobile devices.
You can set default delivery methods in bulk for all notification types or set the delivery method individually for each notification type. For example, you can prohibit mobile device delivery for all notification types. Alternatively, you can limit mobile delivery to certain types of notifications, such as Retention Center rule details and Assignment Past Due.
You can also define whether users can change their personal notification delivery preferences for all or some types of notifications.
- On the Administrator Panel in the Courses section, select Course Settings.
- On the Course Settings page, select Default Notification Settings.
- In the Bulk Notification Settings drop-down lists, select default preferences for Dashboard, Email, and Mobile delivery. This setting applies to all notification types.
- Default On and Default Off: Choose one of these options to set the default delivery method to On or Off. Users can set their own distribution preferences.
- Always On and Always Off: Choose one of these options to set the default delivery method to On or Off for all users. Users cannot set their own distribution preferences. This condition affects the distribution preference globally and replaces any user-defined preference. For example, if the distribution method was set to Default On, some users might have changed their individual preferences to Off. When you change the default notification setting from Default On to Always On, the distribution method changes to On for all users.
- Use Individual Settings: Select this option to set delivery methods individually for each notification type.
- In the Settings section, use the Dashboard, Email, and Mobile drop-down lists to select default preferences for each notification type. The bulk setting for the delivery method automatically changes to Use Individual Settings.
- Optionally, disable a notification type by clearing the check box in the On/Off column.
- Select Submit.
Set default Grade Center history availability
This option was removed in Blackboard Learn 9.1 Q2 2016 and is not available in later versions.
- On the Administrator Panel in the Courses section, select Course Settings.
- On the Course Settings page, select Grade Security Settings.
- On the Grade Security Settings page for Enable Grade History, select Yes to use grade history throughout Blackboard Learn (Recommended). Select No to remove grade history throughout Blackboard Learn. If you select No, you can skip the other rows and select Submit.
- For Permit Instructors to Turn Grade History On and Off, select Yes to allow instructors to set grade history preferences for each individual course. Select No to use the global Enable Grade History setting for all courses (Recommended).
- For Permit Instructors to Clear Grade History, select Yes to allow instructors to clear data from a course's grade history without removing the grade history feature. Select No to prohibit instructors from clearing grade history data (Recommended).
For example, when your institution requires anonymous grading validation for high-stake assignments, be sure to select the No option so that the grade history stating that an assignment was indeed graded anonymously is retained. - Select Submit.
Set default grading schema display and calculations
Grading schemas convert raw numeric scores, such as 88 points out of 100, to specific grade displays, such as B+ or Pass. When students view their grades, they see the grade display that corresponds to their numeric score.
Grading schemas allow Blackboard Learn to support many different grading conventions, including the following:
- Traditional letter grades, such as A, B, C, D, and F
- Binary results, such as Pass/Fail or Progress/No Progress
- Text, such as Excellent, Satisfactory, Poor
You can create any number of grading schemas for instructors to use in courses. Instructors can select a schema to use as a default and then modify the display values and calculations for an individual course.
- On the Administrator Panel in the Courses section, select Course Settings.
- On the Course Settings page, select Default Grading Schemas.
- On the Default Grading Schemas page in the Schema Information section, type a name for this schema. Instructors can change this name in a course. Any changes instructors make to the grade schema settings in a course apply only to that course. Instructors can also create new schemas for a course based on the default schema.
- In the Schema Mapping section, provide score ranges as percentages in the Grades Scored Between column and the display values for the corresponding grade in the Will Equal column. For example, type 90 into the Grades Scored Between box, then type A in the Will Equal box. When students score between 90% and 100%, their grade displays as an A.
The top score in the range updates automatically when you provide a bottom score value. For example, when you type 90 in a Grades Scored Between box, the next row down adjusts the And Less Than value to 90.
The Grades Manually Entered As column updates automatically when you provide a Will Equal value.
You can add or delete rows to accommodate any number of grade ranges. To add a row, select the arrow button in the Insert Rows column. To delete a row, select the Delete Row link. - In the Will Calculate As column, provide the percentage to use in grade-related calculations when instructors manually enter grades. For example, if a score range of 87% to 90% displays a B+, and a manually entered B+ corresponds to 88.5%, Blackboard Learn uses 88.5% to calculate grade averages even if the student's raw score is 87%.
- Select Submit.
More on how Blackboard Learn calculates and displays decimals in grades