Administrators must set up templates for emails sent to learners during the account creation, enrollment, and payment processes.
- Sign in to TDM.
- Select Administration at the top right corner of the screen.
- Select Settings.
- Select the Notifications tab.
Account Creation Notifications
- Select Account Creation Notifications.
- Choose the appropriate language for the emails.
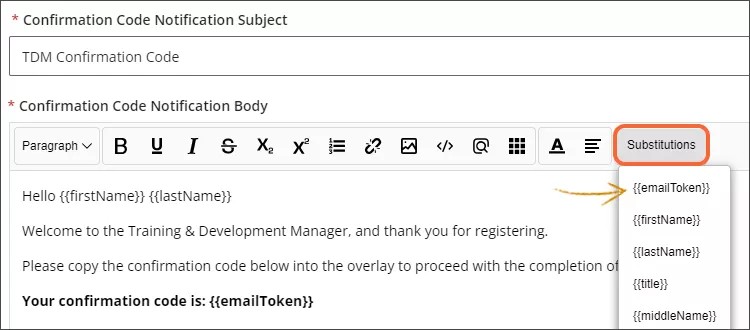
- Fill out the Confirmation Code Notification subject and body fields. This email is sent to learners to deliver a verification token during the account creation process. Enter the text you want to send to the learner.
- Select the Substitutions button to enter the desired replace strings—be sure to include the {{emailToken}} replace string so that a confirmation code is delivered.
- Fill out the "Welcome Email" subject and body fields. This email is sent to learners after they have successfully created an account. Enter the text you want to send to the learner.
- Select the Substitutions button to enter the desired replace strings.
- Select Create.
- To create the emails in a second language, choose a second language from the language menu at the top of the screen.
- Fill out the emails in the second language.
- Select Create.
- Select the OK button.
Profile Notifications
- Choose Profile Notifications.
- Choose the appropriate language for the email.
- Fill out the subject and body of the Profile Updated email. This email is sent to learners when they successfully update their profile. Enter the text you want to send to the learner in the body of the email.
- Select the Substitutions button to enter the desired replace strings.
- Select Create.
- To create the email in a second language, choose a second language from the language menu at the top of the screen.
- Fill out the emails in the second language.
- Select Create.
- Select the OK button.
Enrollment Notifications
- Choose Enrollment Notifications.
- Choose the appropriate language for the email.
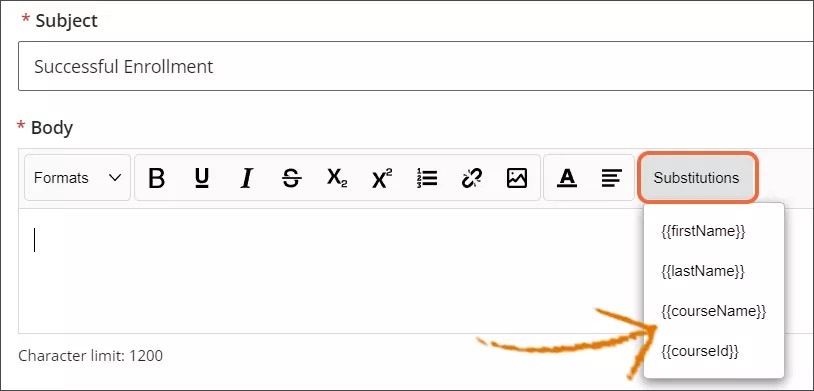
- Fill out the Enrollment Successful Email Subject and Body. email. This email is sent to learners when they successfully enroll in a course. Enter the text you want to send to the learner in the body of the email.
- Select the Substitutions button to enter the desired replace strings—be sure to include the {{CourseName}} and {{CourseId}} strings so the correct course information is included.
- Fill out the Learner Unenrollment Successful Email Subject and Body. This email is sent to learners when they have successfully unenrolled from a course. Enter the text you want to send to the recipients in the body of the email. Select the Substitutions button to enter the desired replace strings—be sure to include the {{CourseName}} and {{CourseId}} strings so the correct course information is included.
- Fill out the Manager Unenrollment Successful Email Subject and Body. When a learner successfully unenrolls from an offering, this email is sent to the email addresses entered when the offering was created. Enter the text you want to send to the recipients in the body of the email. Select the Substitutions button to enter the desired replace strings—be sure to include the {{CourseName}} and {{CourseId}} strings so the correct course information is included.
- Select Create.
- To create the emails in a second language, choose a second language from the language menu at the top of the screen.
- Fill out the emails in the second language.
- Select Create.
- Select the OK button.
Learner Payment Notifications
- Select Learner Payment Notifications. These emails will be sent to the learner based on whether payment for a premium course was successful or unsuccessful.
- Choose the appropriate language for the emails.
- Fill out the subject and body for the Success Notification email. This email will be sent to the learner when the learner’s payment is processed successfully. Enter the text you want to send to the learner in the body of the email.
- Select the Substitutions button to enter the desired replace strings—be sure to include all the required information.
- Fill out the subject and body for the Unsuccessful Notification email in the same way. This email will be sent to the learner when the learner’s payment is not processed successfully. Enter the text you want to send to the learner in the body of the email.
- Select the Substitutions button to enter the desired replace strings—be sure to include all the required information.
- Select Create.
- To create the emails in a second language, choose a second language from the language menu at the top of the screen.
- Fill out the emails in the second language.
- Select Create.
- Select the OK button.
Merchant Payment Notifications
- Select Merchant Payment Notifications. These emails will be sent to the merchant based on whether payment for a premium course was successful or unsuccessful.
- Choose the appropriate language for the emails.
- Fill out the subject and body for the Success Notification email. This email will be sent to the merchant when the learner’s payment is processed successfully. Enter the text you want to send to the merchant in the body of the email.
- Select the Substitutions button to enter the desired replace strings—be sure to include all the required information.
- Fill out the subject and body for the Unsuccessful Notification email in the same way. This email will be sent to the merchant when the learner’s payment is not processed successfully. Enter the text you want to send to the merchant in the body of the email.
- Select the Substitutions button to enter the desired replace strings—be sure to include all the required information.
- Select Create.
- To create the emails in a second language, choose a second language from the language menu at the top of the screen.
- Fill out the emails in the second language.
- Select Create.
- Select the OK button.
Managed Enrollment Notifications
- Select Managed Enrollment Notifications.
- Choose the Language for these emails.
- Fill out the subject and body for the Learner Managed Enrollment Successful email. This email will be sent to learners once they have successfully enrolled in a managed enrollment course before they are approved.
- Select the Substitutions button to enter the desired replace strings—be sure to include the course name and course ID in the email.
- Fill out the subject and body for the Manager Approval Notification email. When a learner self-enrolls in a managed enrollment course, this email will be sent to the email addresses specified when the offering was created.
- Select the Substitutions button to enter the desired replace strings—be sure to include the username, course name, and course ID in the email.
- Select Create.
- To create the emails in a second language, choose a second language from the language menu at the top of the screen.
- Fill out the emails in the second language.
- Select Create.
- Select the OK button.