Flexible grading is an optimized grading experience that provides instructors with the flexibility to grade in their preferred style. With flexible grading, you can:
- Easily review the status of your grading tasks and prioritize your time where it is needed most.
- Grade tests either by student or by question —making it easy to compare answers across the class and ensure fairness and consistency in grading.
- Provide inline, multimedia feedback direct to students.
- Easily access grading rubrics, anti-plagiarism checkers, and more as you work through your grading tasks.
Where do I start grading?
You can start grading from four areas:
Grades page. The Grades page provides immediate access to all your courses' grading tasks. From the navigation bar, select Grades. On the Grades page, grading tasks are organized by course, so you can quickly scan your progress, set priorities across the board, and even begin grading. No need to navigate to each course to see what's ready for grading.
The page only displays information if you need to take action. You see tests that are ready to grade or overdue for students.
- Activity stream. You're alerted when student submissions are ready for grading. Select the link to go directly to the Submissions page for the test. The Submissions page is filtered is filtered to only show students who need grading.
- Submissions tab of a test. When you access a test, the Submissions tab displays all students enrolled in your course. You can search for a student by name or student ID or use the Grading Status filter to display only those submissions that need grading.
- Gradebook. From a course, select the Gradebook tab on the navigation bar. You can choose a gradebook view:
Grades view
From the Gradebook, select Grades. You can view your roster of students who submitted new work. When a student has a new item to grade, select New Submission, View to access the grading page for the submission.
Gradable items view
From the Gradebook, select Gradable Items. You can sort tests in this view by Grading Status. Graded work is labelled All Graded or Complete. Select the name of the test or X to grade to access the Submissions page. The Submissions page will have the Needs Grading filter applied. Select a student name to start grading a submission.
Students view
From the Gradebook, select Students. You can view all students in the course. To grade tests for a student, select their name.
Grade a test submission
With Learn Ultra’s Flexible Grading interface, you can choose to grade assessments by student or by question. This gives you the ability to adapt your grading process.
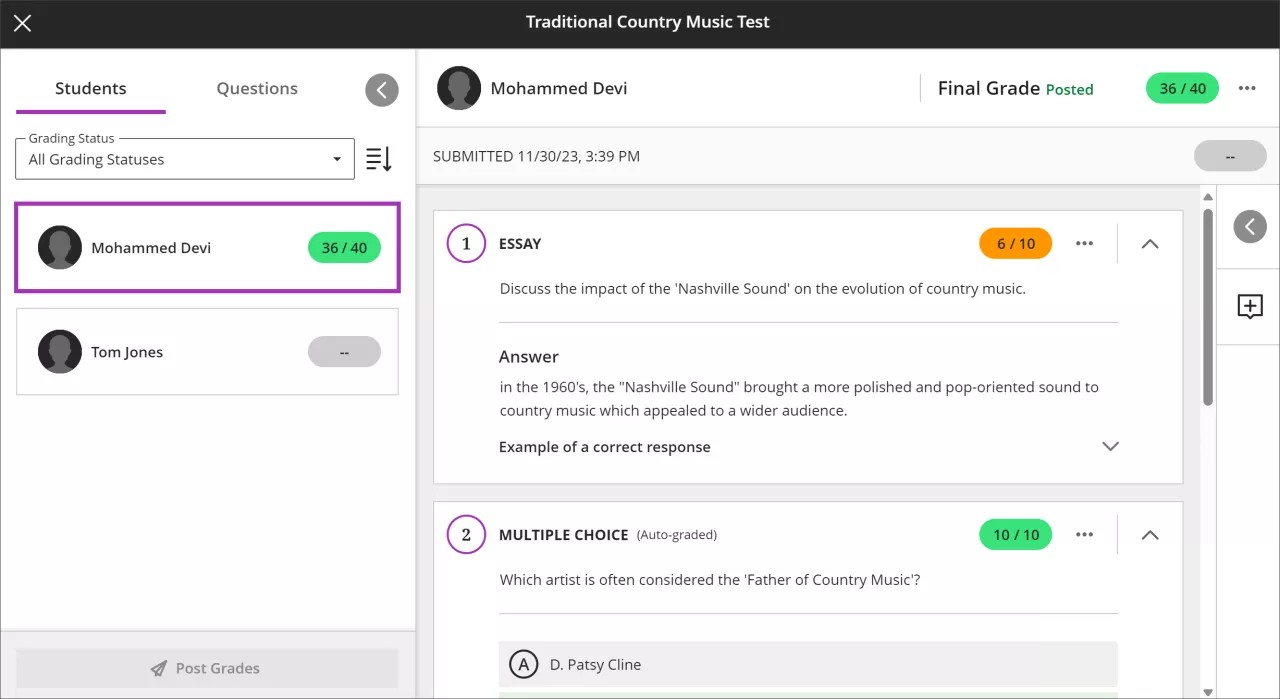
Grade by student
Select a test to grade to access the Submissions page. Then select a student to open the grading page.
When grading from a tablet, only one of the side panels will be open at any time. Accessing one panel will collapse the other.
You can collapse or expand the left and right panels; the application remembers these preferences for your next session. Submission information From this page, you have several options:
Students panel
Expand the Students panel to view the list of students who submitted a test. Collapse the panel to view more of the submission.
- Use the Grading Status filter to display all students or select the Needs Grading filter to focus on remaining grading work.
- If a student has accommodations, a purple pill appears next to their name.
- If a student has late submissions or the due date passed with no attempt submitted, a red circle appears around their profile picture.
- When ready, you can select Post Grades to post grades for all graded students.
Grade information
- If the assessment is configured to allow multiple submission attempts, you can select which attempt to grade.
- After grading, you can view grades for each attempt and the final grade for the submission.
- Use the menu next to the final grade to post the student's final grade or delete their attempt.
Submission information
When you select a student's name, their submission loads for grading.
- View the submission time stamp.
- Show or hide the assessment content displayed to a student when they attempt a submission.
- Show or hide the question.
- View the question's score, if graded automatically, or enter a score.
- Use the menu to edit the grade or regrade the submission.
Feedback
Feedback by question — Select the Feedback button for a question to enter feedback specific to the student's response.
Feedback panel — Expand or collapse the feedback and rubrics side panel to add overall feedback for the attempt or grade with a rubric (if one is available).
- When you post grades, students can view feedback you provided for each question or attempt, including ungraded attempts.
You can embed an audio or video recording of your feedback. Students watch or listen to your feedback alongside any text you include.
Embedding media isn't supported on all browsers. For the best experience, use Chrome or Firefox.
Grade by question
Select a test to grade to access the Submissions page. Then select the Questions tab on the left to grade the submissions by question. The center panel displays all the student responses for an individual question. This is especially useful when grading essay questions.
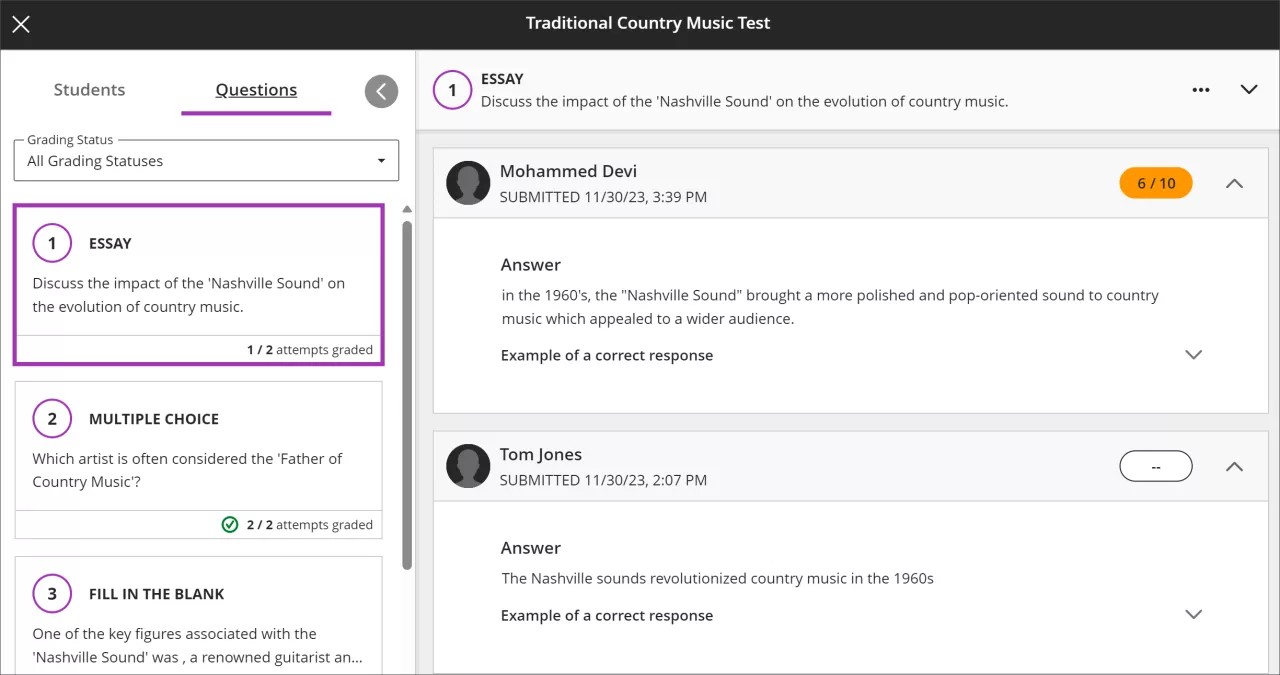
Questions panel
Expand the Questions panel to view the questions in the test. Collapse the panel to view more of the submission.
- Use the Grading Status filter to display all questions or select Needs Grading to focus on only those questions that need manual grading, such as essay questions.
- When you select a question, the response submitted by each student appears on the right.
Grade information
- If the assessment is configured to allow multiple submission attempts, you can select which attempt to grade.
- After grading, you can view grades for each attempt and the final grade for the submission.
- Use the menu next to the final grade to post the student's final grade, override their final grade, or delete their attempt.
Submission information
- View the submission time stamp.
- Show or hide the assessment content displayed to a student when they attempt a submission.
- Show or hide the question or the student's response.
- Show or hide the model answer, if available.
- View the question's score, if graded automatically or enter a score.
- Use the menu to edit the grade or regrade the submission.
Feedback
Feedback by question — Select the Feedback button for a question to enter feedback specific to the student's response.
- After you post grades, students can view feedback you provided for each question, including ungraded attempts.
You can embed an audio or video recording of your feedback. Students watch or listen to your feedback alongside any text you include.
Embedding media isn't supported on all browsers. For the best experience, use Chrome or Firefox.
Grade a test with multiple attempts
When you create a test, you can choose to let students submit more than one attempt. Multiple attempts change how the test's final grade is automatically calculated. Choose how you want to calculate the final grade:
- Average of all attempts
- First attempt with a grade
- Attempt with highest grade
- Last attempt with a grade
- Attempt with lowest grade
If the student has made multiple submission attempts, you can select which attempt you want to grade. In the attempt dropdown menu, you can view the attempt number, the submission time stamp, and the grade for each submission made.
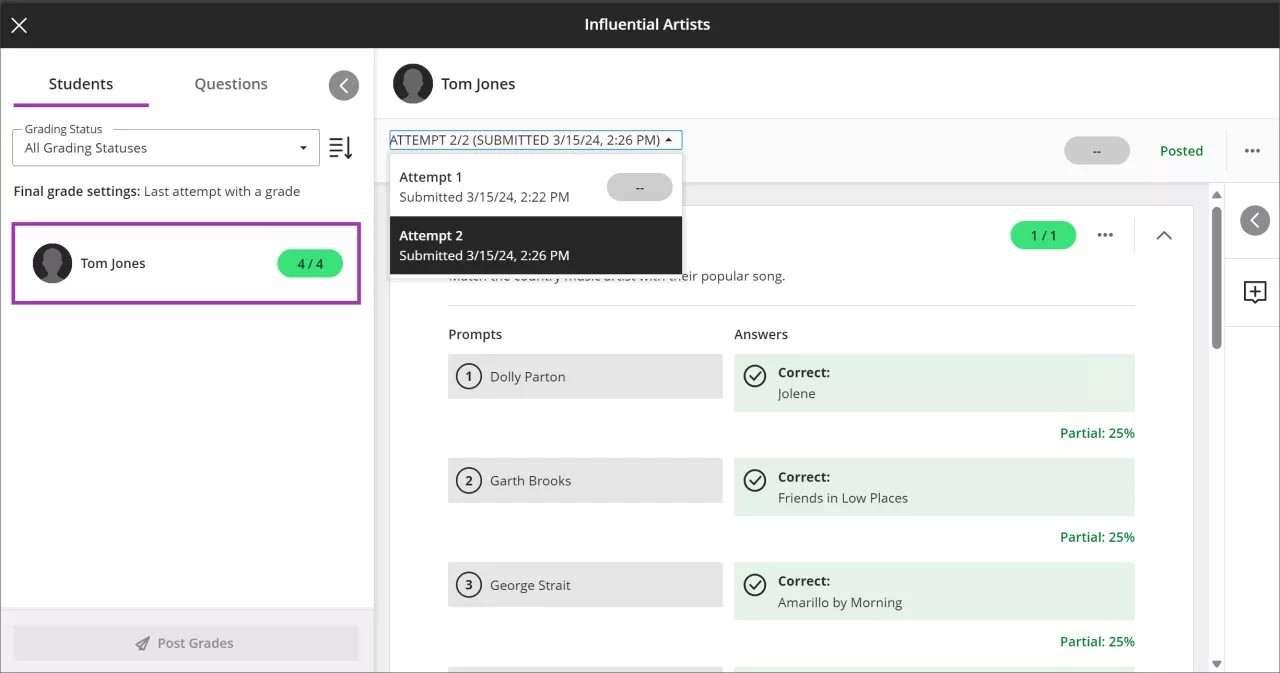
The Grade attempts setting determines how the final grade is automatically calculated, but you have the option to override the final grade. Each attempt is subject to the due date you set for the test. If a student submits an attempt after the due date, the attempt is marked late. Attempts submitted before the deadline are shown as on time.
You can only override the final grade, not the grades for each attempt. If you assign an override grade without grading the student's first attempt, the attempt displays a Needs Grading status. An override label appears next to the grade.
Learn more about the ramifications of overriding grades
When you post grades, students can view them and any feedback you provided. All feedback for all attempts, even ungraded attempts, shows to students. If you used a rubric or questions that are scored automatically, the grade may already exist for the attempt.
Final grades
The final grade for a multiple attempt test is calculated based on the Grade Attempts setting you chose in the Assignment Settings. In the panel that lists a student's attempts, the final grade appears when those attempts are graded. For example, if the final grade is calculated based on the highest graded attempt, the final grade appears immediately after at least one attempt is graded. However, the grade may change as you continue grading more attempts. After you finish grading the attempts, you can post the final grade for the student to see.
What do students see?
Tests with multiple attempts list the number of attempts allowed, as well as how the final grade is calculated. Students view this information on the Details & Information page before they begin. When grades are posted, students can view grades for each of their attempts, as well as the final grade. If you decide to override the final grade, a message appears to let the student know.