Set up Ally
We do the set up for you. If you don't have Ally installed, contact your Blackboard representative or submit a request on Behind the Blackboard.
To grant access to the Institutional Report, you can request your Blackboard representative to add specific roles.
Access Ally Configuration
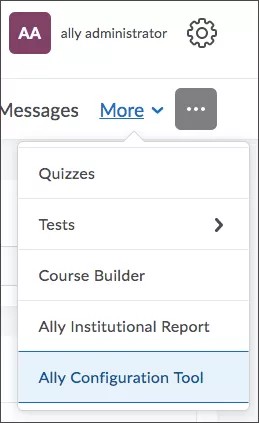
Administrators can access Ally Configuration from the Homepage. Select More and select Ally Configuration Tool.
Ally Configure Courses
Configure courses
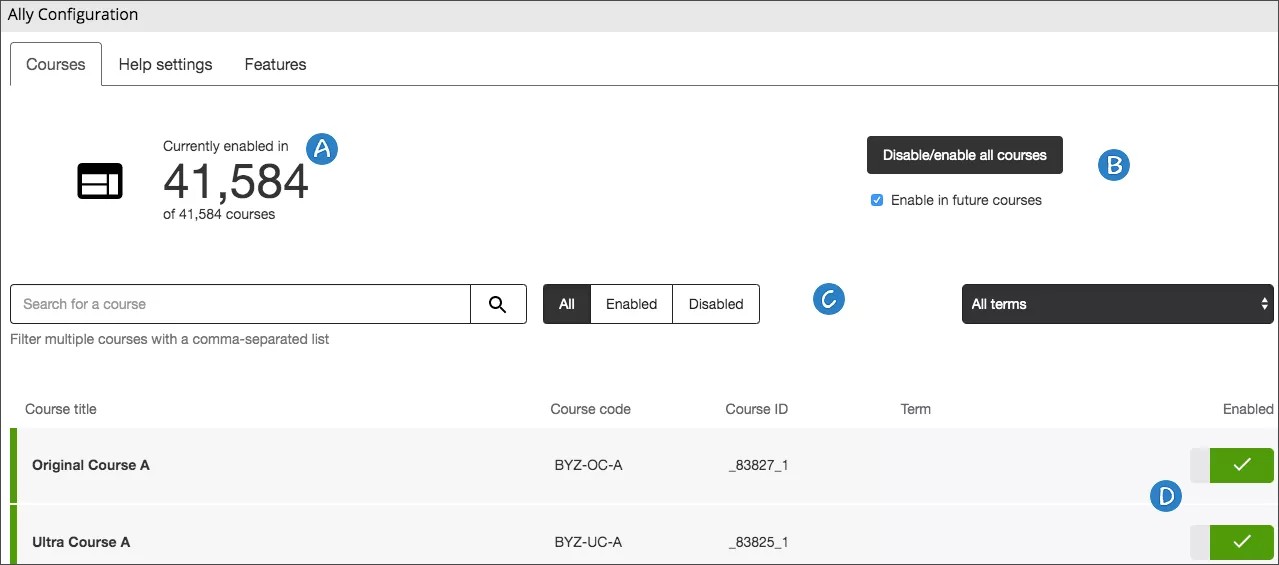
Go to your Ally Configuration page and turn Ally on for all courses or decide course-by-course. It's up to you.
- View how many of your courses use Ally.
- Turn Ally on or off for all existing courses. Decide ahead of time if you want it enabled for all future courses as well.
- Search for individual courses or filter all course by enabled, disabled, and term.
- Turn Ally on or off for individual courses.
Turn Ally on or off for a single course
When Ally is on, instructors and students benefit from the accessibility scores, instructor feedback and alternative formats that Ally provides.
The Institutional report is available for all courses. It doesn't matter if Ally is on or off in a course. The course appears in the Institutional report.
From Ally Configuration, find the course you want to update. Use the Search field and filters to search by course title, course ID and course code.
Select Enable or Disable under the Enabled column to turn Ally on or off.
- Ally is off: Select Enable course UI integration to turn on

- Ally is on: Select Disable course UI integration to turn off

Turn Ally on or off for all courses
Not sure if all courses are using Ally or not? At the top of the Ally Configuration page, see how many of your courses are currently using Ally.
When Ally is on, instructors and students benefit from the accessibility scores, instructor feedback and alternative formats that Ally provides.
The Institutional report is available for all courses. It doesn't matter if Ally is on or off in a course. The course appears in the Institutional report.
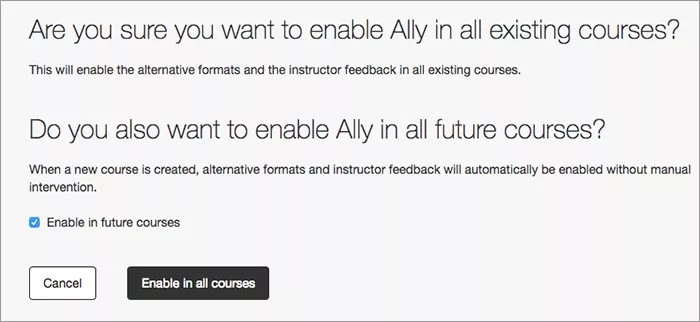
You can turn Ally on or off in every existing course from the Ally Configuration page. Select Disable/enable all courses and select Disable or Enable.
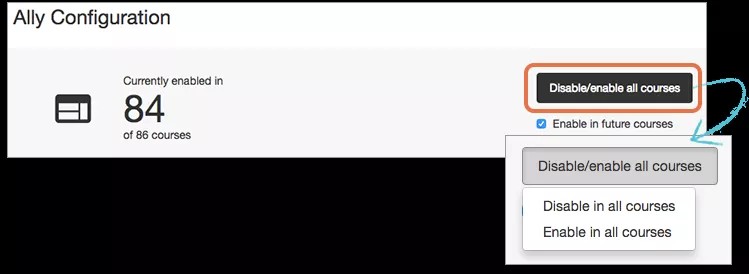
Select Enable in future courses if you want Ally automatically on in all new courses.
If you don't select this, new courses will not have Ally enabled. If you want Ally on at a later date, turn Ally on for single courses.
After you choose to disable or enable in all courses, you need to confirm your choice. Select Enable or Disable, depending on your choice. Select Cancel if you changed your mind and don't want to change anything.
Turn Ally on for all new courses only
When Ally is on, instructors and students benefit from the accessibility scores, instructor feedback and alternative formats that Ally provides.
The Institutional report is available for all courses. It doesn't matter if Ally is on or off in a course. The course appears in the Institutional report.
Select Enable in future courses if you want Ally automatically on in all new courses.
If you don't select this, new courses will not have Ally enabled. If you want Ally on at a later date, turn Ally on for single courses.
Ally Configure Help Settings
Configure Ally user help settings
Configure custom help messages that display in the Alternative formats and Instructor feedback modals. The custom help messages can be used to point students and instructors to existing institutional documentation, share contact information, and so on. When no custom message has been configured, the Help links point to these pages in Blackboard help:
- Alternative formats: This page explains how and when the different alternative formats can be used
- Instructor help: Everything instructors need to know about Ally in their courses
The custom help content can be configured in the Ally Configuration UI, and uses the Markdown format to help provide a structured and accessible message.
- Go to Ally Configuration and select Help settings.
- Choose the default or custom help option for both the Instructor feedback help and Alternative formats help.
- If you choose the custom option, edit the Custom message.
Use the Markdown format to help provide a structured (and accessible) message.
- Select Save changes.

Configure expert help
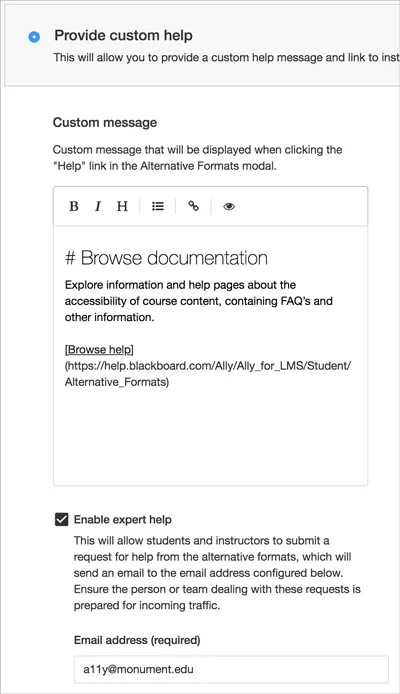
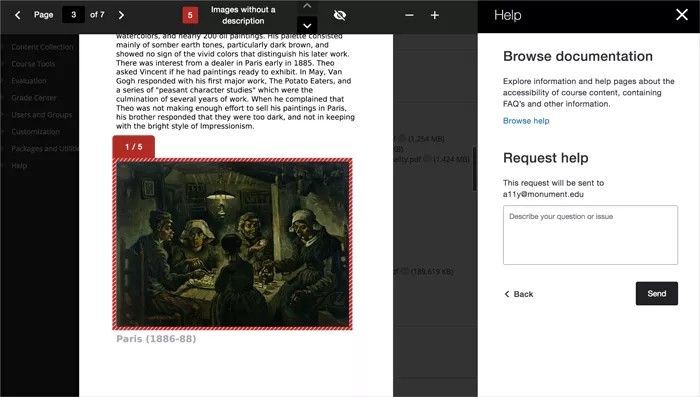
Give your instructors and students easy access to your team of accessibility experts. Enable expert help to add a way for your users to request more help directly from in the alternative formats and instructor feedback panels.
When a request is made, an email containing the help request and details about the current course, content item and user is sent to the email address you configure.
- Go to Ally Configuration and select Help settings.
- Choose Provide custom help for both the Instructor feedback help and Alternative formats help.
- Select Enable expert help.
- Type the email address for your team of accessibility experts.
- Select Save changes.
The Ally API user for the Blackboard Learn integration needs to be given the "Administrator Panel (Users) > Users" or "system.user.view" permission to allow Ally to include the student name and email address in the help request email. The Ally API user for the Moodle integration needs to be given the “moodle/user:viewalldetails” permission to allow Ally to include the student name and email address in the help request email.
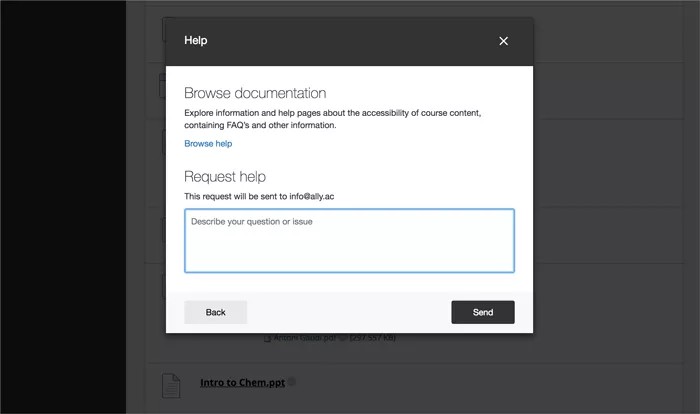
Request alternative formats help
Request instructor feedback help
Customize Ally Features
Customize Ally feature flags
You can turn some features on or off to customize Ally to suit your institutional preferences.
In Ally Configuration, decide what features you want to be enabled.
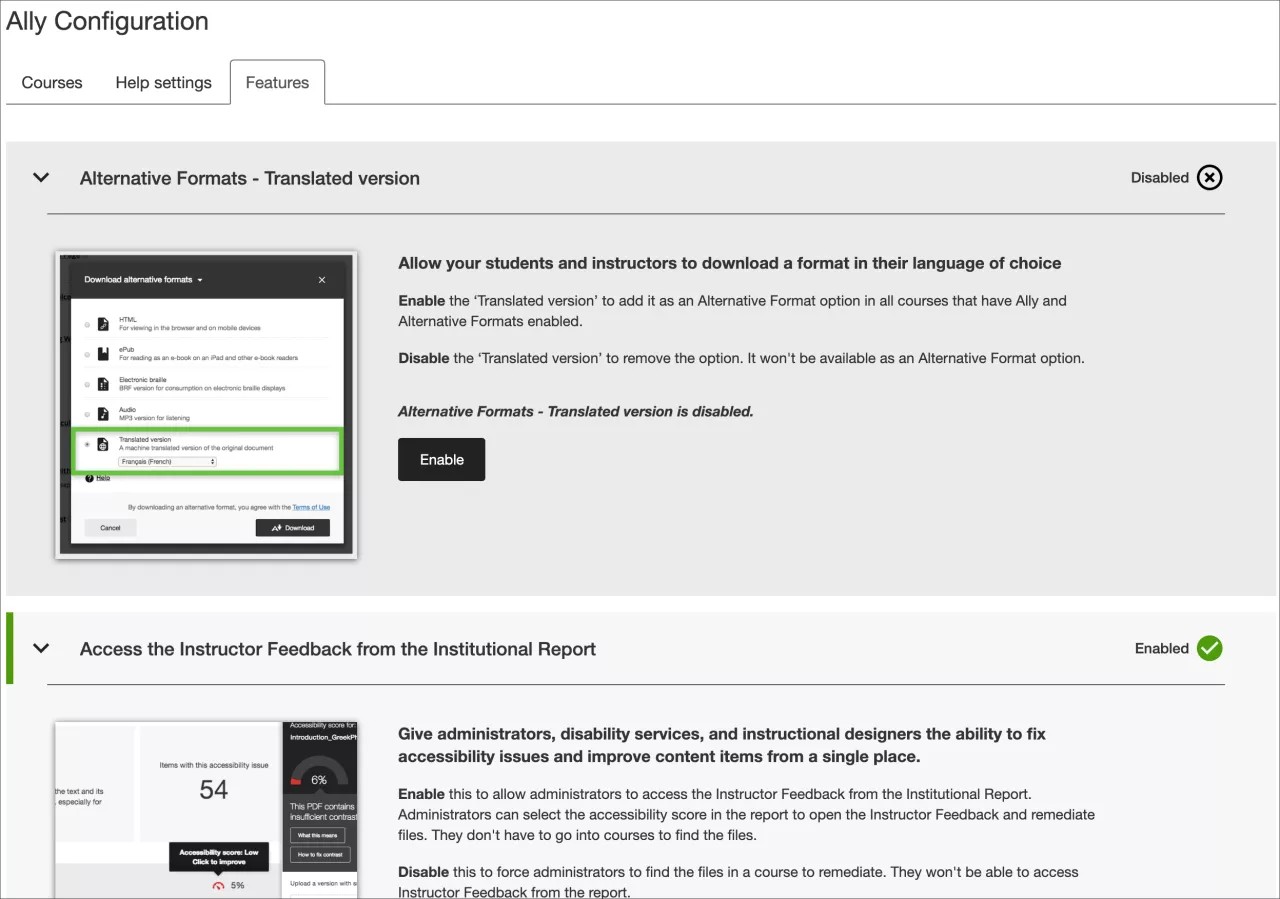
- Go to Ally Configuration and select Features.
- Find the feature you want to turn on or off and select it.
- Immersive Reader alternative format: Students can enhance the reading experience with this online feature.
- Translated version alternative format: Students can download a translated alternative format of an original file.
- BeeLine Reader alternative format: Students can download a BeeLine Reader alternative format.
- Score indicators in all courses for administrators: Administrators can see the Ally accessibility score gauges in all courses, including courses where Ally is not enabled in the Ally Configuration UI. This allows them to fix issues without having to enable Ally in the course.
This feature flag is available for D2L Brightspace, Instructure Canvas, Moodle, and Schoology.
- Access the Instructor Feedback from the Institutional Report: Give administrators, disability services, and instructional designers access to the Instructor Feedback.
- Instructor feedback for WYSIWYG content (Rich Text Editor content): Instructors and administrators can access feedback for content created in your LMS WYSIWYG editor. Tick on the "Also enable LMS built-in checker" checkbox to enable both accessibility checkers.
More on WYSIWYG Accessibility for instructors
This feature flag does not disable the Instructor Feedback or quick fixes on HTML files uploaded or created in D2L Brightspace.
Ally data integration into Impact by Instructure (formerly EesySoft): Institutions with an Impact by Instructure license can allow more detailed monitoring of interactions in the alternative formats modal, the instructor feedback, and the course accessibility report. Institutions can use this data for adoption reports and campaigns within Impact by Instructure. The Impact by Instructure integration is disabled by default.
This integration requires an Impact by Instructure license.
- Select Enable or Disable to turn the feature on or off.
Configure course accessibility report
Configure Course Accessibility Report for D2L
Record Client ID, Key and Secret
- Sign in as an administrator.
- Open Admin Tools and select External learning tools.
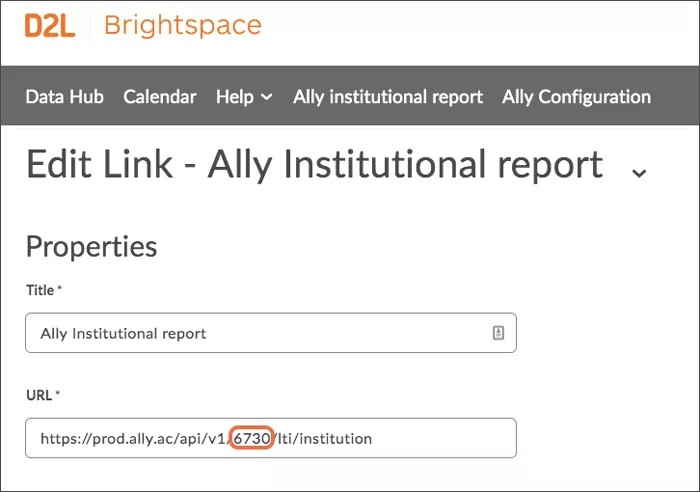
- Open the Ally Institutional Report actions menu.
- Select Edit Link.
- Record the Client ID, Key, and Secret.
If the “Secret” is not visible, it should have been provided to you by your technical consultant during the implementation. Also make a note of your Client ID, which is the number between “v1/” and “/lti”in the “URL”. These values will be needed during the configuration of the course accessibility report.
- Select Cancel.
Add a new link
- Open Admin Tools and select External learning tools.
- Select New Link.
- Type this for the Title: Ally Course Report.
- Use one of these URLs for the Tool Provider URL. Replace "[ClientID]" with the Client ID you recorded.
- Institutions hosted in the US data centre: https://prod.ally.ac/api/v1/[ClientId]/lti/instructor
- Institutions hosted in the Canadian data centre: https://prod-ca-central-1.ally.ac/api/v1/[ClientId]/lti/instructor
- Institutions hosted in the European data centre: https://prod-eu-central-1.ally.ac/api/v1/[ClientId]/lti/instructor
- Institutions hosted in the Singapore data centre: https://prod-ap-southeast-1.ally.ac/api/v1/[ClientId]/lti/instructor
- Institutions hosted in the Australian data centre: https://prod-ap-southeast-2.ally.ac/api/v1/[ClientId]/lti/instructor
- Check Allow users to view this link.
- Select the Link key/secret radio button.
- Use the Key you recorded.
- Use the Secret you recorded.
- Check these Security Settings options:
- Send tool consumer information to tool provider
- Send context information to tool provider
- Send LTI user ID and LTI role list to tool provider
- Select Save and Close.
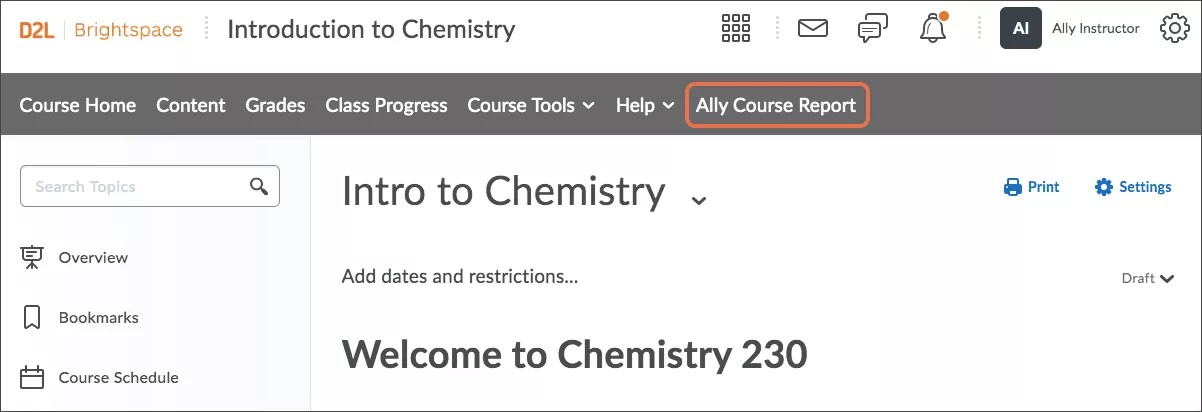
Add course accessibility report to a course
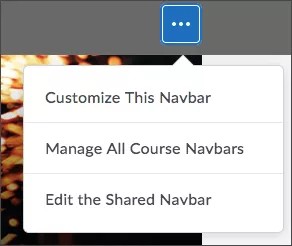
- From a course, open the Actions for Navbar and select Edit the Shared Navbar.
- Select Add Links.
- Select Create Custom Link.
- Use this Name: Accessibility report
- Name: “Accessibility Report”
This is the name of the link in the course Navbar. Rename it if you want.
- Select Insert Quicklink.
- Select Ally Course Report in External Learning Tools.
- Select Limit to specific roles and select the roles that should have access to the course accessibility report.
- Select Create, Add, and Save and Close.
“Accessibility Report” should now be available in the course Navbar. If you encounter any issues configuring the report, please Submit a case on Behind the Blackboard.