System Settings dictate the behavior of your website. You can set General options as well as options for the MyStart Bar, Templates, Alerts and Integration.
From Site Manager, select CONFIGURE and System Settings.

Session timeout
Add an extra level of security to your site with session timeout. When you set a session time out, registered users on the website and Site Manager are signed out of the system after so many minutes of inactivity and will need to sign in again. This means that after so many minutes the account is closed and can't be accessed by anyone without a password.
Users receive a five-minute warning prior to being signed out.
- From System Settings select General.
- Type the number of minutes a user can be inactive before they are signed out in Session Timeout.
The minimum value you can set is 10 minutes.
- Select Save.
Turn self registration on or off
Visitors don't need to register or sign in to use your school's website. Turn on self registration, if you want visitors to your site to have access to additional features and information. For example, as a registered user, parents can access details specific to them and register for calendar events.
- From System Settings select MyStart.
- Select if you want to Display Register Button.
- Select Show to turn on self registration.
- Select Hide to turn off self registration.
- Select Disable to turn off self registration and hide the register link from the MyStart bar.
- Select Save.
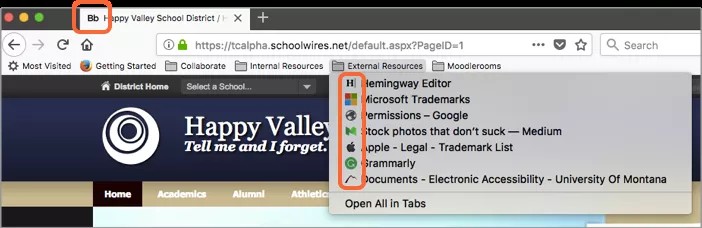
Add a favicon
Favicons are small images that represent your site. Favicons typically appear in a browser URL bar or tab and can be used in lists of browser bookmarks and feeds aggregators.
To add a favicon to your site, create one as an image approximately 16x16 in size. Upload it to your site and then link to the file from your system settings.
- From Site Manager select your top level site. Your district site.
- Select Tools and Files & Folders.
- Select Upload in the Top Level.
- Browse for your image file and select Upload.
- Find the image in the list of files and select More.
- Select Get Link.
- Select the Relative Web Address and copy it.
Paste the link somewhere you can copy it from again. This way you have it, when you copy something new.
- Select Close and close the Files & Folders.
- Select CONFIGURE and System Settings.
- Select Template.
- At the very bottom of the Head Content, link to the image file.
Before you change anything in the Head Content, copy the code already there and paste it somewhere for safe keeping. This way you can always go back to a working version.
- Copy and paste, or type, this text: <link rel="shortcut icon" href='image link you copied'>
- Replace the "image link you copied" text with the link you copied.
- Delete the "https:" text from the link you pasted.
- Your final text should look like this: <link rel="shortcut icon" href='//tcalpha.schoolwires.net/cms/lib/AS00000006/Centricity/Domain/4/Bb_logo.png'>
- Select Save.
Global and site templates
You can force all sites to use the district template or you can allow each site to use their own template.
- From System Settings select Template.
- Select Active to apply the district template to all subsites and Inactive to let sites use different templates.
- Optionally, select Allow subsite directors to customize templates. If you select this option, subsite directors can edit the template for the sites they have admin access to.
- Select Save.
Google authentication and analytics
Set up Google custom search
To use Google custom search on your site you need to create a custom search engine and get your Google Account ID.
Create a custom search engine
Already set up a custom search engine? Skip to locating your Google Account ID.
- Login to (or create) the administrator Google account for your district.
- Navigate to Google's Custom Search Engine page and select Create a custom search engine.
- Type your site’s URL, and select Create.
Get your Search Engine ID
- In the Google Custom Search admin panel, select your domain under Edit search engine.
- From the Setup menu, select the Search engine ID button, and copy your ID.
Remove ads from search results
Optionally, remove ads from your search results. To remove ads you need to register as a school or a non-profit organization.
If your organization is already registered with Google for Nonprofits or Google for Education, have your organization add the email address that is the owner of the Custom Search Engine or a verified administrator of the Custom Search Engine to their organization. If you are registered as a school, the email address must be added as a verified administrator of the Custom Search Engine as a Super Admin of the domain.
Register
If your organization is not registered, visit the Google non-profit or education site.
- Google Non-Profit: Select the Start Now button at the top of the page. Use the same email address to register for Google for Nonprofit as was used to create your Custom Search Engine, or that is a verified administrator of your Custom Search Engine.
- Google for Education: Select Get G Suite for Education and fill out the form. Use either the same Google Account used to create your Custom Search Engine or one that is a verified administrator of your Custom Search Engine
Within a couple business days, you should receive an email indicating that your Custom Search Engine has been upgraded to Nonprofit education. You can now disable ads.
Disable ads
- In the Google Custom Search admin panel, select your domain under Edit search engine.
- Select Setup and Make Money.
- Select Show Ads to turn it off.
Add Your Google Account ID to Site Manager
-
From Site Manager select CONFIGURE.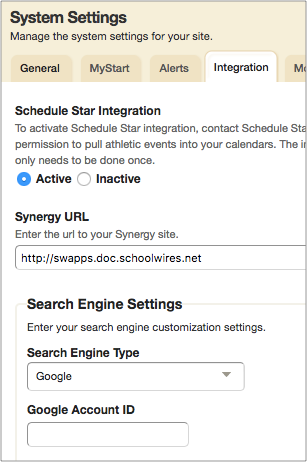
- Select System Settings and Integration.
- Select Google in the Search Engine Type menu.
- Type or paste your Google Account ID.
- Select Save.
Allow sites to post Broadcast E-Alerts to Facebook and Twitter
After you connect your social media accounts you need to enable posting.
- From Site Manager select CONFIGURE.
- Select System Settings and Alerts.
- Choose the sites you want to allow to post to your social media accounts.
- Select Save.