In Canvas, you can create two types of developer keys: LTI keys and API keys. These instructions are for LTI developer keys. Want to create API developer keys? Jump to Canvas API developer keys.
Ally uses LTI to integrate with your Learning Management System (LMS). LTI is a standard developed by IMS Global for secure and seamless integrations.
The standard allows users to access Ally without leaving Canvas. Forget about logging into multiple sites: LTI allows a secure exchange of information that enables a cohesive experience for your users.
There are two versions of LTI: v1.1 and v1.3. Each version requires different configuration steps. The current version is LTI v1.3. The biggest difference from previous versions is the upgraded security model based on OAuth2, OpenID Connect, and JSON Web Tokens.
Ally is moving to LTI 1.3 to take advantage of the upgraded security model.
What does this mean to you? If you are new to Ally, nothing. We do the Ally integration set up with you. But if you already have Ally integrated with your LMS, you’ll need to reconfigure your integration with LTI 1.3.
Reconfigure your Ally integration with LTI 1.3
A typical institution would have these three Ally tools available in the root account:
Each tool has a corresponding LTI developer key and application.
You’ll need to configure each tool following this process:
- Create an LTI 1.3 developer key for each tool.
- Set up each tool application with the developer key information.
- Send the Developer key ID and LTI Deployment ID for each tool to Ally for configuration.
- Remove the LTI 1.1 configuration.
Do this step last for a seamless transition with no interruptions.
Create an LTI developer key for each tool
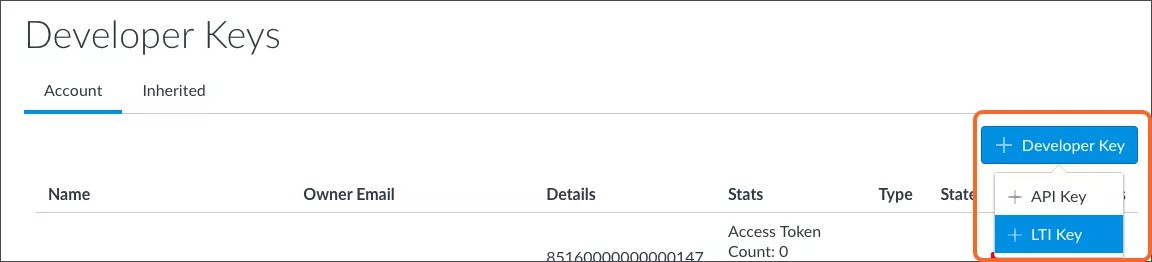
- Go to the root account of the Canvas instance and go to Developer keys.
- Select the + Developer Key button and select LTI Key.
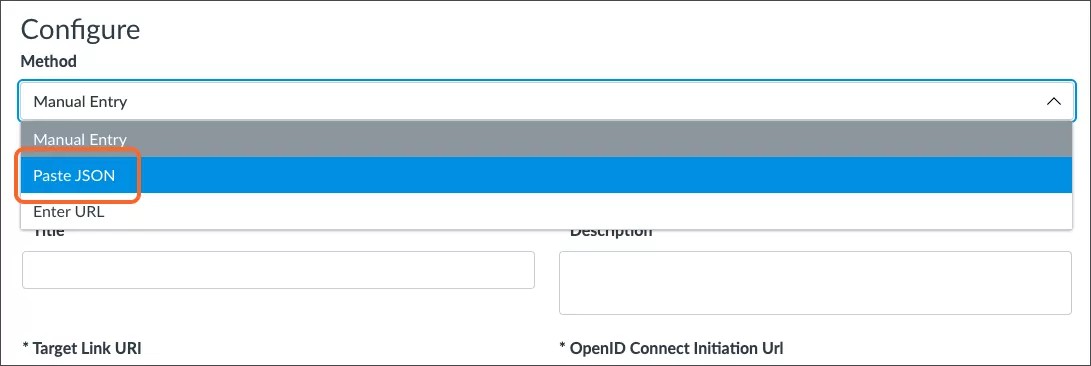
The Key Settings Configure screen opens.
- Select the Method menu and select Paste JSON.
- Open the URL for the LTI tool you are creating the key for to generate JSON configuration. Replace [AllyEnvironment] with the environment information your institution is hosted in.
- Institution Report: https://[AllyEnvironment]/api/v2/auth/lti/1.3/configure/canvas/institution
- Client Configuration: https://[AllyEnvironment]/api/v2/auth/lti/1.3/configure/canvas/config
- Course Accessibility Report: https://[AllyEnvironment]/api/v2/auth/lti/1.3/configure/canvas/course
- Copy the information on the web page that opens.
- Copy and paste this link into the Redirect URIs field. Replace [AllyEnvironment] with the environment information your institution is hosted in.
- https://<AllyEnvironment>/api/v2/auth/lti/1.3/callback
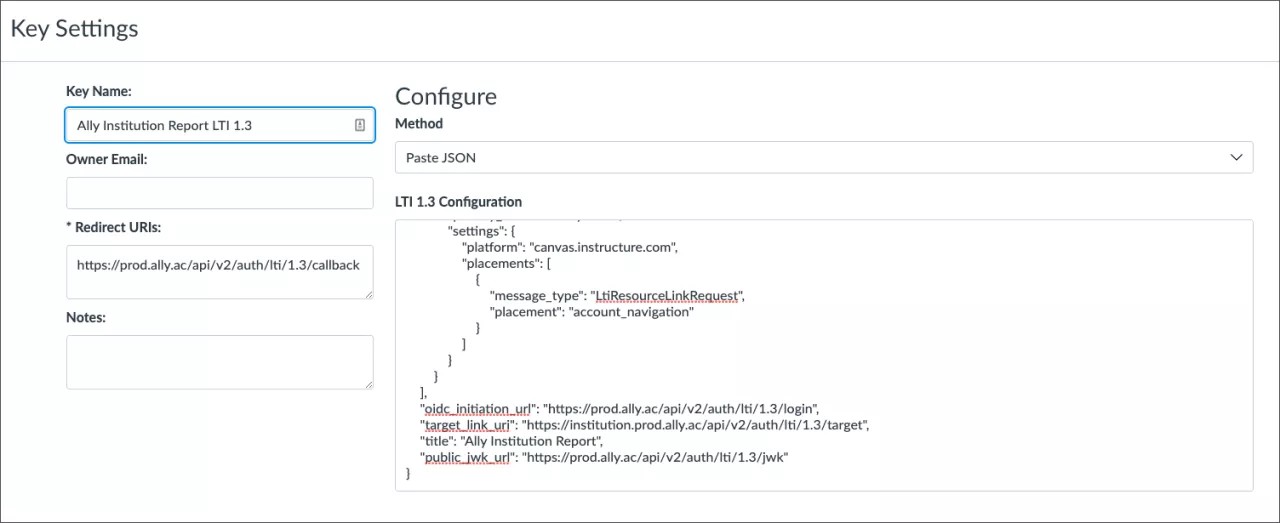
- Provide a Key name.
Include the name of the tool and LTI 1.3 in each. For example: Ally Institution Report LTI 1.3, Ally Course Accessibility Report LTI 1.3, and Ally Client Configuration LTI 1.3.
- Select Save. The new key is added to the Developer keys page and is Off by default.
- Turn the new key on.
- Copy the key ID number and secret in the Details column. This key ID number if your unique client ID.
Ally environment for your region
Use the information for the Ally environment your institution is hosted in.
- US data center: prod.ally.ac
- Canadian data center: prod-ca-central-1.ally.ac
- European data center: prod-eu-central-1.ally.ac
- Singapore data center: prod-ap-southeast-1.ally.ac
- Australian data center: prod-ap-southeast-2.ally.ac
Set up the tool
Follow these steps for the Institutional Report, Client Configuration, and Course Accessibility Report tools.
- From the root account select Settings.
- Select Apps and View App Configuration.
- Select the add an App button.
- From the Configuration Type menu select By Client ID.
- Paste the client key ID number you gave to the Ally support team into the Client ID field.
- Select Submit.
- Select Install.
- Copy the LTI Deployment ID for each report tool.
A new link for the tool appears in the left navigation list of links. After Ally configures the tool in the Ally system, you can access the tool from this link.
Send the key ID to Ally
Go to Behind the Blackboard and create a support case ticket with this information so the Ally team can configure the tools within the Ally system:
- Developer Key ID for each tool
- LTI Deployment ID for each tool
- Request to set up the LTI 1.3 tools
For example, My Institutional Report Developer Key is: #00000000000000000. My Institutional Report Deployment ID is: 0000:00c00dc0ec00c00cdc000fced. Please set up my LTI1.3 report.
You can have separate reports for the different sub-accounts in your Canvas environment. Copy the sub-account deployment ID and add that information to the support ticket as well.
Update the Canvas theme Ally snippet
After the Ally institutional report has been configured with LTI 1.3, update the Ally snippet in the Canvas theme. There needs to be an 'lti13Id' field corresponding to the LTI 1.3 institutional report client id (the Ally Tool ID) added.
- As a Canvas administrator go to Admin and select Account.
- Select Themes.
- Point to the active theme and select Open in Theme Editor.
- Select the Upload tab.
- In the Javascript snippet, add the ltil3Id property. Replace the [InstitutionalReportDeveloperKeyID] with your Institutional Report Developer Key ID.
window.ALLY_CFG = {
'baseUrl': 'https://prod.ally.ac',
'clientId': 00000,
'lti13Id': '<YourInstitutionalReportDeveloperKeyID>'
};
$.getScript(ALLY_CFG.baseUrl + '/integration/canvas/ally.js'); - Select Apply theme.