When you create a course, Blackboard Learn requires only two course properties: a course name and a course ID. However, several other course properties control important aspects of courses, such as when they're available, whether guest users are permitted, and where the course appears in the course catalog.
You can edit course properties to provide settings that weren't included when the course was created. For example, courses created in batch might have only a button style and an announcement in addition to the required course name and course ID. Courses created by copying source courses might require a different banner image or availability time period.
Courses can also be merged, becoming child courses in a larger course set, appearing in the course listing under the master course. Child courses are marked as unavailable, and must remain that way, but can be managed in the master course. Active courses—courses with student submissions—should never be made into a child course of a merge course relationship.
How to view or edit course properties
Child courses have limited options in the menu and need to be managed from their associated master courses.
- On the Administrator Panel in the Courses section, select Courses.
- Search for a course.
- On the Courses page, open the menu and select Edit.
- Edit the course properties. You can't change the course ID.
- Select Submit.
Merge and separate child courses
Instructors who teach multiple sections of the same course may prefer to manage those sections through a single master course with associated child courses. Active courses—courses with student submissions—should never be made into a child course of a merge course relationship.
In the course listing, master and child courses always appear together, with child courses indicated by an up arrow in the status column, pointing to the master course. New content must be managed from the master course. Child courses are marked as unavailable but can be managed through the master course.
To edit or manage a child course only, it needs to be separated from its master course.
Upon being merged, all enrollments in the child course are replicated in the master course, and any future enrollment changes in the child course are also synchronized automatically with the master course. Duplicate student enrollments are reported and ignored. Users in other roles, such as Grader, Teaching Assistant, or Guest, are assigned roles based on the last time they're added to the master course.
Merge courses
You can merge courses in two ways. One method is to select courses and merge them into a new master course.
- On the Administrator Panel in the Courses section, select Courses.
- Point to Create Course and select Merge Enrollments.
- Edit the course properties as if you're creating a new course.
- Next to Add Child Courses select Browse to select the courses you want to merge.
- Select Submit.
The second way to merge courses is to use an existing course as the master course and add child courses to it. A master course that already has one or more child courses can have additional child courses subsequently added as well.
- On the Administrator Panel in the Courses section, select Courses.
- Search for a course.
- Point to the course ID of the course that is or will become the master course, and open the menu.
- Select Edit. The Course Settings page displays.
- Select the check box for Select Courses to Merge to show the Child Courses section.
You don't have to select this check box for existing master courses.
- In the Child Courses section, type the course ID of the child course to add to the master course. You can type multiple course IDs separated by commas. Or, select Browse to open a pop-up window where you can search for courses.
- Select Submit.
Separate courses
Separation removes a child course from a merged set of courses. The course itself isn't deleted. Instead, it becomes a distinct course. The course no longer is associated with the merged set, and it contains no material from its former master course. The separated course retains both its content and enrollments from the moment it was separated out.
- On the Administrator Panel in the Courses section, select Courses.
- Search for a course.
- Child courses are listed with their associated master courses and are designated with an arrow in the status column.
- Open the child course's menu and select Separate.
- On the Separate page, select an option for managing the child course's existing enrollments in the master course:
- Remove Master Enrollments removes any enrollments that were added to the master course when the child course was originally merged with it. Choose this option if you don't want users enrolled in this course to remain enrolled in the master course. For example, choose this option if the course you want separated was accidentally merged into the set.
- Retain Master Enrollments keeps the enrollments in the master course, but marks them as unavailable. Choose this option if some user data such as grades or assignment submissions need to be preserved in the master course.
- Select Submit.
Enable or disable course structures
Course structures contain predefined course materials such as menu links, instructions, and content examples that help instructors jump-start their course organization. Administrators control whether this feature is available.
More on using course structures
- On the Administrator Panel in the Courses section, select Course Settings.
- On the Course Settings page, select Course Menu and Structures.
- On the Course Menu and Structures page, select the check box for Enable Course Structures. To disable them, clear the check box.
- Select Submit.
Enable or disable course themes
Course themes add a background image to the course display and change the color of the user interface, including the course menu, buttons, and controls. The theme can be changed again at any time. Applying a theme doesn't affect course content or a chosen course structure.
Course themes are only available if your institution uses the Bb Learn 2012 system theme or has created a custom theme based on the Bb Learn 2012 system theme.
- On the Administrator Panel in the Courses section, select Course Settings.
- On the Course Settings page, select Course Themes and Icons.
- On the Course Themes and Icons page, select the check box for Enable Course Themes. To disable them, clear the check box.
- Select Submit.
Enable or disable the Quick Setup Guide
The Quick Setup Guide helps instructors choose elements for their courses such as a course structure and a theme. They can also edit the course name and description, and access topics and video tutorials to help them learn more about building their courses.
You can choose whether the Quick Setup Guide appears when instructors enter their courses. If you choose to disable its appearance, instructors can access it from Control Panel > Customization > Quick Setup Guide.
- On the Administrator Panel in the Courses section, select Course Settings.
- On the Course Settings page, select Quick Setup Guide.
- On the Quick Setup Guide page, select the check box for Do not show the Quick Setup Guide when entering a course to disable it. To enable it, clear the check box.
- Select Submit.
Make a course available or unavailable
In the course search results, Blackboard Learn indicates unavailable courses with a red X. To make the course available, open the course's menu and select Make Available.
To make a course unavailable, open the course's menu and select Make Unavailable.
You can also disable courses in the database with the Snapshot Command Line tool. Blackboard Learn indicates disabled courses with a circle with an X through it.
Add a course to the course catalog
To appear in the course catalog, courses must be assigned to at least one category. After a course has a category, Blackboard Learn automatically adds the course to the course catalog.
You can assign categories in the course properties when you create or edit a course or open the course's menu and select Categorize.
You can also use the Categorize button on the Courses page. The Categorize button allows you to assign categories to one or more courses at a time.
- On the Administrator Panel in the Courses section, select Courses.
- Search for a course.
- Select the check box of the course or courses to add to the catalog.
- Select Categorize.
- Optionally, replace any previously assigned categories with the new categories by selecting Replace any existing categorization of these courses with the categories selected below.
- Select a category to select it and select the right-pointing arrow to move it to the Selected Items list. To remove a category, select it and select the left-pointing arrow to move it back to the Items to Select list.
- Select Submit.
View reports for a course
Blackboard Learn provides several reports to help you monitor user activity in forums, groups, and content areas associated with courses. You can also view reports to see which course items are aligned with specific course standards or objectives.
Reports show the first 100,000 results.
The Event Tracking option must be set to Yes on the Setting Auto-Reporting Options page before Blackboard Learn can record course statistics.
More on setting auto-reporting options
- On the Administrator Panel in the Courses section, select Courses.
- Search for a course.
- Open the course's menu and select Reports.
- Open the report's menu and select Run.
The Report Information section is read-only.
- In the Select Format menu, select a format for the report results:
- PDF: Select PDF to save the report in a PDF file on your computer. PDF is the default format.
- HTML: Select HTML to view the report in your browser.
- Excel: Select Excel to save the report in a Microsoft® Excel® file on your computer. This format doesn't include charts.
- Word: Select Word to save the report in a Microsoft® Word file on your computer.
- Define the time period for the report. Type the Start Date and End Date directly into the boxes or select the calendar icon to select the dates from the calendar. Dates must be in this format: mm/dd/yyyy
- To report on data for all users, don't make a selection in the Select Users box. To limit the report to specific users, select one or more usernames.
For Windows, to select multiple items in a list, press the SHIFT key and select the first and last items. To select items out of sequence, press the CTRL key and select each item needed. For Macs, press the COMMAND key instead of the CTRL key.
After you make a selection in the Select Users box, you can't clear the selection. Select all users to run the report on data for all users.
- Select Submit.
Add file types for use with course content items
You can attach any type of file to a content item in a course. Blackboard Learn recognizes several file types by default and can open these files directly in the browser or an associated application. If Blackboard Learn doesn't recognize the file type, users can download the attached file and open it on their computers.
| Extension | File Type | Programs Associated with the File Type |
|---|---|---|
| aam | Multimedia | Macromedia® Authorware® plug-in
The AAM file is the starting point for a series of files that must be enclosed in a ZIP file. |
| aiff | Audio | Audio program
AIFF is an uncompressed audio format. AIFF files tend to be large. |
| asf | Multimedia | Microsoft® .NET™ Show
ASF files can contain audio, video, images, and text. |
| au | Audio | Real Audio Player™ |
| avi | Video | Video player (Windows only) |
| doc, docx | Text | Microsoft® Word - word processor |
| exe | Executable | Executable file.
Executable files are applications. Some network security policies and firewalls might prohibit users from downloading executable files. |
| gif | Image | Graphics program or web browser |
| html, htm | Web page | HTML editor or web browser |
| jpg, jpeg | Image | Graphics program or web browser |
| jif | Image | Graphics program or web browser |
| mp3 | Audio | Audio program |
| mpe | Audio/Video | Audio program |
| mpg, mpeg | Video | Video player |
| moov, movie | Movie | QuickTime® movie |
| mov | Video | Movie or media player |
| Text | Adobe® Acrobat® Reader® | |
| png | Image | Graphics editor or web browser |
| ppt, pptx, pps | Slide show | Microsoft® PowerPoint®, PowerPoint Player® |
| qt | Movie | QuickTime® |
| ra | Audio | Real Audio Player™ |
| ram | Video | Real Audio Movie™ |
| rm | Audio | Audio program |
| rtf | Text | Word processor |
| swf | Multimedia | Macromedia® Shockwave® plug-in |
| tiff, tif | Image | Graphics program or web browser |
| txt | Text | Text or HTML editor, word processor |
| wav | Audio | Audio program |
| wma | Audio | Audio program |
| wmf | Graphic | Microsoft® Windows® |
| wmv | Media/Audio | Microsoft® Windows® |
| wpd | Text | WordPerfect® or other word processor |
| xls, xlsx | Spreadsheet | Microsoft® Excel® |
| zip | Compressed package | WinZip® |
Administrators can create other recognized file types and associated applications by adding MIME extensions to the web.xml file found on the application server at this location:
Windows Syntax: C:\blackboard\config\tomcat\conf\web.xml
UNIX Syntax: blackboard/config/tomcat/conf/web.xml
The XML file includes a few sample extensions that you can use as a blueprint to create additional MIME extensions.
We recommend that only experienced system administrators perform this task.
Bulk delete course materials
You may find it most useful to bulk delete course materials at the end of a course. You can select the materials you want to delete and keep the rest for use in the future. For example, you can delete students and grades from a course, but keep the content.
You can't recover materials you choose to bulk delete.
If you choose to bulk delete "Users," all users with the role of Student are removed from your course. The roles of Teaching Assistant, Grader, and Course Builders aren't removed.
Archive a course first so that you can restore to its exact state before a bulk delete.
Bulk delete process
Control Panel > Packages and Utilities > Bulk Delete
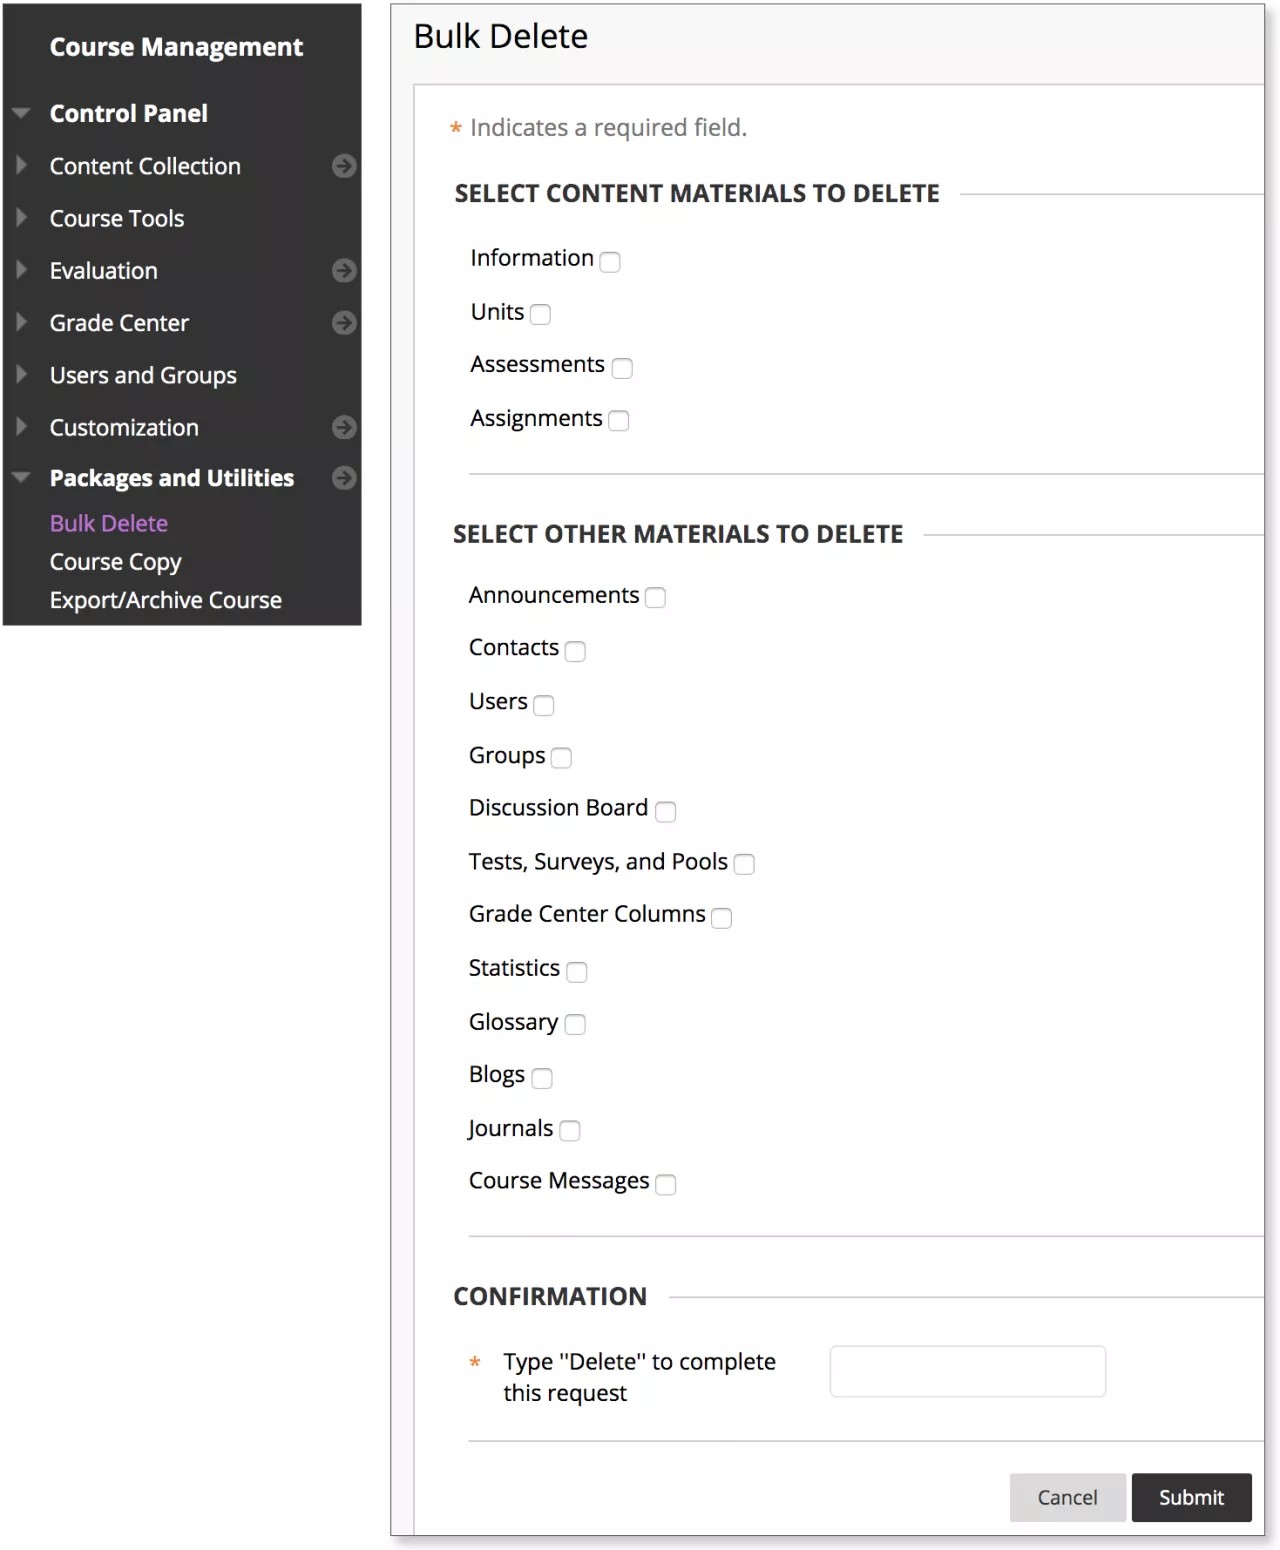
- In the Select Content Materials to Delete section, select the check boxes for the content areas in the course that you want to delete.
- In the Select Other Materials to Delete section, select the check boxes for content found in other areas of the course that you want to delete. For example, if you select Contacts, all of the data associated with staff information will be deleted.
- In the Confirmation section, type "Delete" in the box to confirm the bulk delete.
- Select Submit.
Delete a course
You can't restore deleted courses or course files. We recommend that you archive courses before deletion. Archived courses can be restored and include user enrollments and interactions along with course content.
More on Course Files command line tools
- On the Administrator Panel in the Courses section, select Courses.
- Search for a course.
- Select the check box for each course to delete.
- Select Delete.
- Select OK.