Custom brands in Ultra
A brand is a set of colors, names, and graphics for the system. Several different brands can exist on the same virtual installation. Brands are displayed based on primary institution role. Therefore, the system can appear differently to different sets of users while those users share the same content.
Brands also use separate hostnames to help control style.
What brand will a user see?
Brands are displayed based on hostnames and primary institution roles.
| Condition | Result |
|---|---|
| The user accesses the system from a branded hostname and no role is required. | Display the brand associated with the hostname. |
| The user accesses the system from a hostname, a role is required, and the user has that role as their primary institution role. | Display the brand associated with the hostname and the role. |
| The user accesses the system from the default hostname and the user's primary institution role has a brand assigned. | Display the brand associated with the role. |
| A brand and a role are undefined for the hostname and the primary institution role. | Display the default brand. |
Create a brand
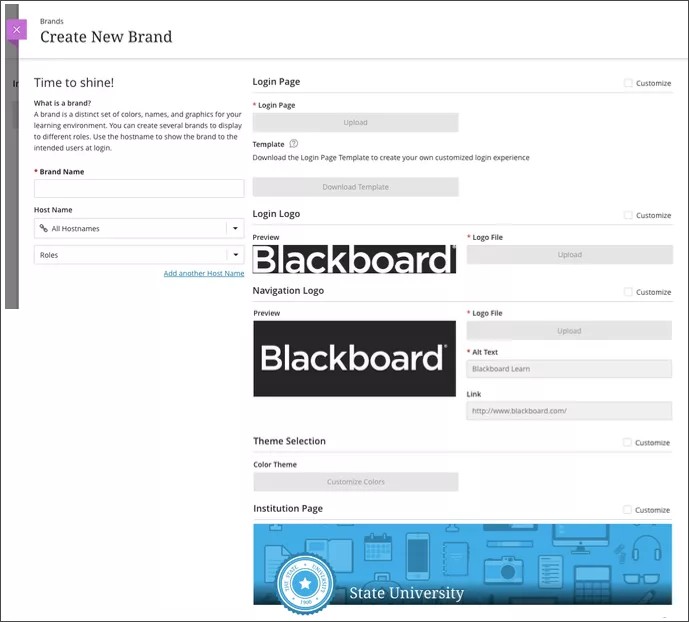
In the Ultra experience, you can customize the login page, logos, and colors your users see. You can customize the default brand or create new ones for your chosen roles and host names.
- On the Administrator Panel, under The Ultra experience is here!, select Brands.
- The Brands page appears. Here, you can access all of the brands available in your system.
- To customize the default brand, select Edit in the brand's menu. You can't edit the default brand's name, roles, or host names.
- To create a new brand, select Create New Brand.
- Name your custom brand and customize the options:
Roles and host names
Large institutions or networks of institutions may use host names within a Blackboard Learn domain to show distinctions. Institutions can use host names for departments, degree programs, or regional campuses. For example, nursing.monument.edu, graduate.monument.edu, or springfield.monument.edu. You can use set up brands to appear based on these host names.
On the Create New Brand page, enter the host name where you want this brand to appear. You can leave the hostname blank to have the brand appear on the default hostname. To request more hostnames for your Blackboard Learn environment, contact Blackboard Support through Behind the Blackboard.
Select the role that should see this brand. Brands are displayed based on primary institution role.
Each brand needs to have a unique role and host name combination. If you choose a role and hostname that's already used for another brand, you'll receive an error message when you try to save your new brand.
You can't edit the default brand's name, roles, or hostnames.
Customize the login page
You can create a custom login page to extend your brands. You can also create a custom login page separate from a custom brand.
- On the Administrator Panel, under The Ultra experience is here!, select Brands.
- Create a new brand or select Edit next to an existing one.
- In the Login Page section, select Download Template. The file downloads to your computer.
- Open the file with a text editor. The colors, style of text, and the text itself can be edited. It is also possible to create a link to an image.
- Save the login file to your local machine.
- Back on the Brand Details page, under Login Page, select Upload to search for the JSP login page saved on your local system.
- Select Save to save changes.
- Log out to test the new login page.
Login pages may not be visible for all users. You'll receive a message explaining which login pages won't be viewed and which settings you need to change.
Troubleshoot custom login pages
- If the page fails and you are unable to log in, type the following address in your web browser to bring up the default login page: http://domain_name.host_name/webapps/login?action=default_login.
- After logging in, go back to Administrator Panel > Brands.
- Edit the brand and uncheck the Customize option next to Login Page to restore the default login page. Users who see this brand will be able to login.
Add custom logos
You can change the logo on the Ultra login page to match your institution's branding.
Under Login Logo, select Upload to choose a new image file from your computer. The image you upload appears on the login screen as a circular image. To prevent distortion, select a square or circular image.
Select an image that is at least 200 x 200 pixels so the logo appears in high quality on all devices.
- The image loads in the Preview area to show you how it will look for users.
- To change the logo, open the file menu under Logo File and select Delete File. You can choose a new file to upload.
- To save a copy of the logo, open the file menu under Logo File and select Download File.
You can change the logo on the Ultra base navigation to match your institution's branding.
Under Navigation Logo, select Upload to choose a new image file from your computer. The image you upload appears on the base navigation as a rectangle.
Select an image that is at least 102 x 68 pixels so the logo appears in high quality on all devices.
- The image loads in the Preview area to show you how it will look for users.
- In the Alt Text field, type a text description of the image for users who use assistive technology such as screen readers. The alt text is also used as subject for activity stream notifications.
- In the Link field, type or paste a URL. Users who click the image are brought to the page you specify here. Format the link so it begins with http://.
- To change the logo, open the file menu under Logo File and select Delete File. You can choose a new file to upload.
- To save a copy of the logo, open the file menu under Logo File and select Download File.
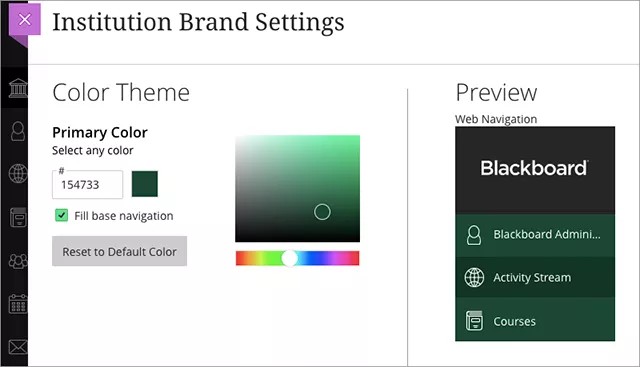
Customize the color theme
Color branding allows you to brand your institution's version of Blackboard Ultra with one or two colors, while maintaining WCAG's AA Accessibility standards.
- Under Theme Selection, select the Customize checkbox.
- Select the Customize Colors button.
- Type the hex code for your Primary Color or choose one from the color picker. A preview of your updated color selection displays in the Preview section.
- Select Fill base navigation to apply the color to all buttons on the base navigation.
- To remove the custom color, select Reset to Default Color.
- Select Save and then Publish to make the color theme available.
At this time, the colors changes aren't available on the mobile apps. We are developing that functionality; stay tuned for it in a future release!
Add an Institution Page
You can create an Institution Page for your custom brand. Individuals who have access to the brand will have access to the custom Institution Page—making it the ideal place to post communications for that audience.
You can access a brand's Institution Page in two ways: in the Brands area of the Administrator Panel or directly from the Institution Page on the base navigation.
- On the Create New Brand page, go to the Institution Page section.
- Select the Customize checkbox.
- Select Save to save your changes.
- Back on the Brands page, open the menu for the brand and select View Institution Page.
- You're brought to the brand's custom Institution Page, where you can add modules and logos.
You have access to all branded variations when you visit the Institution Page. At the top of the window, select an option in the Brand Institution Page menu to view and customize pages associated with brands.

More on customizing the Institution Page
Edit or delete a brand
- To edit or delete an existing brand, go to Administrator Panel > Brands.
- The Brands page appears. Here, you can access all of the brands available in your system.
- Select Edit in the brand's menu to customize or change options.
- Select Delete in the brand's menu to permanently delete it.
You can't delete the default brand.
Video: Institution Branding
Watch a video about institution branding
The following narrated video provides a visual and auditory representation of some of the information included on this page. For a detailed description of what is portrayed in the video, open the video on YouTube, navigate to More actions, and select Open transcript.
Video: Institution branding explains how to customize the Ultra experience to match your institution's brand.