In outcomes assessment, evidence is the collected sample of student assignments. This evidence is assessed for the evaluation of programs, courses, research projects, faculty and student achievements, and more.
Assessment managers and assessment administrators create evidence collections, sample the collections, and assign evaluators.

Create evidence collections
You create evidence collections to gather evidence from courses that is relevant for a specific project or assessment activity. For example, create an evidence collection to gather all assignment submissions from courses within a particular program or business unit that are aligned to a specific goal.
You can set up an evidence collection by defining the criteria used to collect artifacts from Blackboard Learn courses.
- Access Goals and Assessments in these areas:
- Administrator Panel > Tools and Utilities
- Outcomes tab
- My Institution tab > Tools
- Select View Collected Evidence to see a list of existing collections.
- Select +Collect Evidence to create a new collection.
- On the Collect Evidence page, select Find Goals.
- In the Discover Goals pop-up window, select the goals the evidence must be aligned to for inclusion in the collection. Select Submit.
- In the Define Collection Options section, select where evidence will be collected from: the entire system, a limited scope, or from specific places. Within each of those options, you can further narrow the criteria by choosing specific student sets or restricting dates. If you are associated with institutional hierarchy nodes, only those nodes will be available for you to select. You can view more information on managing institutional hierarchy nodes. Use your browser's back function to return here.
- Give the collection a name. Specify start and end dates to help you manage the timelines of various collection projects and understand when projects have been completed.
- Select Submit if you're finished or Collect More Evidence if you need to create another evidence collection.
To collect evidence, content within courses must be aligned to the relevant goals.
More on creating and aligning goals
Sample a collection to create an evidence set
An evidence set is the subset of artifacts, which are student assignment submissions that meet the collection criteria, that were randomly drawn from the evidence collection. You create an evidence set by sampling the evidence collection to reduce the number of artifacts that will be evaluated for institutional assessment activities. After sampling, evaluation can occur.
- On the View Evidence Collections page, select a collection name.
- On the collection's page, you can access these items:
- Status of the collection at the top of the page
- Buttons for your next available action
- Collect tab to display the items that match the evidence collection criteria
- Sample tab to display the randomly selected subset of artifacts from the collection. This tab appears after sampling has occurred.
- Select Sample Artifacts. If the collection was already sampled, you can select Sample Again.
- In the pop-up window, choose to Include All Artifacts or Randomly Select Artifacts. If you choose to randomly select, type the total number of artifacts needed and, optionally, the minimum number of artifacts needed from each assignment.
- Select Submit. The sampling process runs immediately and only takes a few seconds to complete.
Evaluate artifacts in an evidence set
You select one or more evaluators to review artifacts in an evidence set. They use a rubric to evaluate the artifacts that have been assigned to them. Any user in the system can be added to an evaluation session. They don't require any special permission or access. Evaluators are automatically sent invitations through email and the Blackboard notifications system to review an assigned selection of artifacts within an evidence set.
Create an evaluation session
- On the View Collected Evidence page, select a collection name. The collection must be sampled before you can create an evaluation session.
- Select Create Evaluation Session.
- In the pop-up window, under Select Evaluators, browse for one or more evaluators.
- For Evaluation Setting, select the number of evaluators that need to evaluate each artifact.
- For Grading Rubrics, browse for a rubric for evaluators to use.
- Select a Due Date.
- Select the Privacy check box to enable anonymous evaluation.
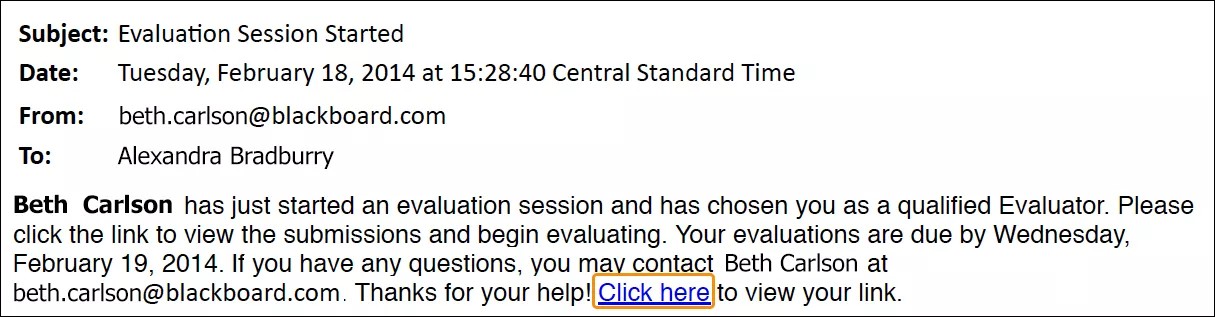
- Select Start Session. Users are automatically notified by email that you've selected them as evaluators for this session. A notification is also posted in the Updates section of My Blackboard. Both the email and the notification contain a link to the Evaluator View.
About evaluation sessions
Evaluators see only the artifacts assigned to them. Then, the assessment manager can more effectively compare the scores of different evaluators of the same artifact and better understand inter-rater reliability.
The assessment manager can return to the evaluation session page to monitor the progress of various evaluators. They can opt to check the artifact evaluations themselves, drop or add evaluators, and close the session. If evaluators are added or removed, the system automatically redistributes the remaining non-evaluated artifacts across the updated list of evaluators.
Access the evaluator view
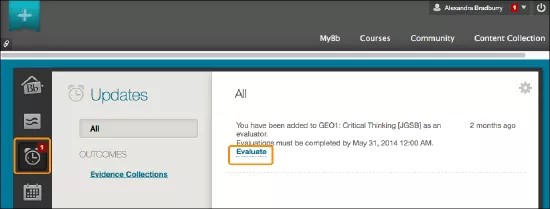
After you create an evaluation session, evaluators are automatically sent invitations through email and are notified on their Updates page in My Blackboard.
- Evaluators select the link to their assigned evaluations in the email message or on the Updates page. If evaluators access from the email message, they must log in to Blackboard Learn before they select the link.
- Only the artifacts within their assigned evidence sets appear. Evaluators open the menu for an artifact and select Evaluate.
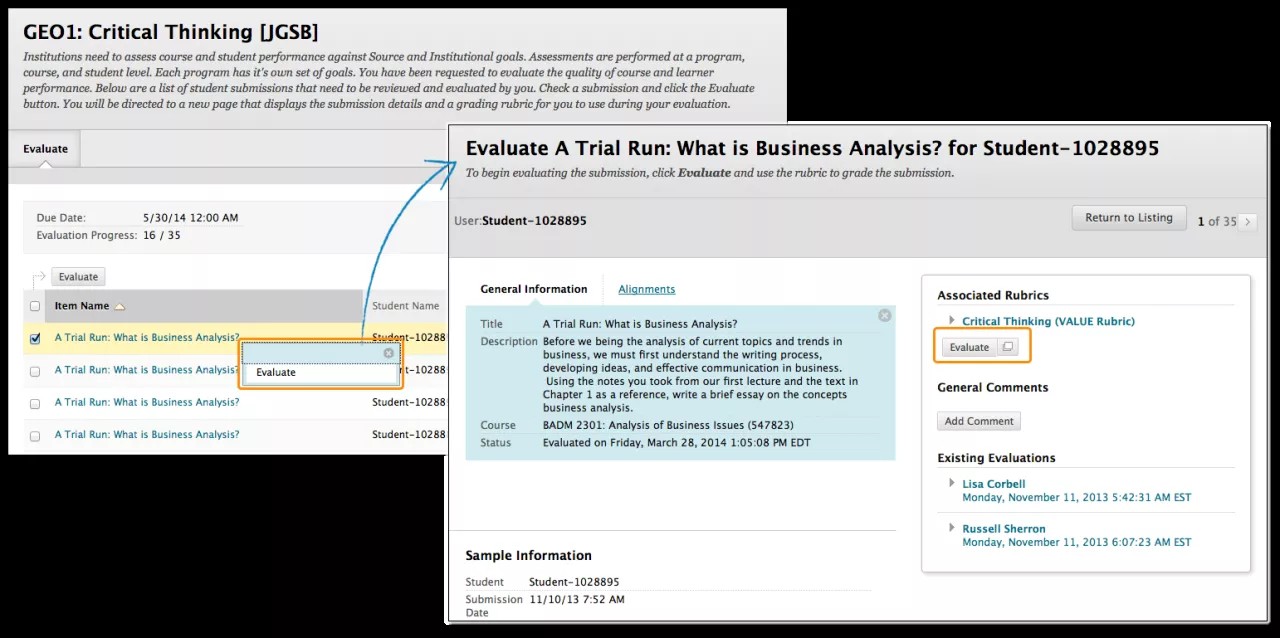
- The student's submission appears. The evaluator selects either Evaluate or Evaluate in New Window to view the rubric and select point values.
- The evaluator selects Submit.
Analyze the results of the evaluation
After evaluation of an evidence set is complete, assessment managers can run a report to understand the results. If they don't choose to perform a separate outcomes evaluation on collected evidence, they can instead report on the rubric scores collected from assignments within the course.
If the collected assignment submissions were graded in the course with a rubric, those rubric evaluations are also collected. The course rubrics display in the list of rubrics available when analyzing results.
- On the View Collected Evidence page, select a collection name. The collection must be sampled before you can analyze results.
- Select Analyze Results.
- On the Analyze Evidence Collection Results page, you can view the results now or download the results.
- Select a rubric. The list of rubrics includes outcomes assessment rubrics and rubrics associated with the assignment within a course.
- If you chose to view the results now, you have additional options: select the date range for the results report and how to compare the results.
- Select View Results. If you chose to view the results now, they appear on the screen. If you chose to download, you're prompted to save the file.