Users Workspace
User accounts are created and managed in the Users Workspace or through integration services. Users are any visitor on your website who can sign in.
To access the UsersWorkspace, open Site Manager and expand USERS & GROUPS. Select Users.

Video: Users workspace overview
The following narrated video provides a visual and auditory representation of some of the information included on this page. For a detailed description of what is portrayed in the video, open the video on YouTube, navigate to More actions, and select Open transcript.
Video: Users workspace overview explains the user workspace. In the Users Workspace, you can add a New User, Filter Users, Unlock All Users, Export Users, Remove users by group, or sort users.
Add a user
Use your Student Information System (SIS) to create and update user accounts. To learn more, See Universal Connector.
For users not in your SIS, such as coaches, administrative personnel, and guidance counselors, you can manually create individual accounts.
You can also import accounts using a .CSV file.
Users created in the Users Workspace aren't included in your SIS district updates. Changes to a user's email address, phone number, and other personal information aren't added.
- From Site Manager, expand USERS & GROUPS.
- Select Users.
- Select New User.
- Provide a First Name and Last Name.
- Optionally, assign a passport from the Passport menu. By default, passports are unassigned.
- Optionally, provide an Email Address.
A Google email address must be provided, if users can sign in with Google.
- Provide a User Name.
- Select Send Email to User. This is selected by default. If an email address is provided, users receive an email telling them an account has been created on your site. The email includes a link to the site, the user's User Name, and an auto-generated password.
- Select Save.
- Optionally, provide more information.
- Reset Password: You can choose to have a password reset email sent to the user or you can manually change the password. If you manually change the password, no email is sent to the user. You need to share the new password with the user.
- Emulate User: See what the user sees. Select Emulate User to view the website as if you were them.
- Delete User: Deleted accounts are not permanently deleted. They are sent to the Recycle Bin, where they can be restored or permanently deleted.
- General: Add basic user information, assign passports, and select authentication service.
- Address: Add the user's address.
- Groups: Assign and remove the user to and from groups.
- Family Relationships: Add students to parent or legal guardian accounts.
- Advanced
- Editing Privileges: View and access areas users can edit.
- Select Save.
Import users
If you have a Student Information System (SIS), use it to create and update user accounts. To learn more, see Universal Connector.
You can create an CSV file and import many user accounts all at once. If you want to modify data for existing user accounts, use Update Users instead.
If you try to import a user who already has an existing account, when you View Exceptions, you'll see this message: The username already exists. Please enter in a different username.
Import Users
Start with the CSV. Include these fields.
- First name (required)
- Last name (required)
- User name (required)
- Password
- Email address
- Phone number
- Passport ID: You can get the Passport ID numbers from the Users workspace Passports tab.
- Groups ID: You can get the Groups ID numbers from the Groups workspace.
- User code
- Title
- Address
Upload the file and map the fields.
- From Site Manager, expand USERS & GROUPS.
- Select Users.
- Select Import Users.
- Select Import.
- Browse and select your completed CSV file.
Only First Name, Last Name and User Name are required fields. You can add additional fields.
- Optionally, select Use Section Robot to create a section for each user.
If you select Use Section Robot to create a section for each user, a Section workspace is created in a location you specify for each user. This gives each user their own space to work in.
- Select Continue.
-
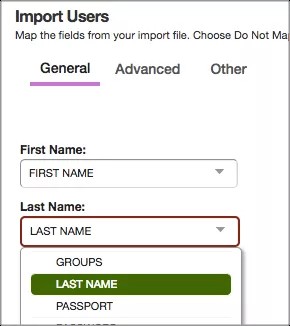
Under General, map the fields in the Site Manager to those in your import file. Select the name of your field from the Site Manager menus. For example, in the First Name menu select your first name field.
- Optionally, if you mapped Email addresses, select Notify user via email of account creation. If an email address is provided, users receive an email telling them an account has been created on your site. The email includes a link to the site, the user's user name, and a link to set their password.
- Optionally, map other fields under Advanced and Other.
- Optionally, if you are using Section Robot to create sections for users, you must select where you want sections to be created and how they'll look.
- Select a site from the Select a Site menu.
- Select a channel from the Select a Channel menu and select Continue.
- Select a configuration option from the Select a Section Configuration menu and select Continue.
- Select section name and menu name formats and select Continue.
- Select Import.