Custom locales in Ultra
You can create or edit locales for more effective information delivery to specific institutions, courses, users, and roles. Custom locales can provide these benefits:
- Teach language through immersion
- Display cultural norms
- Provide specific instructions
- Reinforce cultural adoption
- Support institutional branding
In the Ultra experience, you can create and edit an Ultra locale directly in the Blackboard Learn user interface. No need to export files and edit separately. Additionally, your custom locale is maintained with each new release, so you don't need to maintain changes whenever your system is upgraded.
Your Blackboard Learn instance needs to have cloud services enabled to use custom locales. Third-party cookies need to be enabled in your browser to use the Ultra locale editor.
Ultra locales only contain strings in the Ultra Experience and Ultra Course View user interfaces. To edit strings that appear in the Original Experience or Original Course View, see Create and Edit Language Packs for the Original Experience. There are some areas of the Ultra user interface that aren't available to be edited in the custom locale, including the locale editor.
Ultra locales and languages packs
A custom Ultra locale is an add-on to a system language pack. Many language packs in Blackboard Learn SaaS are already supported in the Ultra experience. By default, these language packs don't have Ultra locales associated with them because the language is supported in both the Original and Ultra experiences natively. However, you can add and edit the Ultra locale for an existing language pack in Blackboard Learn.
Custom Ultra locales work with language packs to provide you a means for updating text in the user interface. The use cases below help you determine where to make your changes based on the types of courses you use at your institution.
All strings on the Administrator Panel can be found within the language pack, regardless of which experience you use. You can't edit strings for the locale editor itself.
Ultra Experience, Ultra Course View only
For Blackboard Learn environments in the Ultra Experience using Ultra Course View only, all strings can be found in the custom Ultra locale. Create or associate an Ultra locale with a custom or default language pack.
Ultra Experience, Original & Ultra Course Views
For Blackboard Learn environments in the Ultra Experience using both course views, you'll also want to use a hybrid approach to editing text in the user interface.
Any strings that appear within the Original Course View can be found and edited in the language pack. Any strings in the Ultra Course View as well as outside of courses are considered to be part of the Ultra Experience and can be found in the custom Ultra locale.
Refer to the section below to learn more about editing language packs for the Original Course View.
Ultra Experience, Original Course View only
For Blackboard Learn environments in the Ultra Experience using Original Course View only, you'll want to use a hybrid approach to editing text in the user interface.
Any strings that appear within the Original Course View can be found and edited in the language pack. Any strings outside of a course are considered to be part of the Ultra Experience and can be found in the custom Ultra locale.
Create and Edit Language Packs for the Original Course View
If you have a custom language pack that you used for courses in the Original Experience, you can apply those changes when you enable Ultra. You'll need to create an Ultra locale for that custom language pack, even if you don't intend to make any changes. Ultra only supports custom language packs that have an Ultra locale associated.
Original Experience, Original Course View only
For Blackboard Learn environments in the Original Experience, the process is the same as you might be used to in Blackboard Learn 9.1.
Learn how to create and edit language packs for the Original Experience.
Create an Ultra locale
You can create and edit an Ultra locale directly in Blackboard Learn. Copy an existing locale to get started.
Ultra locales can only be copied from base language packs. Copying custom language packs isn't supported. The Ultra locale will use base language pack's values as its defaults, even if its associated with multiple language packs in the future.
You can't select a locale within the individual courses that use the Ultra Course View at this time. Any changes you make to an Ultra custom locale appear in all Ultra Course View courses when the language pack is set as the system default.
- On the Administrator Panel, select Language Packs.
- Find the language pack you want to use as your basis. Select Copy in its menu.
- Name the language pack and specify a code using the format xx_XX. Select Submit.
- Find your locale copy in the Language Packs list.
- Select Create in the Ultra Locale column to start your customization. You can also select Manage in the locale's menu.
In the Ultra Language Pack section of the Manage Language Pack page, select Create custom Ultra locale.
If Ultra locales already exist in your system, you can reuse one from the list.
- Select a base locale to use as your starting point. This will likely match the locale you cloned earlier.
- The customization panel opens. On this page, you can view and edit strings that appear in the Ultra user interface. The table on this panel includes both keys and values for a given string.
- Keys are code components and are named based on the path where they appear in the code. For example, base.courses.completeCourse appears in a confirmation message when an instructor wants to complete a course.
- The value is the text that appears in the user interface. The value on the left is the original value in the locale. You can change the value on the right.
Find and edit strings
The list of available strings is thousands of entries long. To help narrow your view, use the page arrows to navigate between pages.
Type a word or phrase into the Search box to find all matching strings. The search function looks for strings that match keys or values. You can replace a common word or phrase or find a list of all strings that appear in a particular part of the user interface.
You can also sort the list to filter your view. Sort by alphabetical order, reverse alphabetical order, or date of last update.
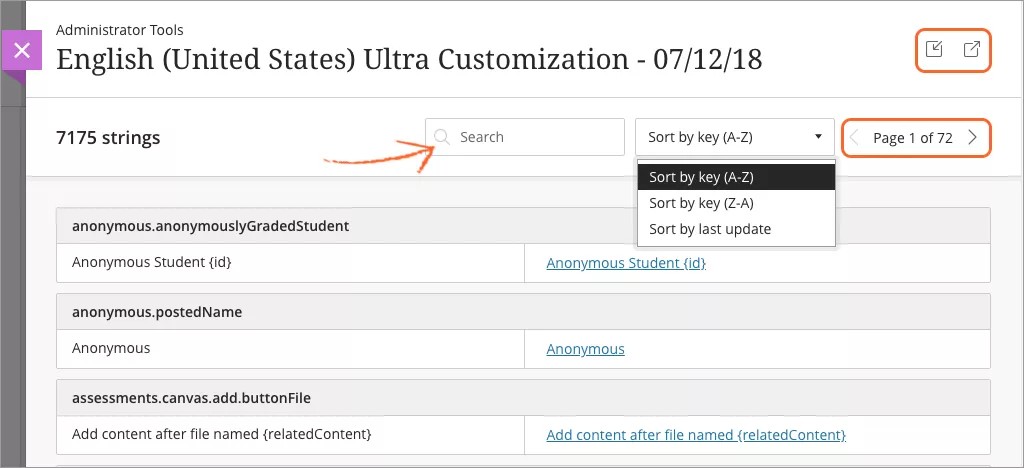
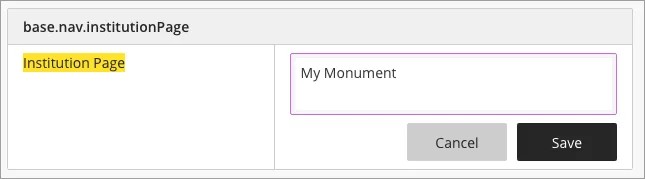
To edit a string, select the value link on the right of the table. To revert your changes and use the locale's default, delete the text in the field and select Save.
When you're finished with your updates, select Publish.
To edit an Ultra locale you've published previously, return to the Language Packs list and select Edit in the Ultra Locale column.
Export and import locales
A custom Ultra locale can only be associated with one site. If you'd like to use the same locale across multiple environments, such as Stage, Test, and Productions instances, you can use the export and import functions to easily share changes across sites. Exporting and importing custom locales is also beneficial for testing changes on non-production sites before users see the changes.
We don't recommend editing the locale file outside of Blackboard Learn. Incorrect formatting can cause the import to fail.
To export the current locale, select the Export icon at the top of the panel. To import a locale, select the Import icon and browse your computer for the file.
When you import a locale, a message appears to warn you that existing strings will be overwritten. Select Import & Overwrite to continue. A success or failure message appears when the import operation is complete.
Publish a custom locale
When you're finished editing the Ultra locale, select Publish. A message appears to let you know that it may take up to 15 minutes for changes to appear to users.
For users to view the changes, ensure that your new language pack is the system default. First, you'll need to set the language pack as available.
- On the Manage Language Pack page, select Yes under System Availability and select Submit to save your change.
- Select Submit.
Changes won't appear for users who use a language different from the system default. If you want changes to appear for a majority of users, return to the Manage Language Pack screen and select the Default checkbox to make this language pack the default.
Variables & plural values
You may see brackets and other characters in strings that appear out of place or don't appear in the user interface. These characters are known as variables and are elements of the Ultra code that change based on the conditions or events. For example, the string More options for {relatedContent} appears on the Course Content page and is used as hover text when an instructor wants to edit or delete a piece of content. Blackboard Learn replaces {relatedContent} with the title of content so it makes sense to the user. This string would appear as More options for Chapter 1 Test or something similar.
To help prevent unexpected changes in this behavior, we recommend you don't edit variables in strings. Text around variables can be edited safely.
Blackboard Learn uses specialized syntax for handling plural values. For example, a link displaying the number of groups in a discussion changes to be grammatically correct based on the number of groups: No groups, 1 group, or 2 groups.
This code appears in the locale editor. An example of this code may be the following:
{numberOfValues, plural, =0{Acceptable answers for {identifier} are {values_LOCALIZED_LIST}} one{Acceptable answer for {identifier} is {values_LOCALIZED_LIST}} two{Acceptable answers for {identifier} are {values_LOCALIZED_LIST}} few{Acceptable answers for {identifier} are {values_LOCALIZED_LIST}} many{Acceptable answers for {identifier} are {values_LOCALIZED_LIST}} other{Acceptable answers for {identifier} are {values_LOCALIZED_LIST}}}
In these strings, you should only edit the sections inside of the brackets that have plural identifiers in front of them. In the code example above, it is safe to edit Acceptable answers for, Acceptable answer for, are, and is.
Additionally, there are some values in the code for localization purposes. We suggest you don't edit these variables.
Currency
_LOCALIZED_CURRENCY_USD_SYMBOL
_LOCALIZED_CURRENCY_USD_ACCOUNTING
_LOCALIZED_CURRENCY_USD_CODE
_LOCALIZED_CURRENCY_USD_NAME
Decimal Precision
_LOCALIZED
_LOCALIZED_{number_of_digits}
_LOCALIZED_{number_of_digits}_STRICT
Date / Time
_LOCALIZED_DATE_
_LOCALIZED_TIME_
_LOCALIZED_DATETIME_
_LOCALIZED_TIMEZONE_
_LOCALIZED_DURATION
Users
_LOCALIZED_USERNAME_
Lists of items
_LOCALIZED_LIST
Video: Custom Locales in Blackboard Learn with the Ultra Experience
Watch a video about custom locales
The following narrated video provides a visual and auditory representation of some of the information included on this page. For a detailed description of what is portrayed in the video, open the video on YouTube, navigate to More actions, and select Open transcript.
Video: Custom Locales provides an overview and how to create a custom Ultra locale.