Add the instructor-facing course accessibility report to your Learning Management System (LMS).
The course accessibility report acts as a complement to the existing accessibility indicators. It provides an accessibility summary and overview at the course level.
The report shows instructors this useful information:
- Accessibility score for the course
- Distribution of course content by content type
- List of all issues identified in the course
Instructors see their course content items that have issues. Instructors can then access the instructor feedback from the report to fix the issue.
The report helps instructors determine priority and gives options for order of fixing. For example, "Content with most severe issues" and "Content that's easiest to fix".
Blackboard Learn
Configure Course Accessibility Report for Blackboard Learn
Add the instructor-facing course accessibility report to your version of Blackboard Learn.
- Blackboard Learn SaaS 3500 + and Learn 9.1 Q4 2018 and above
- Blackboard Learn SaaS earlier than 3500 and Learn 9.1 Q2 2017 CU3 and above
- Blackboard Learn With Basic LTI Building Block
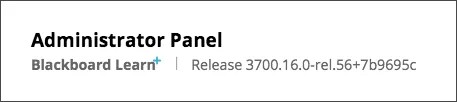
Not sure which steps to follow? Sign into Blackboard Learn as an administrator and go to the Administrator Panel. Your version number is listed there.
Moodle
Availability of the course accessibility report will require an update of the Ally Moodle plugins. This update will be made available in the next few weeks, and a separate release announcement will be sent out.
The course accessibility report available for institutions using self-hosted Moodle 3.5 and above. This requires upgrading the Ally Moodle plugins, at which point the course accessibility report automatically becomes available in all courses.
The link to the course accessibility report also shows in courses for which Ally isn’t enabled, but the report won’t actually load in those cases.
Institutions using Moodle 3.5 should upgrade their version of the report_allylti plugin to at least 3.5.3.
Institutions using Moodle 3.6 and above should upgrade to at least the following plugin versions:
Ally Moodle plugin version 3.6.4 and above require PHP 7.1. If you don’t have PHP 7.1, we recommend not upgrading beyond version 3.6.3.
Instructure Canvas
Configure Course Accessibility Report for Canvas
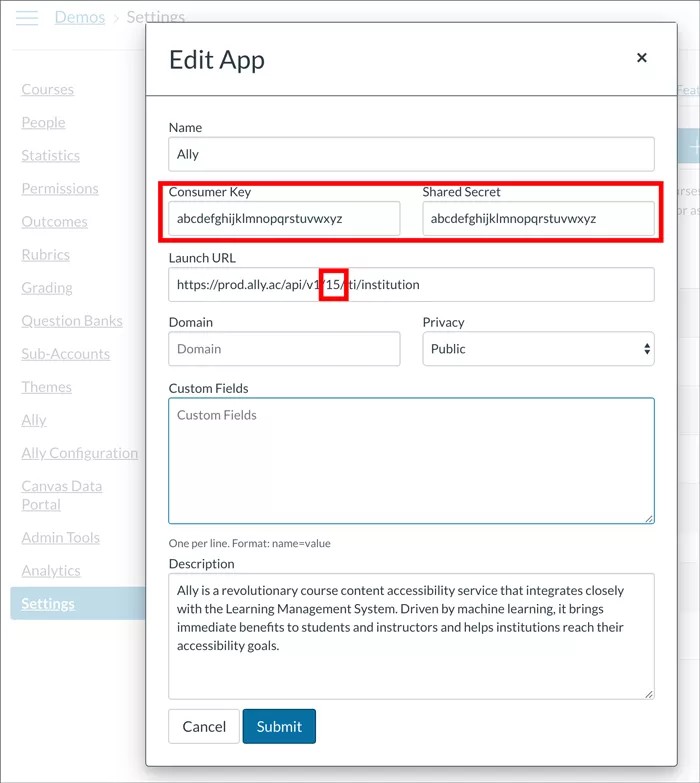
Record Consumer Key, Shared Secret, and Client ID
- Sign in as the administrator that configured the institutional report and navigate to Settings in the administrator workspace.
- Select the Apps tab and select Edit next to the Ally institutional report app.
- Record the Consumer Key, Shared Secret, and Client ID.
If the “Shared Secret” is not visible, it should have been provided to you by your technical consultant during the implementation. Also make a note of your Client ID, which is the number between “v1/” and “/lti”in the “Launch URL”. These values will be needed during the configuration of the course accessibility report.
Add new application
- Sign in as an administrator and navigate to the Settings of the (sub-)account for which the course accessibility report should be added.
- Select the Apps” tab and select View App Configurations.
- Select the + App” button to add a new app.
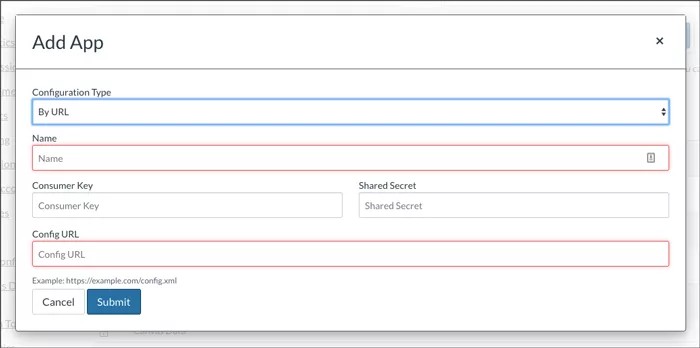
- Enter this information:
- Configuration Type: By URL
- Name: Accessibility report
This is the name used in the course left hand navigation. Rename it if you want.
- Consumer Key: Use the Consumer Key you recorded
- Shared Secret: Use the Shared Secret you recorded
- Use one of these URLs for the Tool Provider URL. Replace "[ClientID]" with the Client ID you recorded.
- Institutions hosted in the US data centre: https://prod.ally.ac/api/v1/[ClientId]/lti/instructor
- Institutions hosted in the Canadian data centre: https://prod-ca-central-1.ally.ac/api/v1/[ClientId]/lti/instructor
- Institutions hosted in the European data centre: https://prod-eu-central-1.ally.ac/api/v1/[ClientId]/lti/instructor
- Institutions hosted in the Singapore data centre: https://prod-ap-southeast-1.ally.ac/api/v1/[ClientId]/lti/instructor
- Institutions hosted in the Australian data centre: https://prod-ap-southeast-2.ally.ac/api/v1/[ClientId]/lti/instructor
- Submit the form.
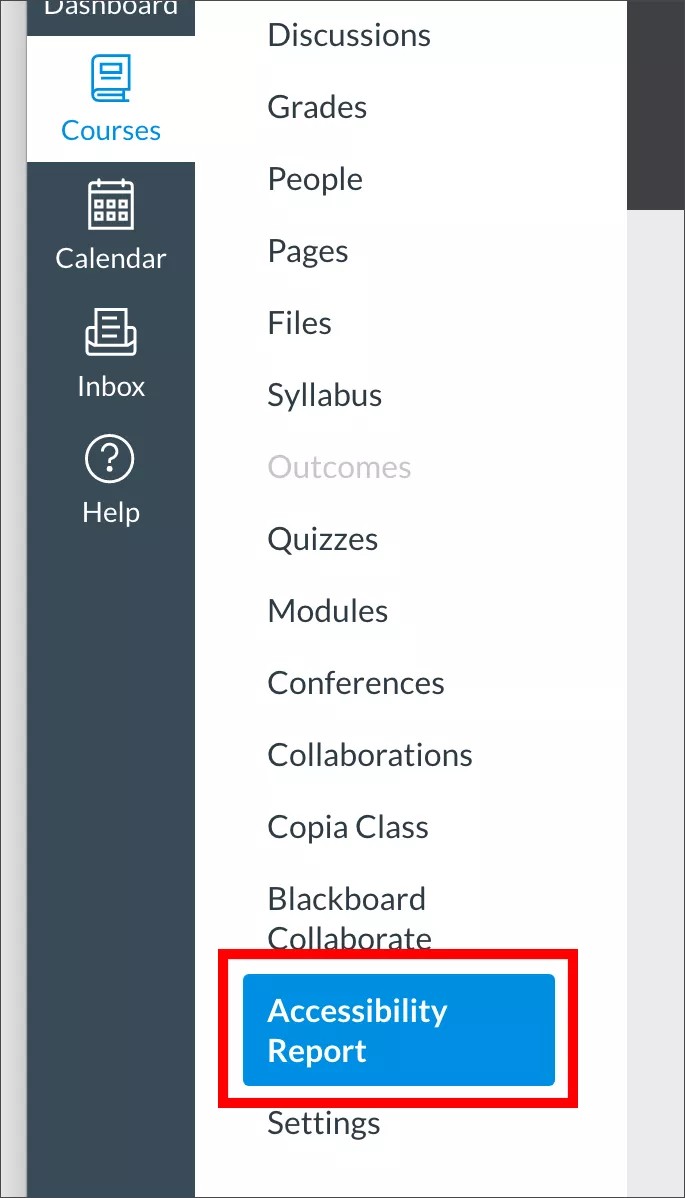
Accessibility Report should now be available in the course left hand navigation. Note that you can also perform these steps in the Settings” for an individual course in case the accessibility reports needs to be added to an individual course. If you encounter any issues configuring the report, please Submit a case on Behind the Blackboard.
Configure Course Accessibility Report for D2L
Record Client ID, Key and Secret
- Sign in as an administrator.
- Open Admin Tools and select External learning tools.
- Open the Ally Institutional Report actions menu.
- Select Edit Link.
- Record the Client ID, Key, and Secret.
If the “Secret” is not visible, it should have been provided to you by your technical consultant during the implementation. Also make a note of your Client ID, which is the number between “v1/” and “/lti”in the “URL”. These values will be needed during the configuration of the course accessibility report.
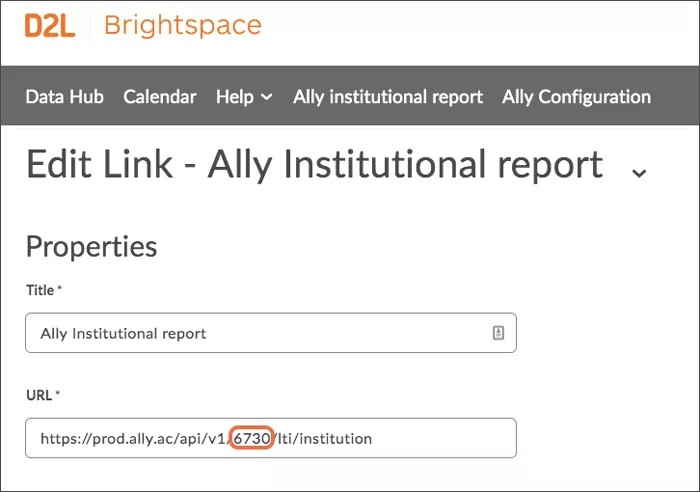
- Select Cancel.
Add a new link
- Open Admin Tools and select External learning tools.
- Select New Link.
- Type this for the Title: Ally Course Report.
- Use one of these URLs for the Tool Provider URL. Replace "[ClientID]" with the Client ID you recorded.
- Institutions hosted in the US data centre: https://prod.ally.ac/api/v1/[ClientId]/lti/instructor
- Institutions hosted in the Canadian data centre: https://prod-ca-central-1.ally.ac/api/v1/[ClientId]/lti/instructor
- Institutions hosted in the European data centre: https://prod-eu-central-1.ally.ac/api/v1/[ClientId]/lti/instructor
- Institutions hosted in the Singapore data centre: https://prod-ap-southeast-1.ally.ac/api/v1/[ClientId]/lti/instructor
- Institutions hosted in the Australian data centre: https://prod-ap-southeast-2.ally.ac/api/v1/[ClientId]/lti/instructor
- Check Allow users to view this link.
- Select the Link key/secret radio button.
- Use the Key you recorded.
- Use the Secret you recorded.
- Check these Security Settings options:
- Send tool consumer information to tool provider
- Send context information to tool provider
- Send LTI user ID and LTI role list to tool provider
- Select Save and Close.
Add course accessibility report to a course
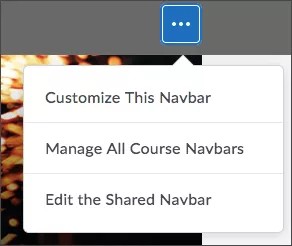
- From a course, open the Actions for Navbar and select Edit the Shared Navbar.
- Select Add Links.
- Select Create Custom Link.
- Use this Name: Accessibility report
- Name: “Accessibility Report”
This is the name of the link in the course Navbar. Rename it if you want.
- Select Insert Quicklink.
- Select Ally Course Report in External Learning Tools.
- Select Limit to specific roles and select the roles that should have access to the course accessibility report.
- Select Create, Add, and Save and Close.
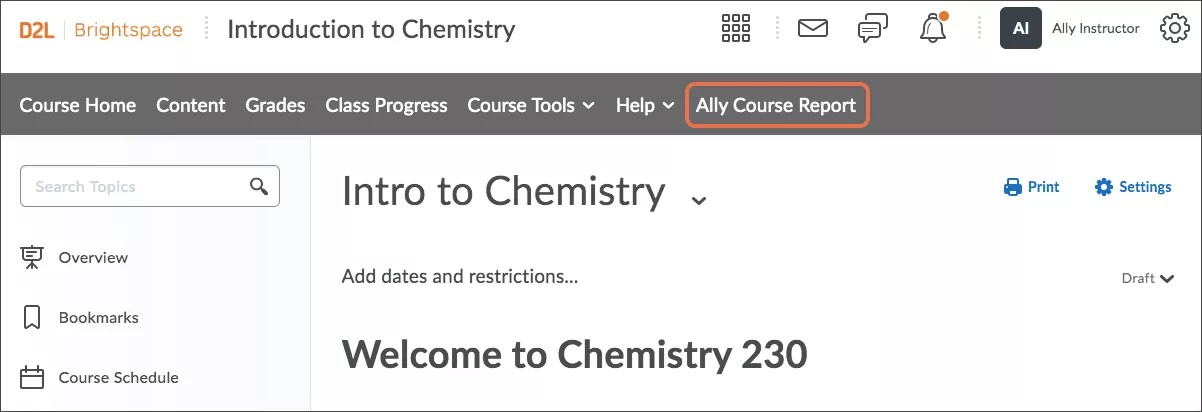
“Accessibility Report” should now be available in the course Navbar. If you encounter any issues configuring the report, please Submit a case on Behind the Blackboard.
Schoology
Configure CAR Schoology
- As a Schoology administrator, open https://app.schoology.com/apps/profile/4848967623.
If you use a custom URL, you may need to replace app.schoology.com with your institution's URL.
- Select Install LTI App.
- Select I Agree and Add to Organization. The Ally Course Accessibility Report app now appears under Organization Apps in the App Center.
- Select Configure.
- Use one of these URLs for the Custom URL. Replace "[ClientID]" with your Client ID.
- Institutions hosted in the US data centre: https://prod.ally.ac/api/v1/[ClientId]/lti/instructor
- Institutions hosted in the Canadian data centre: https://prod-ca-central-1.ally.ac/api/v1/[ClientId]/lti/instructor
- Institutions hosted in the European data centre: https://prod-eu-central-1.ally.ac/api/v1/[ClientId]/lti/instructor
- Institutions hosted in the Singapore data centre: https://prod-ap-southeast-1.ally.ac/api/v1/[ClientId]/lti/instructor
- Institutions hosted in the Australian data centre: https://prod-ap-southeast-2.ally.ac/api/v1/[ClientId]/lti/instructor
- Enter your Consumer Key and Shared Secret.
- In Custom Parameters enter the follow code. Replace "[ClientID]" at the end with your Client ID.
building_id=$com.schoology.Context.Building.id
ally_client_id=[ClientID] - Select Save settings. Ally's Course Accessibility report will now appear on the left navigation menu in your courses.