Institution roles control what brands, tabs, and modules users see when they log in to Blackboard Learn. Institution roles also grant or deny access to Content Collection files and folders.
All licenses assign the default institution role to all users on the system. You can assign different institution roles to different users and add new institution roles to the system that can be assigned to users.
Implementing institution roles effectively requires detailed planning to maximize benefits and avoid inconsistencies and overlaps. One of the best places to start is with other systems within the institution that store student information. For example, the student database might categorize students by departments (Language Arts, Science, History) and locations (Campus East, Campus West). Applying the same model for organizing student information to institution roles helps ensure consistency throughout the institution.
Example: An administrator creates an institution role called CY_2011 and assigns it to all users that are in the 2011 class year. Content is created and restricted to the CY_2011 role. Only users with a primary or secondary institution role of CY_2011 can see this content.
About removable and non-removable institution roles
Previous versions of Blackboard Learn included a set of 20 institution roles, which now appear as non-removable institution roles. You can change Role Names of non-removable institution roles, but you can't delete them or change their Role IDs. These Role IDs might be required by existing building blocks and third-party integrations.
You can create custom institution roles. You can remove custom institution roles or change their Role IDs. However, use caution when deleting roles or changing Role IDs as doing so affects any building blocks or third-party integrations that use those roles.
About the student institution role
The default primary institution role is Student. This is a non-removable role and you can't change the Role ID. You can change the Role Name. For example, the Role ID remains Student, but the Role Name could be Participant or Basic User or some other word or phrase.
If a removable institution role is deleted, all users who were assigned that role as their primary institution role automatically return to the Student role.
About primary and secondary institution roles
Each user is assigned a primary institution role.
You can also assign one or more secondary institution roles to a user. Multiple institution roles grant the user the sum of their privileges. A user with multiple institution roles has access to all of the brands, tabs, modules, and Content Collection files and folders available to any of those roles.
Secondary roles allow you to grant additional privileges to users based on the requirements of their jobs and the tasks they need to complete in Blackboard Learn. This allows users to have access to more content and tools without changing their primary role or function.
Institution roles aren't primary or secondary in themselves. Rather, the primary and secondary designation applies to the user account. For example, one user can have a primary institution role of Student while another user has a secondary institution role of Student.
Best practices for planning institution roles
Design a content plan
In most cases, the different types of users need access to different types of content and tools within Blackboard Learn. For example, students require a difference set of tabs, modules, and Content Collection files and folders than instructors.
When you have identified the main types of users at your institution, you can design a content plan that outlines the brands, themes, modules, and Content Collection files that provide the right user experience for each group of users. Then create institution roles that grant access to each content set.
Planning institution roles based on content is typically the most efficient way to structure roles that can support new content and future growth.
Create institution roles in groups by category
Use categories such as campus, major, and class year to define institution roles. Use other institutions as a model for developing categories.
- Designation: STUDENT (Primary Institution Role)
- Campus: CAMPUS_WEST
- Major: MAJOR_PHYSICS
- Class Year: CY_2011
Use a naming convention
Blackboard Learn lists roles in alphabetical order. A naming convention based on institution role categories helps make the right roles easier to find when editing their privileges and assigning them to users.
For example, if your institution has three campuses called Central, East, and West, naming the institution roles CAMPUS_CENTRAL, CAMPUS_EAST, and CAMPUS_WEST helps ensure that the roles are easy to locate in the list.
If you name them CENTRAL_CAMPUS, EAST_CAMPUS, and WEST_CAMPUS, the roles won't be grouped together in the list.
Test institution roles
Create user accounts that you can use to test institution roles. For example, create a test user account for each institution role. Log in as the test user to see what users with that institution role will see when they access Blackboard Learn.
Blackboard recommends you create a test user with the institution role of Guest to preview what unauthenticated users will be able to see. Changes to the Guest institution role can have serious consequences as this role controls what users can see in Blackboard Learn without logging in.
Example: This example illustrates the planned effect of institution roles on two test users.
User: Jane Smith
| Role | Services |
|---|---|
| Campus - East (primary) | East Branding General Campus Announcements |
| Dept - East Campus Chemistry | Chemistry Department News and Announcements
Chemistry Department instructional tools such as simulations and interactive tutors |
| Function - Faculty | Administrative resources and forms
Portfolio publishing capabilities |
| Status - Active Full-time Professor | Special events for full-time faculty |
| Job - Student Advisor | Training resources and guidelines for advisors |
| Job - East Campus Science Faculty | Science faculty Content Collection of reusable learning objects, videos, and still imagery licensed by the department for teaching
100 MB of virtual hard drive space |
User: Joe Bell
| Role | Services |
|---|---|
| Campus - West (primary) | West Branding General Campus Announcements
West Traffic Updates |
| Campus - East | General Campus Announcements |
| Dept - West Campus Chemistry | (none) |
| Function - Faculty | Administrative resources and forms
Portfolio publishing capabilities |
| Status - Adjunct | Guidelines for Adjunct Faculty |
| Job - West Campus Science Faculty | 200 MB of virtual hard drive space |
| Job - East Campus Science Faculty | Science faculty Content Collection of reusable learning objects, videos, and still imagery licensed by the department for teaching
100 MB of virtual hard drive space |
Create institution roles
Make sure the new role matches the content plan and naming convention used at your institution. You can remove roles that don't comply with the conventions, but better results come from detailed planning before creating any roles.
- On the Administrator Panel in the Users section, select Institution Roles.
- Select Create Role. This table describes the available fields. [r] indicates a required field.
Create Role Available Fields Field Description Role Name [r] Identifies the role within the user interface. This field is required and must be unique. This field has a limit of 50 characters. Role ID [r] Identifies the role in the database and to external systems. This field is required and must be unique. Use only alphanumeric characters. Don't use spaces or special characters. This field has a limit of 50 characters. Description Provide usage notes or comments for administrators. Only users with administrative privileges see this description. This field isn't required, but it is a good idea to add a description of the role. Don't use HTML code in this field. This field has a limit of 1,000 characters. - Select Submit.
Edit institution roles
- On the Administrator Panel, in the Users section, select Institution Roles.
- Open the role's menu.
- Select Edit.
- Type changes into one or more of the fields. This table describes the available fields. [r] indicates a required field.
Institution Roles Available Fields Field Description Role Name [r] Identifies the role within the user interface. This field is required and must be unique. This field has a limit of 50 characters. Role ID [r] Identifies the role in the database and to external systems. This field is required and must be unique. Use only alphanumeric characters. Don't use spaces or special characters. This field has a limit of 50 characters. Description Provide usage notes or comments for administrators. Only users with administrative privileges see this description. This field isn't required, but it is a good idea to add a description of the role. Don't use HTML code in this field. This field has a limit of 1,000 characters. - Select Submit.
Delete institution roles
Deleting an institution role is permanent. You can't restore the role. If you delete the role in error, an administrator must create a new, identical role and assign it to users.
To avoid having to recreate and reassign the role, consider using Snapshot to disable the institution role rather than deleting it.
Deleting an institution role breaks the link between users and that institution role. If the deleted role is the primary institution role for a user, the user's primary institution role returns to the default of Student.
Deleting an institution role doesn't delete content that displays only to users with that role. However, users can't see the content until it's made available to an existing institution role.
- On the Administrator Panel in the Users section, select Institution Roles.
- To delete one role, open the role's menu and select Delete. To delete multiple roles, select the check boxes of the roles you want to delete. Select Delete.
If a role doesn't have a check box, it's a non-removable role or you don't have permission to delete it.
- Read the confirmation message. If you still want to delete the role, select OK. Select Cancel to return to the Institution Roles page without deleting any roles.
Make brands available by institution role
When you create or edit a brand, you associate it with an institution role in the Availability list on the Brand Settings page. You can associate the brand with all institution roles by selecting Everyone or to a single institution role by selecting a Role Name.
The host name also affects which brand a user sees. Host names are part of the URL used to access Blackboard Learn. For example, an institution can create a different host name for different departments, such as http://law.yourschool.com and http://medical.yourschool.com. Host names are specified in the brand settings.
- On the Administrator Panel in the Communities section, select Brands and Themes.
- Select Manage Brands.
- Open the module's menu.
- Select Edit.
- In the Availability section, select an Institution Role from the list. Only users assigned to this role will have access to this brand. Select Everyone to make the brand available to all users.
- To make changes to the brand properties, select Save and Customize. To save without making other changes to the brand, select Submit.
Make modules available by institution role
Institution roles control what modules users have access to within Blackboard Learn.
- On the Administrator Panel in the Communities section, select Tabs and Modules.
- Select Modules.
- Open the module's menu.
- Select Edit Properties.
- Scroll down to the Availability header.
- In the Available to section, select whether to make this module available to Everyone or to Specific Roles.
- If you selected Everyone, skip to the next step. If you selected Specific Roles, in the Items to Select list, select the roles to make this module available to. Select the right-pointing arrow to move the items into the Selected Items list. To reverse the selection in either box, select Invert Selection.
For Windows, to select multiple items in a list, press the SHIFT key and select the first and last items. To select items out of sequence, press the CTRL key and select each item needed. For Macs, press the COMMAND key instead of the CTRL key.
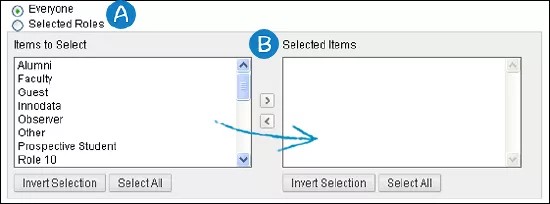
- Make this module available to all users (Everyone) or restrict access by user's institution role (Selected Roles).
- If you are restricting access by role, select a role to select it. Then select the arrow to move it to the other list.
- Select Submit.
Make tabs available by institution role
Institution roles control what tabs users have access to within Blackboard Learn.
- Open the tab group's menu.
- Scroll down to the Availability header.
- If you selected Everyone, skip to the next step. If you selected Specific Roles, in the Items to Select list, select the roles to make this module available to. Select the right-pointing arrow to move the items into the Selected Items list. To reverse the selection in either box, select Invert Selection.
- Select Submit.
Assign institution roles through Snapshot
Institution roles can be attached to users through Snapshot and the Blackboard Learn APIs. To learn more, see the Administrative API specifications on the Developer Community (available in English only).
About Snapshot files
Snapshot user files include the INSTITUTION_ROLE element. This represents the Primary Institution Role and is expressed as the Role ID.
Secondary institution roles are added through a separate Snapshot file type: User Institution Role Membership. Each record matches one user to one institution role. To match a user to multiple institution roles requires multiple records in the file. This table describes the fields included in a record in a Snapshot User Institution Role Membership file.
| Element | Description |
|---|---|
| EXTERNAL_PERSON_KEY | A unique identifier for a user at the institution. This ID is provided by the institution and isn't displayed to users. String. Max length 64. Not Null, External Key |
| ROLE_ID | Institution role. Passed as a string. Not null. |