Add a rich description to images and graphs to improve comprehension
Images can be a great way to engage your learners with different modes of learning, and can help communicate complex ideas to students. For students with visual impairments, image descriptions that explain the content of an image are crucial for their learning. For all students, text descriptions can provide deeper context to aid their comprehension.
Image descriptions are often called "alternative descriptions", "alternative text", and "alt text". This is because they provide a text based, descriptive alternative to the image.
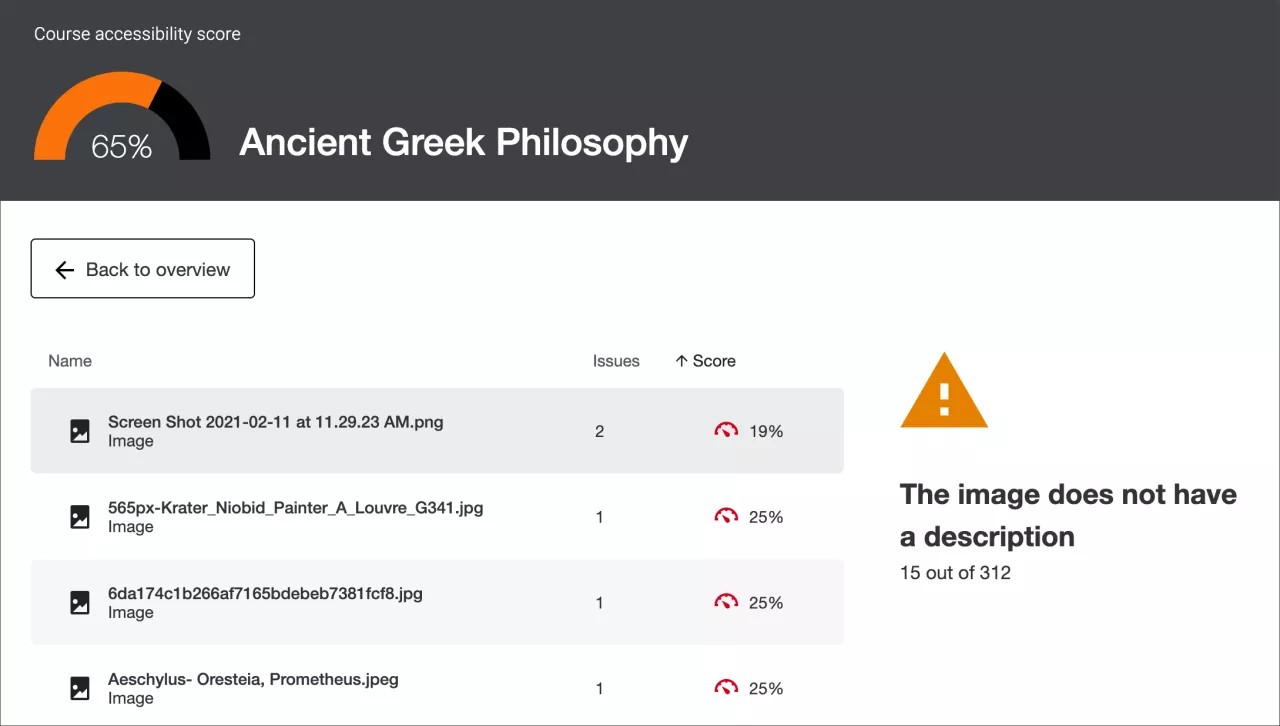
Ally checks for image descriptions anywhere there is an image. This includes image files and files that include images. For example, a document or presentation.

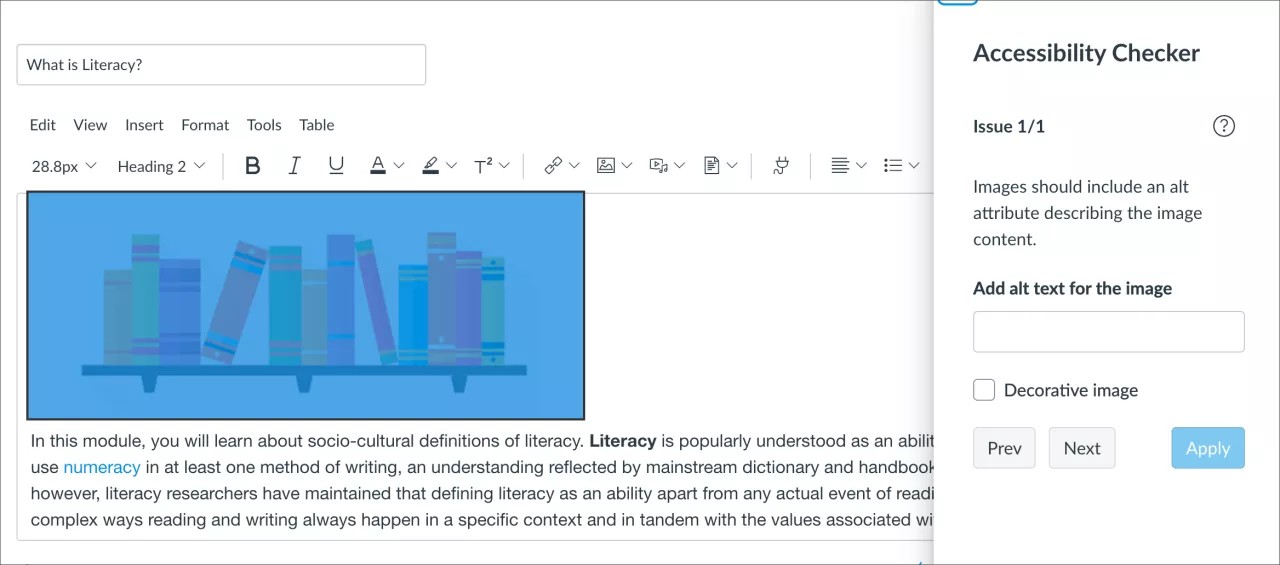
Select the Accessibility score indicator to open the instructor feedback panel. Follow the guided steps to add descriptions to your images.
Preview Where the Accessibility Issue Is
See where this issue is
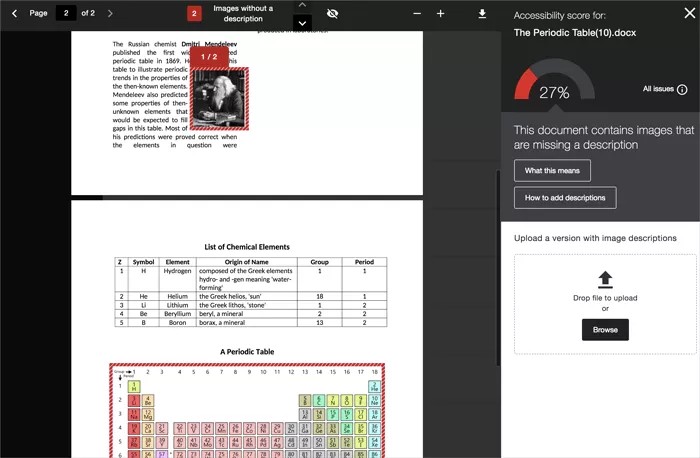
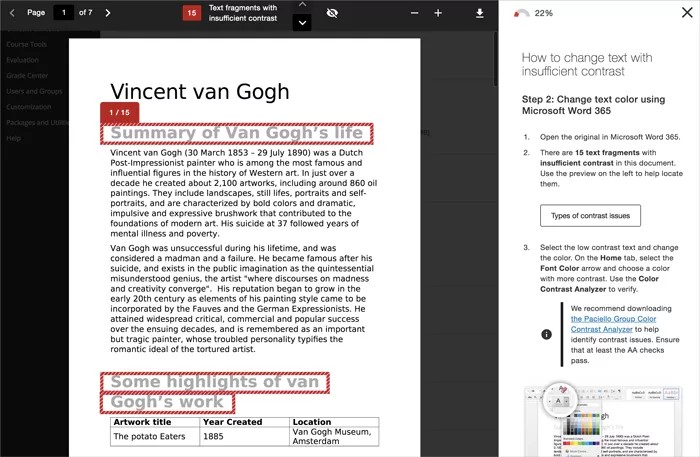
The preview highlights where specific accessibility issues can be found in the document. Highlights show every occurrence of one issue type at a time. For example, if your images are missing alternative descriptions, the highlights show you every place this specific issue occurs. If your document also has poor text contrast, select that issue in the feedback panel to see the occurrences of that issue highlighted.
Highlights are provided for these issues:
- Images without an appropriate alternative description
- Text fragments with insufficient contrast
- Tables without table headers
All other accessibility issues are not highlighted in the preview.
Missing text description
Text contrast
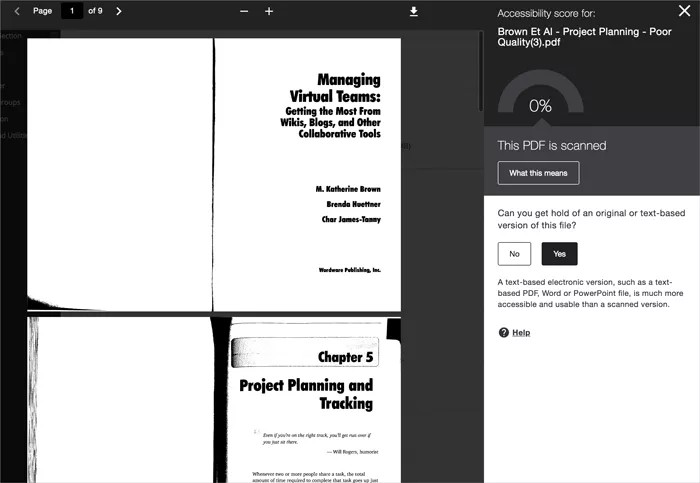
Scanned PDF
Preview tools

Use the tools above the preview to explore the issues in your document.
- Move through the document preview page by page.
- See how many times a specific issue appears in the document.
- Jump between the issue highlights.
- Hide or show the highlights.
- Zoom the preview content in or out.
- Download the original file.
Add descriptions to an image file
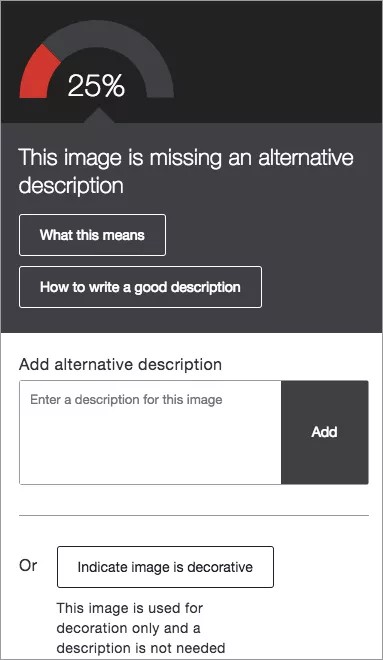
When you’re ready, add your image description to the text field in the instructor feedback panel and select Add.
Make sure your description is more than just the title of the file, or Ally will report an accessibility error. Describe the image and what’s important. Mention any text in the image to improve your score. To learn more, see Writing good descriptions.
Mark an image file as decorative
If your image is only for visual effects, and doesn't contain information relevant to the learning content, select Indicate image is decorative.
Alternative descriptions aren't necessary for decorative images. Your accessibility score improves. This helps assure students of the purpose of those files.
Add descriptions to images in other files
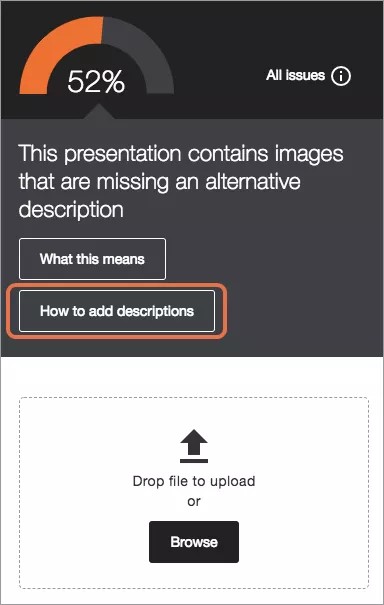
Sharing presentations and documents with students can provide them useful review and study materials. Since many files include images, it is important that the images contain an alternative description, to help both in labeling document images as well as for students with visual impairments.
If your presentation or document has images missing alternative descriptions, you need to fix it in your presentation or document software. Upload the new file to Ally when you’re ready. Select How to add descriptions for step-by-step guidance on how to do this.
Not sure how to write effective alternative descriptions? Make sure your description is more than just the title of the file, or Ally will report an accessibility error. Describe the image and what’s important. Mention any text in the image to improve your score. To learn more, see Writing good descriptions.
- Select How to add descriptions and follow the instructions.
- Open the file on your computer.
If you don't have a copy of the file on your computer, leave the instructor feedback panel and download the file from the course.
- Add descriptions to your images.
- Microsoft® Office: Double or right-click on an image to open the Format Picture panel. Select Size & Properties and Alt Text. Add the description text. Don't worry about the title.
- LibreOffice: Select an image. Select Format from the menu bar and select Description. Add the description text.
- Save the file.
- Upload the updated file to your course.
If you still have the instructions open in the instructor feedback panel, select Next and Browse to upload your file. If you don't have the instructor feedback panel open, select the Accessibility score indicator next to the file in your course and select Browse to upload your file.
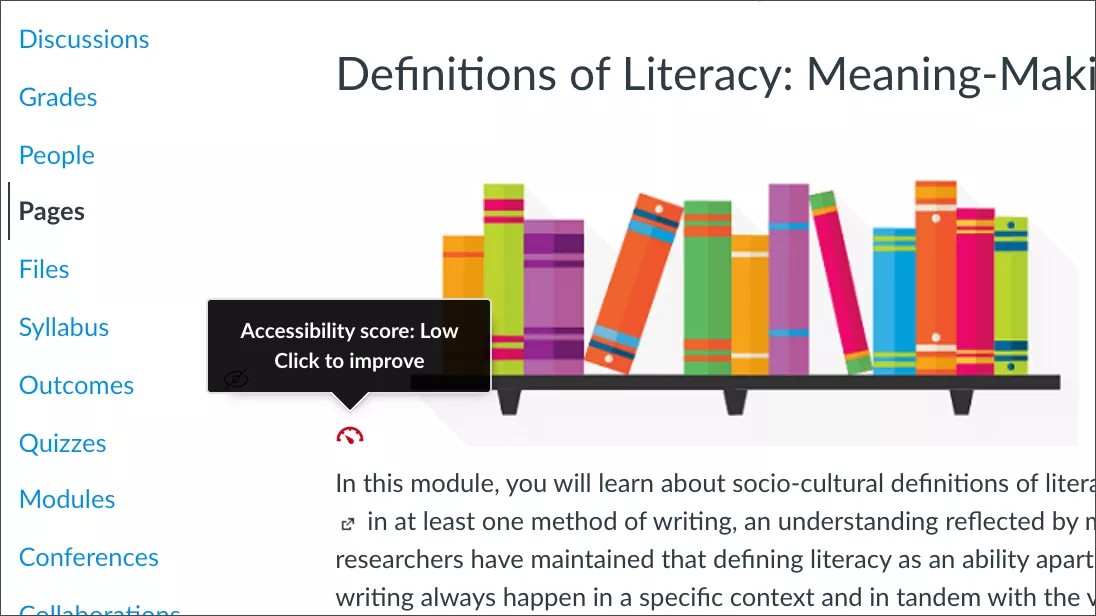
Add image descriptions to your course WYSIWYG content
Go to your course content and edit it to see the score. Select the score to open the Instructor Feedback panel and add a description for the image.
Learn more on how to fix content in your course WYSIWYG editor
Alternative Text on Images
Writing good descriptions
Follow these best practices to write good alternative text descriptions for your images:
- Describe the image based on the page context. Convey the full meaning of the image.
- Avoid saying "image of" or "picture of". Screen readers automatically announce images as images.
- Be concise.
- Write narratives for complex images like infographics. Put this narrative on the page immediately following the infographic. Include an anchor link at the top of the page to view the text alternative. See an example of an infographic with a text alternative.
- Avoid images of text. If you can't avoid it, copy the text into the alternative description.
- Say something new. Don't repeat alternative descriptions on the same page. Don't repeat what is already said on the page.
- Identify images that don't represent relevant content as decorative.
What is a decorative image?
An image is decorative when it doesn't add to the information on the page. For example, art work used to separate topics or a photo of someone on the phone when discussing communication skills.
They are valuable in their visual appeal but may not need to be read by screen readers.
More on decorative images on the web accessibility initiative website
Why are alternative image descriptions important?
There are many reasons to use alternative descriptions with your images.
- Alternative descriptions, or text, are in the WCAG 2.2 guidelines
- Students can search for an image
- Students with visual impairments have difficulty perceiving images
- Student with a poor network connection may have difficulty perceiving images
- Screen readers can't read images
- Some students learn better from descriptions than images
- Text scales better than most images when the screen or page is enlarged
Instructure Canvas image description best practices
You’ve added an alternative description to an image in your course and resolved the Red indicator “dial” flipped to Green. Depending on how and where in your course you’ve added your image description, there are a few considerations detailed in the scenarios below.
Scenario: You provide an alternative description for an image through Ally in a Canvas rich content page.
The description is now present in the rich content item and you will see a Green indicator “dial”. The description added through Ally will get pushed back into the Canvas content directly so that it can be stored by Canvas and made available to your students.
Scenario: You provide an alternative description for an image through Ally in the Canvas Files tool.
Ally has captured your alternative description and you will see a Green indicator “dial”. Ally will store the description so that your students can access it when they encounter the image in your course. However, when a description is added from the Files tool, it will not be stored by Canvas.

Scenario: You provide an alternative description for an image through the Ally Course Accessibility Report.
Ally has captured your alternative description and you will see a Green indicator “dial”. Ally will store the description so that your students can access it when they encounter the image in your course. However, when a description is added from the Course Accessibility Report, it will not be stored by Canvas.
Scenario: You provide an alternative description for an image through Ally but the built-in Canvas checker says it is still missing.
You will see a Green indicator “dial”, but the built-in Canvas checker may say that your image is still missing a description. Don’t worry, Ally has stored the alternative description for that image so your students can still access it. Because the Canvas Files tool and Course Accessibility Report do not allow Ally to push your description back into the content directly, the built-in Canvas checker will be unaware of the description added through Ally.
Scenario: You provide an alternative description for an image directly within the Canvas rich content area through the “Image Options.”
The alternative description added directly to your image through the Canvas rich content editor is stored in Canvas and made available to your students. Ally will recognize the presence of the description and you should see a Green indicator “dial”.

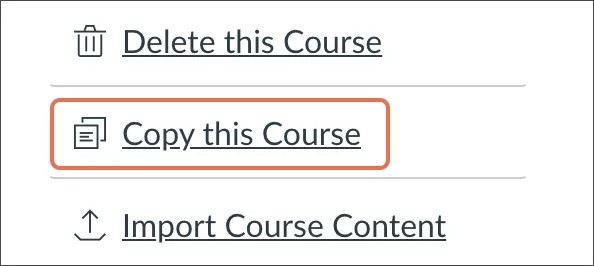
Scenario: You have copied your course containing the added Alternative Descriptions to a new course.
It is recommended to always use the native Canvas course copy functionality to ensure your alternative descriptions carry over with your images to your new course. Using the Canvas course copy means that no matter which way you added your alternative descriptions, Ally can surface them for your students in your new course.
When a course is copied it may take a few minutes for Ally to surface the descriptions from the previous course, so it may take a few minutes for the Ally indicators to update. So if you see Red indicator “dials” for images and you’re expecting to see Green, wait a few minutes for Ally to recognize and update for your new course.
Avoid using the “Course Import” and “Course Export” options to preserve your image descriptions
Using the export and import functionality (including Canvas Commons) to copy courses forward may not always have desired results. When exporting and importing a course, alternative descriptions added through Ally will only be available in your new course in scenarios where Canvas was able to store the description, such as a description added through the content page. Alternative descriptions added through the Canvas Files Tool will not appear in the new course, and you will see Red indicator “dials.” For this reason, we do not recommend using the export and import method if possible.