Where do I start grading?
You can choose where you want to start grading!
Want to see how many assignments are ready to grade in all your courses? In the list where your name appears, you have immediate access to all your courses' grading tasks on the global Grades page. All your grading tasks are organized by course. You can quickly scan your progress, set priorities across the board, and even begin grading. No need to navigate to each course to see what's ready for grading.
The page only displays information if you need to take action. You see assignments that are ready to grade or which assignments are overdue for how many students.
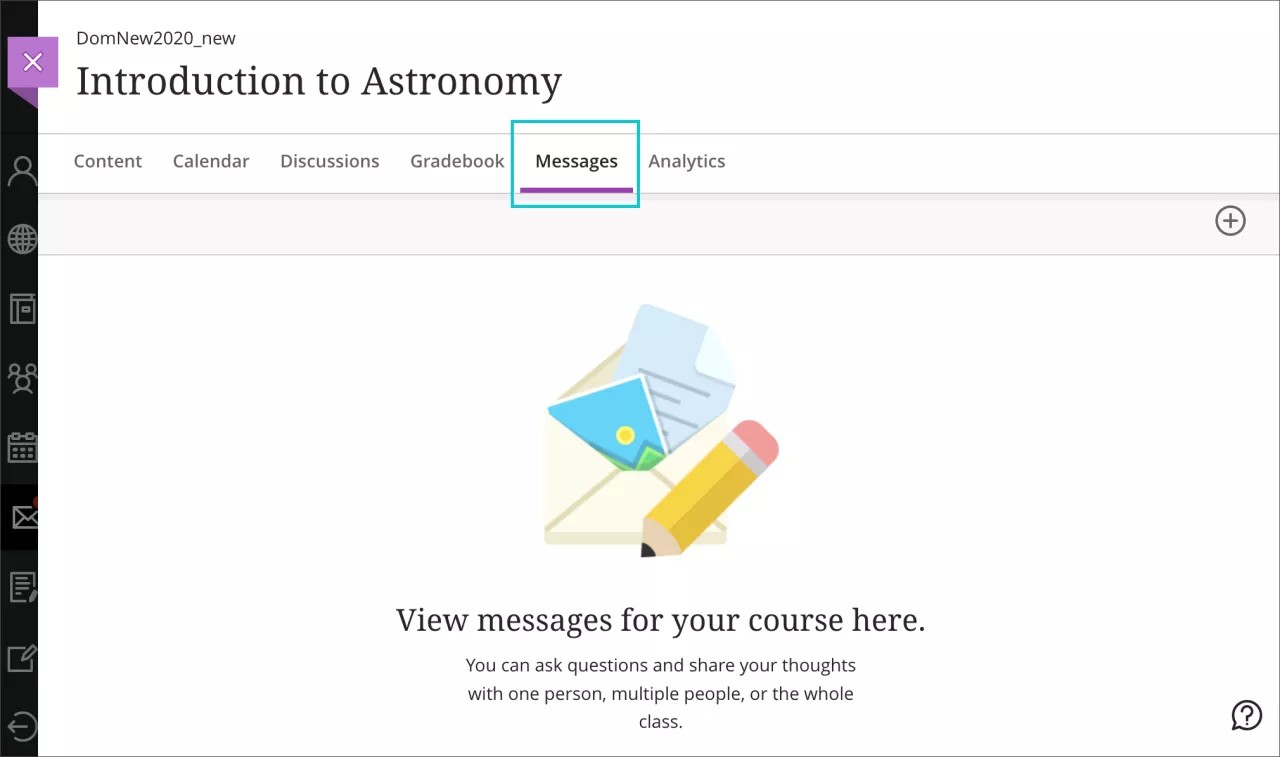
Want to narrow your focus? In a course, you can access the course gradebook on the navigation bar. You can see who has made submissions and start grading.
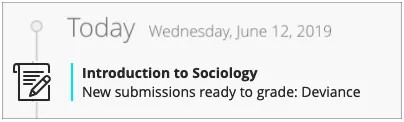
From the activity stream, you're alerted when student submissions are ready for grading. Select the link to go to the gradebook. Or, select an assignment on the Course Content page to see how many students have made submissions.
Watch a video about grading assignments
The following narrated video provides a visual and auditory representation of some of the information included on this page. For a detailed description of what is portrayed in the video, open the video on YouTube, navigate to More actions, and select Open transcript.
Video: Grading assignments explains how to grade assignments.
Start grading from an assignment
When you access an assignment, the Content and Settings page displays the instructions and files you provided, and details such as the due date. Select the Settings icon to make changes. For example, you can change the grading schema at any time and the change will show to students and in your gradebook.
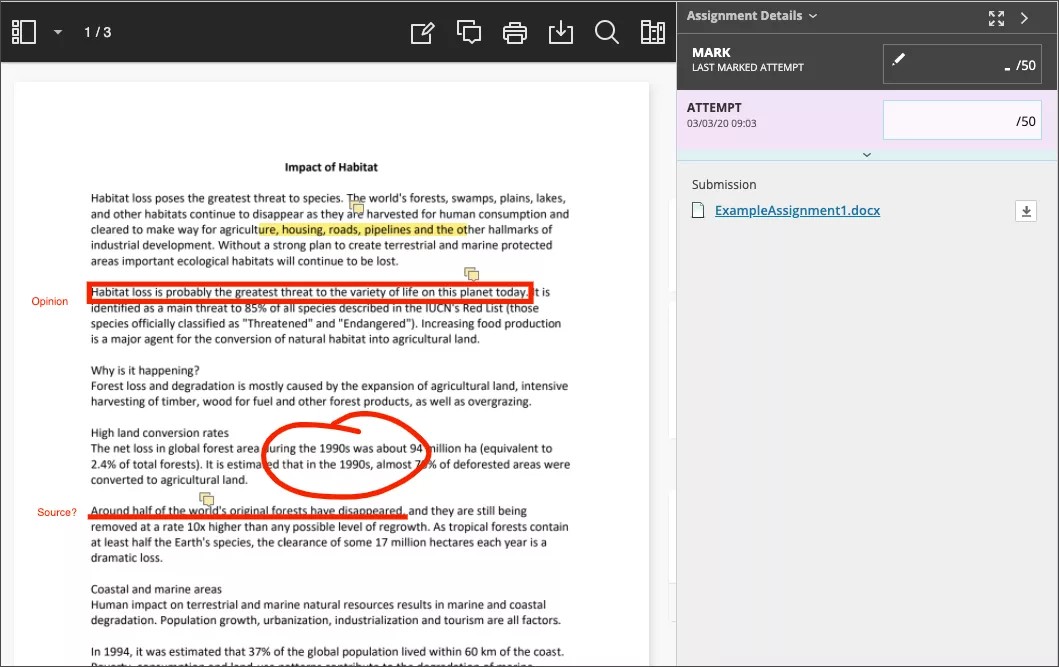
View the rubric. If you associated a rubric with the assignment, you can review it.
Keep up with the conversation. If you allowed conversations about this assignment, select the Open class conversation icon. Students can discuss the assignment with you and their classmates. As the conversation develops, it appears only with the relevant assignment.
A small circle appears with the icon to indicate new activity.
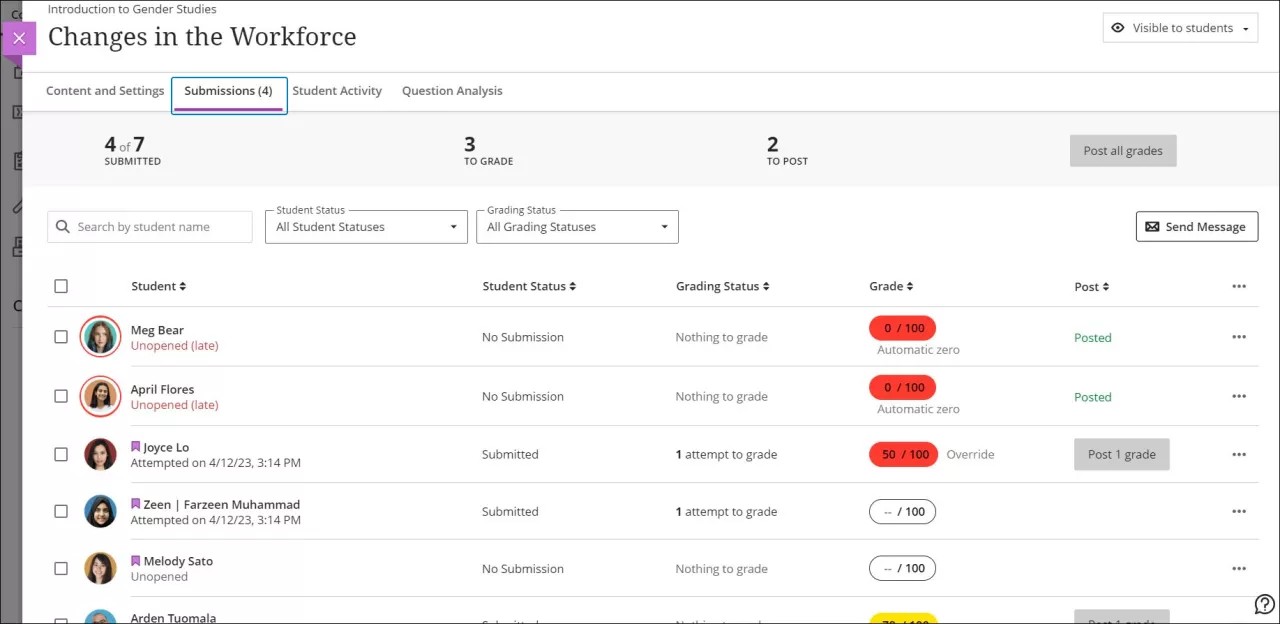
Check how many need grading. Select the Submissions link to see how many students have completed the assignment.
Refine questions. If you included questions, you may need to make corrections after students have opened an assignment or group assignment. For example, you may have chosen the wrong answer, found a typo, or want to adjust points or scoring options. You can make a change for all students to see and automatically update all grades.
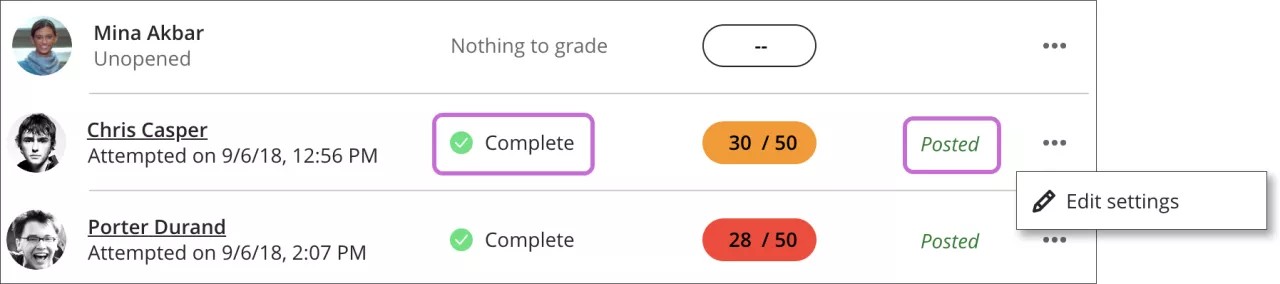
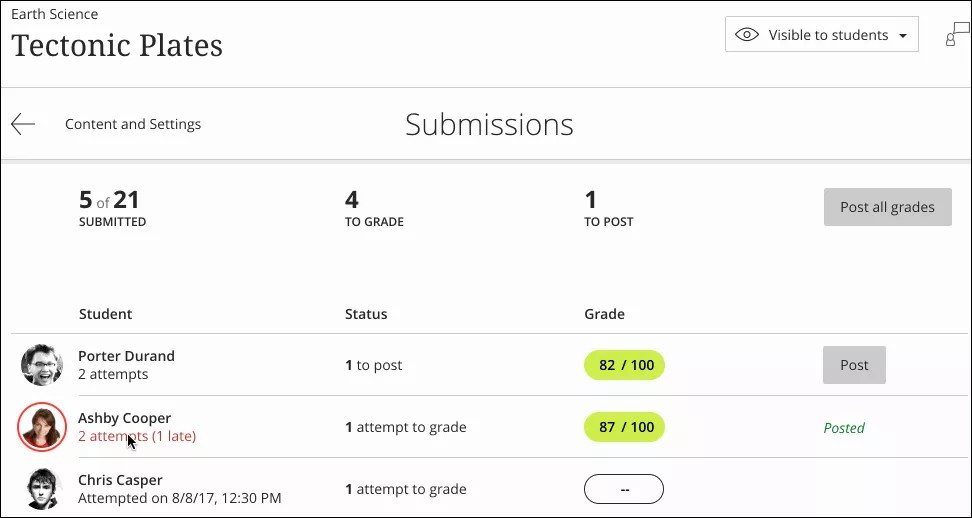
Assignment submissions list page
The submissions list page displays all enrolled students. You can search for a student or a group and select how many items to display on the page. The system remembers your selection, so if you leave and come back, the setting is retained in the next session. You can select which page to view at the bottom of the screen.
Use the Filter menu to display only those submissions that need grading. At this time, you can filter by All statuses and Needs grading. The Filter menu doesn't appear for group and discussion items.

Keep track of all submissions on one page. Quickly see which attempts are ready to grade. Student profile pictures appear with a red circle when they have late submissions or the due date has passed with no attempt submitted.
Access the details. Review the instructions and settings at any time. For example, select the Content and Settings link to return to the assignment page.
View students with accommodations. You can set accommodations for individual students and exempt them from requirements, such as assessment due dates and time limits. Use accommodations to help students progress in the course even though they may have difficulty with some requirements. In the gradebook and roster, icons appear next to the names of students with accommodations.
Review the conversation. Select the Open class conversation icon to see what students are saying.
Download submissions. To accelerate your grading process, you can download students' assessment submissions and view them offline. You can download all or only selected submissions as a single ZIP file.
More on downloading submissions
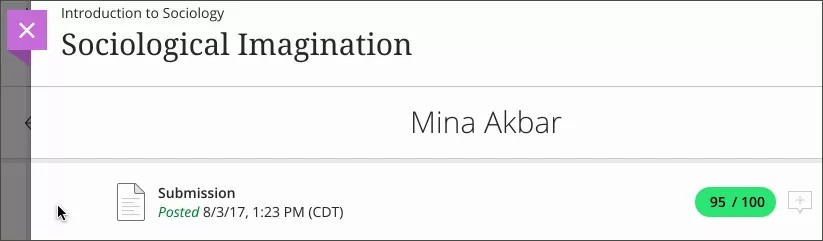
Start grading. Select student names to access their individual submissions, and assign grades and provide feedback. Type a numeric value of no more than five digits. You can include two additional digits after a decimal point. You can also assign grades directly on this page. These grades are override grades. An override label appears next to the grade. After you assign a value, click anywhere outside the grade area to save.
Ready to post grades? Post appears next to each grade you haven't released yet. You can choose which grades to post and when. Posted grades appear with a Posted message in the column. You can also grade all submissions for an item in succession and then select Post all grades to release all grades in one action.
When you post grades, students can view them and any feedback you provided. All feedback for all attempts, even ungraded attempts, shows to students.
If you chose not to show correct answers for automatically scored questions, return to the assessment settings panel and select the Show correct answers check box.
More on showing correct answers
From a student's submission page, access the menu next to the grade pill to add an exception for the assignment. An exception includes additional attempts or extended access, even if the assignment is hidden from other students. You can also add exceptions after you post grades.
View submission timestamps
When you start or review grading, you can point to a submission timestamp to view more information. Timestamps appear on students' submission pages and on their attempts panels when you've allowed multiple attempts for an assessment.
For example, on a student's submission page, you can view when the student made the submission and when you posted the grade. The timestamp appears in red with a "late" label after the due date passes.
For multiple attempts, on the Submissions list page, select a student's name to open the attempts panel. Point to a timestamp to view the additional information.
Feedback panel
Open an attempt. On the Submission page, select the feedback icon to open the feedback panel. The panel remains in place as you scroll through the assignment and add overall feedback and a grade.
When you post grades, students can view them and any feedback you provided. All feedback for all attempts, even ungraded attempts, shows to students.
Insert a feedback recording in the editor
You can embed an audio or video recording of your feedback in the editor as you grade attempts. The recording option appears in the feedback editor for most graded items in your course. Students watch or listen to your feedback alongside any text you include.
This feature isn't supported on all browsers. For the best experience, use Chrome or Firefox.

Bb Annotate
You can annotate and grade student files directly within the browser with Bb Annotate. Bb Annotate is supported on the same browsers Blackboard Learn supports.
Bb Annotate
You can use BB Annotate for inline grading in your courses. Bb Annotate offers a more robust feature set to provide customizable feedback to students. Features include a sidebar summary view, freehand drawing tools, various color selections, and much more.
BB Annotate grading workflow
On the Assignment Submission page, supported file types open in the browser. You can view and annotate these document types in the browser:
- Microsoft® Word (DOC, DOCX)
- Microsoft® PowerPoint®(PPT, PPTX)
- Microsoft® Excel®(XLS, XLSX)
- OpenOffice® Documents (ODS, ODT, ODP)
- Digital Images (JPEG, JPG, PNG, TIF, TIFF, TGA, BMP, HEIC)
- Source code (Java, PY, C, CPP, etc)
- Medical Images (DICOM, DICM, DCM)
- PSD
- RTF
- TXT
- WPD
Office Suite Macros, such as Visual Basic, aren't supported.
Annotation sessions expire after one hour. You'll receive a warning message before your session expires. Your completed annotations, feedback, and files are saved on the page. When you return, you can resume working.
Animated gifs display only the first frame in the pdf viewer for annotation purposes. Download the submission to view the animated gif.
Original formatting and embedded images are preserved. If a student submitted an unsupported file, you're prompted to download it. Assignment submissions created through the editor aren't compatible with inline grading.
Bb Annotate is supported on current versions of Firefox, Chrome, Edge, and Safari.

As part of the responsive design, the menu display changes based on the screen size. On medium and small screens, the Document View settings display the page number you're viewing. Annotation tools are stacked under the View Annotation Tools icon. On small screens, the Content Library is hidden.
Menu options from left to right
- Sidebar: View Thumbnail, Outline, or Annotation views of the submission.
- Pages: Use the arrows to jump to different pages in the submission.
- Pan: Move the submission on the page.
- Zoom and Fit: Zoom in and out of the submission or adjust the view to fit the page, fit the width, or select the best fit.
Annotation tools: Select each tool to view the tool properties.
Your selection for each tool is saved between submissions.
- Drawing, Brush, and Eraser: Draw freehand on the submission with various colors, thickness, and opacity. Select the eraser to remove annotations. You can erase parts of a freehand drawing with the eraser or select the Delete icon to delete the whole drawing.
- Image or Stamp: Choose a preloaded stamp or create your own customized stamp or image to add to the submission.
- Undo: Undo or revert the last thing you did.
- Redo: Repeat the last thing you did.
- Text: Add text directly on the submission. You can move, edit, and change the text and select the font, size, alignment, and color of the text.
- Shapes: Choose Line, Arrow, Rectangle, Ellipse, Polygon, and Polyline. Each shape has its own settings to change the color, width, opacity, and more.
Comment: Provide feedback in comments. Your comments appear in a panel next to the submission. You can make your comments anonymous by selecting the Anonymous button. You only have the option to make anonymous comments if your institution has turned them on.
Students can access the annotated files but won't be able to add annotations in their submissions.
Print or Download: Print or download the submission with the annotations.
A known issue with some browsers' built-in PDF viewer may not display all your annotations. Please view annotated PDFs in a native PDF viewer such as Adobe Acrobat.
- Search: Search the submission for specific text.
Content Library: Create a bank of reusable comments. You can add, edit, delete, and search comments in the library. You can also add a comment directly to the submission page from the menu. Select the plus sign to add a new comment to the Content Library. You can Place comment, Copy to Clipboard, Edit, or Delete content from the library. Type keywords or phrases to search for saved comments.<
The Content Library is only available in SaaS environments.
- Highlighter: Select specific portions of the submission to highlight. As you highlight text on the submission, an additional menu opens. You can highlight, strikethrough, underline, squiggle, or comment on the highlighted section.
Watch a video about Annotate in Blackboard Learn
The following narrated video provides a visual and auditory representation of some of the information included on this page. For a detailed description of what is portrayed in the video, open the video on YouTube, navigate to More actions, and select Open transcript.
Video: Annotate in Blackboard Learn provides a tour of the Annotate tools available for inline grading in your Blackboard Learn courses.
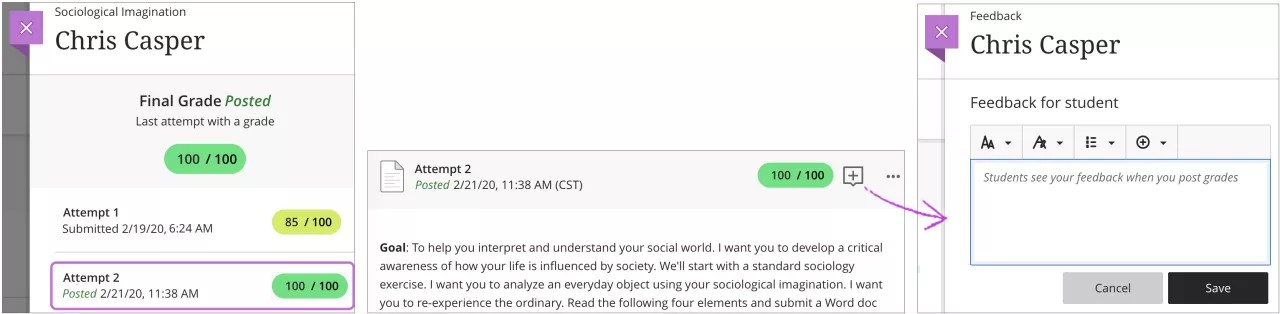
Grade an assignment with multiple attempts
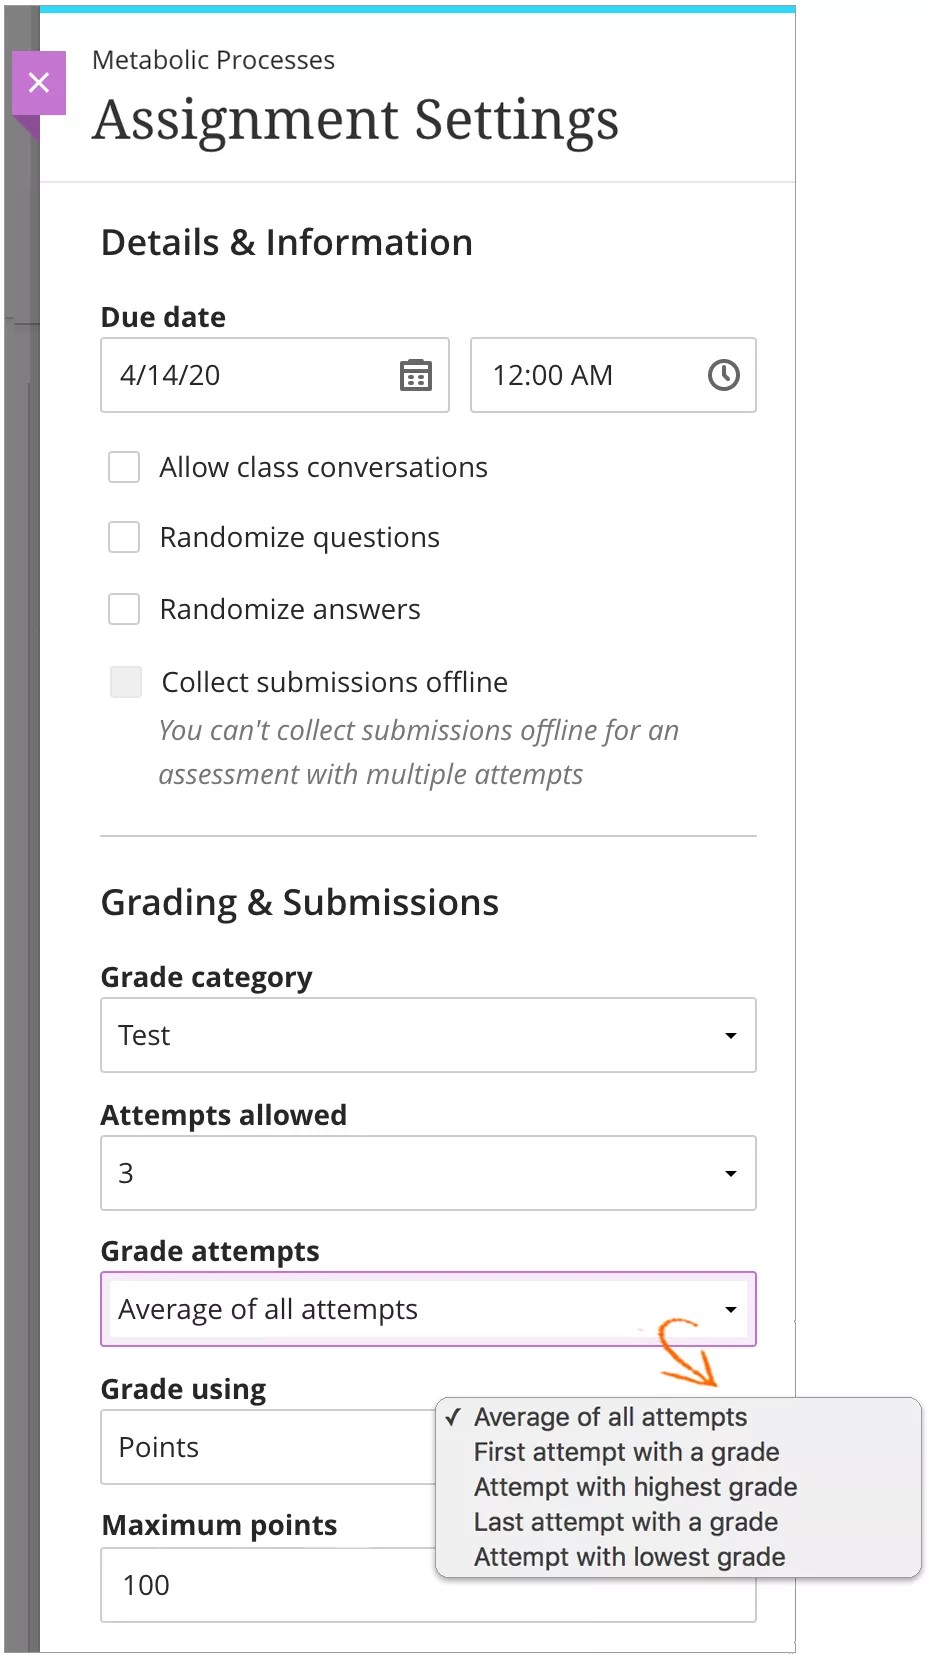
When you create an assignment, you can choose to let students submit more than one attempt. Multiple attempts change how the assignment's final grade is automatically calculated. Choose how you want to calculate the final grade:
- Average of all attempts
- First attempt with a grade
- Attempt with highest grade
- Last attempt with a grade
- Attempt with lowest grade
You can't allow multiple attempts on a group assignment or when you collect submissions offline.
The Grade attempts setting determines how the final grade is automatically calculated, but you have the option to override the final grade. Each attempt is subject to the due date you set for the assignment. If a student submits an attempt after the due date, the attempt is marked late. Attempts submitted before the deadline are shown as on time.
You can only override the final grade, not the grades for each attempt.
More on the ramifications of overriding grades
View individual attempts
You can grade an assignment with multiple attempts from the same places you grade an ordinary assignment:
- Activity stream
- Gradebook
- The assignment
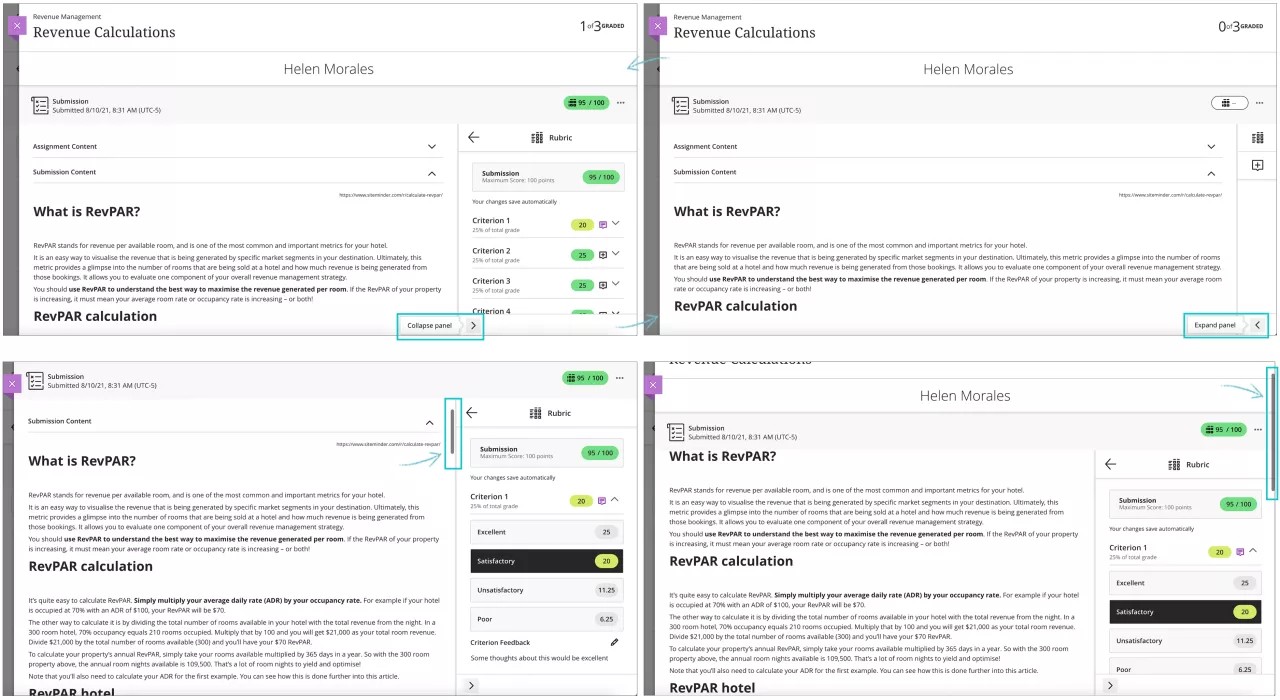
When you select a student's name, a panel appears that displays each attempt, along with the date it was submitted. Select an attempt to view the submission.
The feedback icon appears next to each attempt. Select the icon to open the feedback panel, which persists on the side of the screen. You can scroll through the assignment and add overall feedback and a grade.
Use collapsible and expandable panel on the right to navigate through tabs such as rubrics, feedback, and originality report. You can also navigate the submission view and the panel tabs with different scroll bars. Independent scroll bars allow instructors or graders to scroll up and down the submission content without affecting the side tab navigation or the header. Use rubrics in a more practical way and provide feedback focused on a specific part of the submission.
Reminder: When you post grades, students can view them and any feedback you provided. All feedback for all attempts, even ungraded attempts, shows to students.
If you used a rubric or questions that are scored automatically, the grade may already exist for the attempt.
Final grades
The final grade for a multiple attempt assignment is calculated based on the Grade Attempts setting you chose in the Assignment Settings. In the panel that lists a student's attempts, the final grade appears when those attempts are graded. For example, if the final grade is calculated based on the highest graded attempt, the final grade appears immediately after at least one attempt is graded. But, the grade may change as you continue grading more attempts.
After you finish grading the attempts, you can post the final grade for the student to see.
What do students see?
Assignments with multiple attempts list the number of attempts allowed, as well as how the final grade is calculated. Students view this information on the Details & Information page before they begin. When grades are posted, students can view grades for each of their attempts, as well as the final grade. If you decide to override the final grade, a message appears to let the student know.
More on how students access assignments in Blackboard Learn
Grade an assignment with a time limit
When you allow students to work past the time limit for an assignment, you're able to view which assignments exceeded the time limit. If you added questions, you can also view how many questions were answered after the time limit.
More on grading work with a time limit—examples appear in the grading tests topic