Your institution controls which tools are available in the Original Course View. Assignments are always available to instructors in the Ultra Course View.
Before assigning group work
You don't want students to see group activities as busy work. If group work doesn't enhance your learning objectives and provide value, consider alternative teaching techniques. Only use group work for projects an individual student can't do as well alone and finish in the intended amount of time.
Research shows that students work harder when others rely on them. To encourage this interdependence, create group assignments that require the students to divide the work to meet the goal, question and challenge each other's ideas, and share feedback and encouragement.
Before incorporating group work into your course, consider these questions:
- Will the group work further my course objectives?
- What introductory material or group resource information can I provide to help students succeed?
- How will the groups be formed?
- Will students be involved in planning the groups?
- How will I assess students' learning and maintain individual accountability? Will I require a group deliverable?
- How will I handle concerns and problems?
Source: "44 Benefits of Collaborative Learning." gdrc.org n.d. Web. 3 Jan. 2020.
Watch a video about group assignments
The following narrated video provides a visual and auditory representation of some of the information included on this page. For a detailed description of what is portrayed in the video, open the video on YouTube, navigate to More actions, and select Open transcript.
Video: Group Assignments shows how you can deliver assignments to groups of students.
About group assignments
Collaborative learning offers many benefits over traditional instruction. Studies show that when students work as a team, they develop positive attitudes, solve problems more effectively, and experience a greater sense of accomplishment.
You create a group assignment nearly the same way you create assignments for students to complete individually. Gradebook items are created automatically.
If students with accommodations are in a group, all students in that group inherit the accommodation for that item. For example, you create a group assignment and one group member has a due date accommodation. That group's work isn't marked late if they submit after the due date.
For a specific group assignment or group test, you can give an individual group an exception for extended access only. Multiple attempts aren't allowed for group assessments at this time.
Students can hold virtual meetings with their group members if Collaborate Ultra is enabled at your institution and you enable conversations for the assignment.
More on using Collaborate Ultra in your course
Create a group assignment
On the New Assignment page, select the Settings icon to open the Assignment Settings panel. Provide a due date and select the settings you want to apply to the group assignment:
- You can allow class conversations for a group assignment. Students can choose between a conversation with the class as a whole or among only their group members.
- You can also choose to collect submissions offline that don't require groups to upload submissions. You can add instructions, files, a rubric, and goals so the groups can prepare for the offline work. You can also enable conversations for offline work.
- You can issue an access code to control when groups may submit a group assignment. At this time, access codes are generated randomly by the system. You can't customize the access codes.
At this time, you can't create a group assignment with multiple attempts, a time limit, hidden names, or with parallel grading.
Select Assign to groups.

Create groups
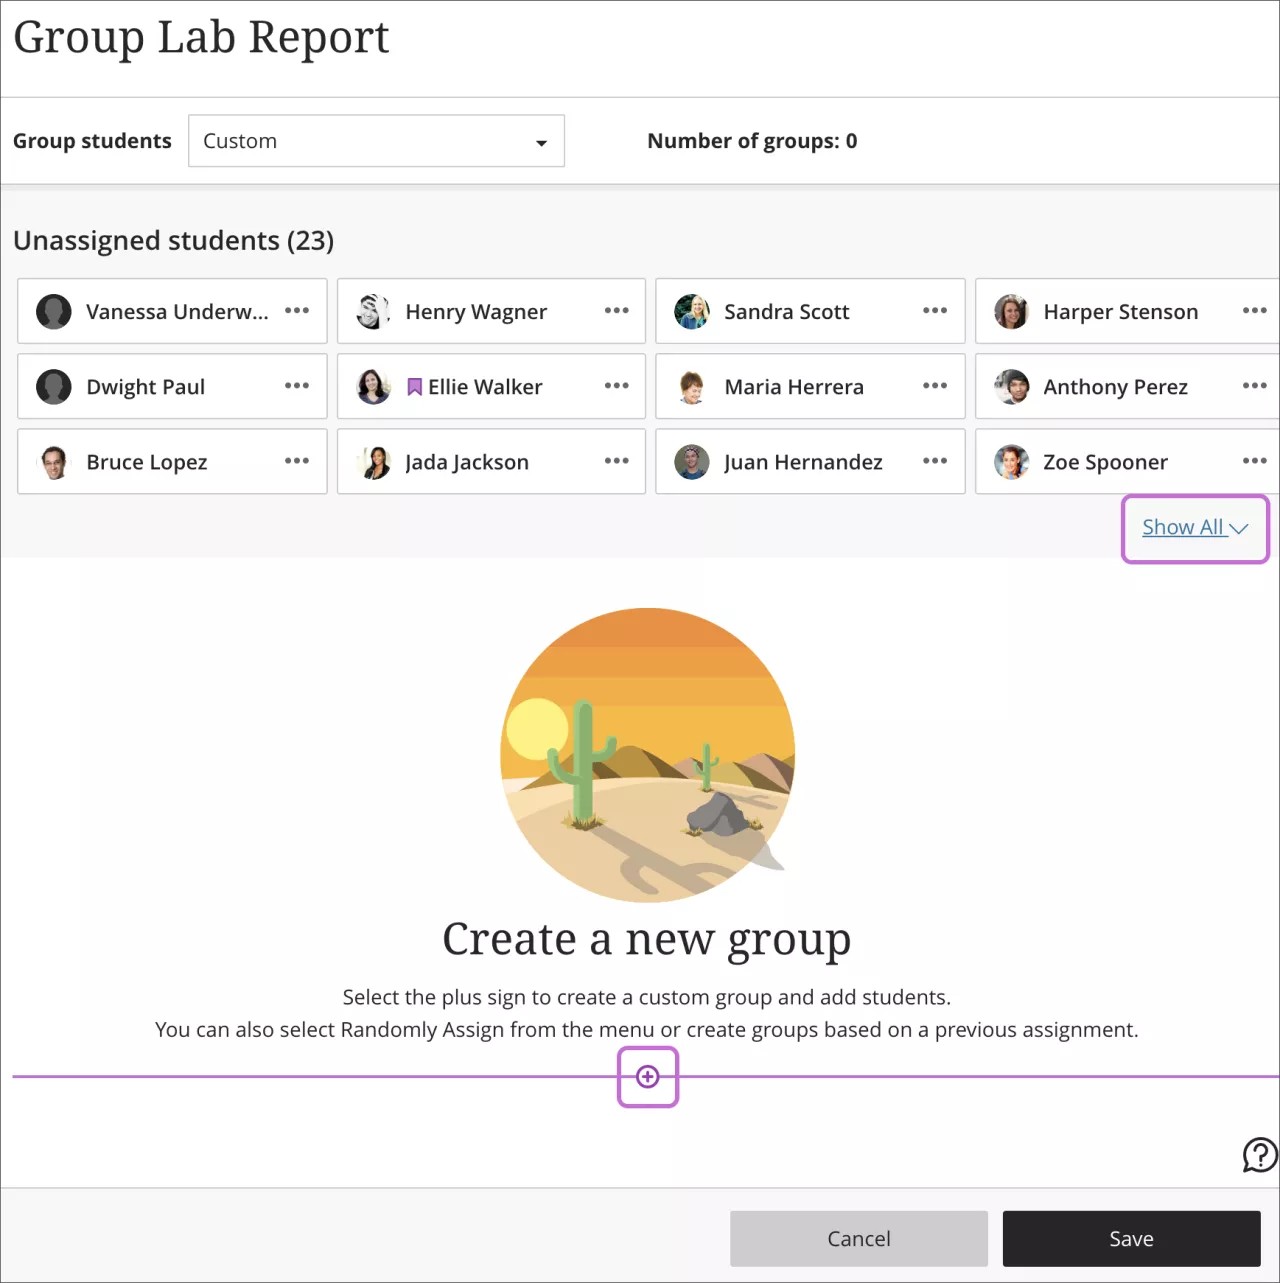
On the groups page, a partial list of your students appears in the Unassigned students section. Select Show All to view the entire list. You can create multiple groups to deliver the assignment to. You can also select the plus sign below the student list to create a custom group and add students.
Your teaching assistants can create and manage group enrollments. Your graders can only grade group assignments.
Students who aren't assigned to a group won't have access to the group assignment because it won't appear on their Course Content pages. If you ask students to self-enroll in a group, they can't access the assignment until they join a group.
You can divide your students among groups in these ways:
- Custom
- Randomly assign
- Self-enrollment
- Reuse groups
To help you with the division and selection of students for the group or groups you are creating, you can paginate through students who aren't currently assigned to a group. You can also move to the top of the page when there are enough students shown on the screen.
The students' avatars in this view are hidden, to help people with vision impairment navigate through cards more efficiently.
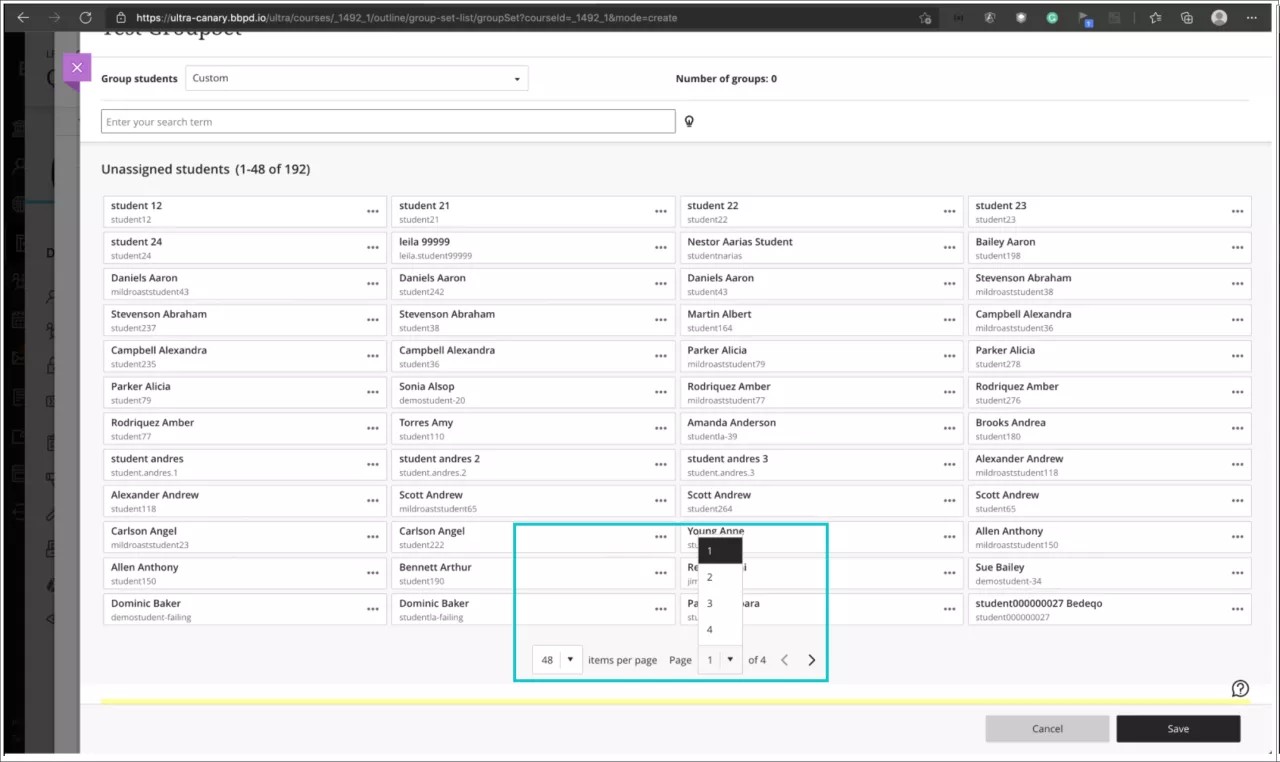
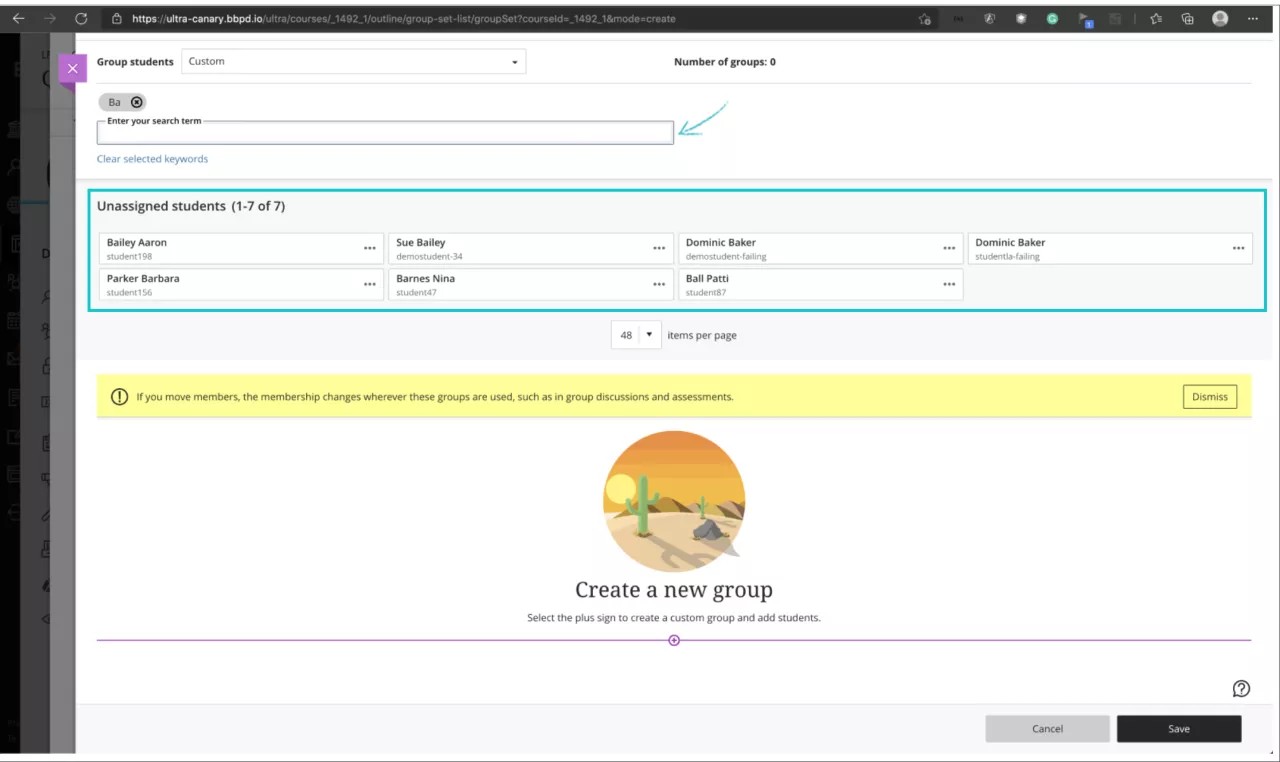
You can also use the search bar to find a specific student or filter the display of unassigned students by search criteria. The bar shows predicted results and will display only students pending to be assigned to a group.
Custom groups
You can create as many groups as you want, with any number of students in each group. You can also create new groups or remove groups based on how many you want for this assignment.
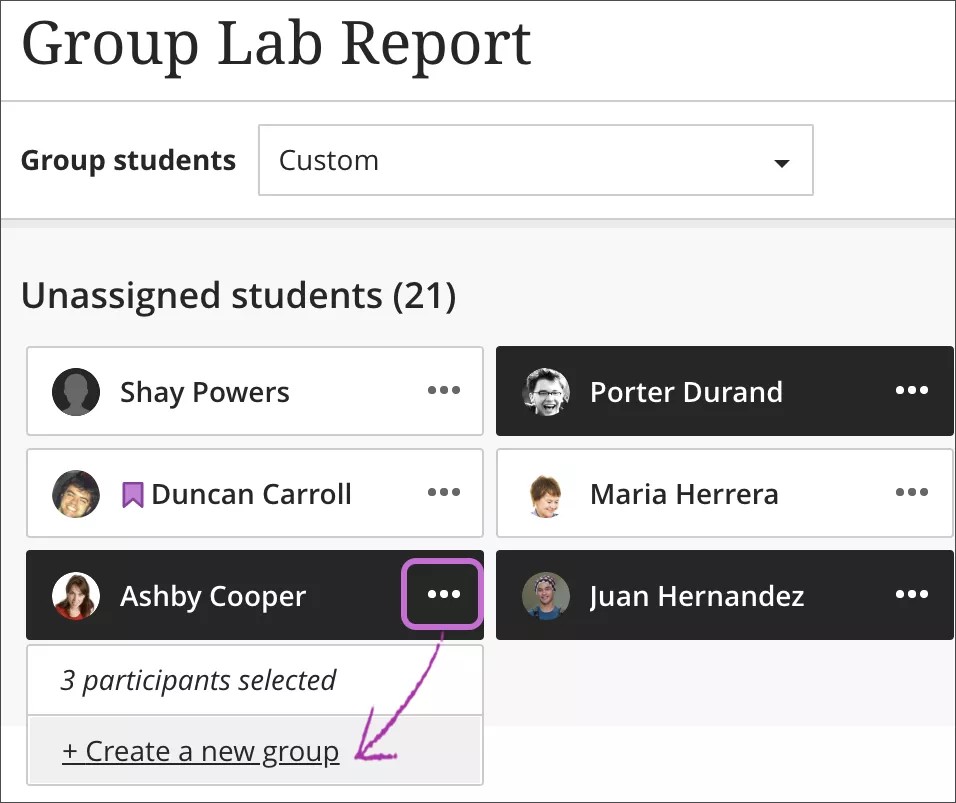
- In the Group students menu, select Custom.
- Select each student's name to select them at the same time. Select a student's name again to remove the selection.
- After you select the students, open the menu next to one of their names and select Create a new group. You can also move multiple students to a group listed in the menu. You can't move students to a group with submitted work.
- Edit the group name if you want to change the default naming.
- Optionally, provide a group description that only appears to you at this time. You have no limit on the number of characters.
Select the plus sign wherever you want to add another group. You can also repeat steps 2-5.
At this time, if you save a Custom group set, return to the group set, and select Custom again, your groups are deleted.
Randomly assign
Students are randomly assigned to the number of groups you choose. You need at least four students so the system can randomly assign students to at least two groups.
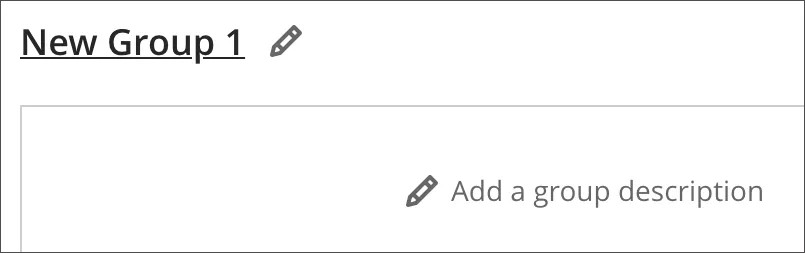
- In the Group students menu, select Randomly assign.
- In the Number of groups menu, select how many groups to create. You need to create at least two. Students are equally assigned to the number of groups you choose. Be careful as you make changes before you save. If you create four groups with titles and optional descriptions, and then use the menu and change to six groups, your groups redistribute and the titles and descriptions are removed.
- To remove all students from the current group set, select Unassign All at the top of the page. The setting changes to Custom if you move students to different groups after they're grouped and before you save.
- Edit each group name if you want to change the default naming.
- Optionally, add group descriptions that only appear to you at this time. You have no limit on the number of characters.
Select the plus sign wherever you want to create a group in addition to the groups the system created.
Self-enrollment
You can ask students to self-enroll in groups to complete a group assignment. Only students may join.
Students see the group assignment on the Course Content page and a link to enroll. You can also add an enrollment period. Students are notified when the enrollment deadline approaches. When the enrollment period ends, students can no longer join groups, and they aren’t enrolled automatically. Students need to ask you to add them so they can view the group assignment. You can add unenrolled students to the groups you choose if those groups haven’t submitted work.
You can't add to or change membership in groups with submitted work. You also can’t delete groups with submitted work.
If you want to release the group assignment in the future, students can't access the content, but they can join a group.

If you choose to release the group assignment based on performance on another item, students can’t access the content until they achieve a certain score on an item or gradebook column. However, if one of the group members meets the performance criterion, that member can submit on behalf of the entire group. Any member who hasn’t met the performance criterion also receives the grade you assign. You can change individual members’ grades before you post the grades.
More on assigning a different grade to group
On the groups page, you can create as many groups as you want, with any number of students in each group. You can also create new groups or remove groups based on how many you want for this assignment. You need to create at least two self-enrollment groups.
A partial list of your students appears in the Unassigned students section. Select Show All to view the entire list.
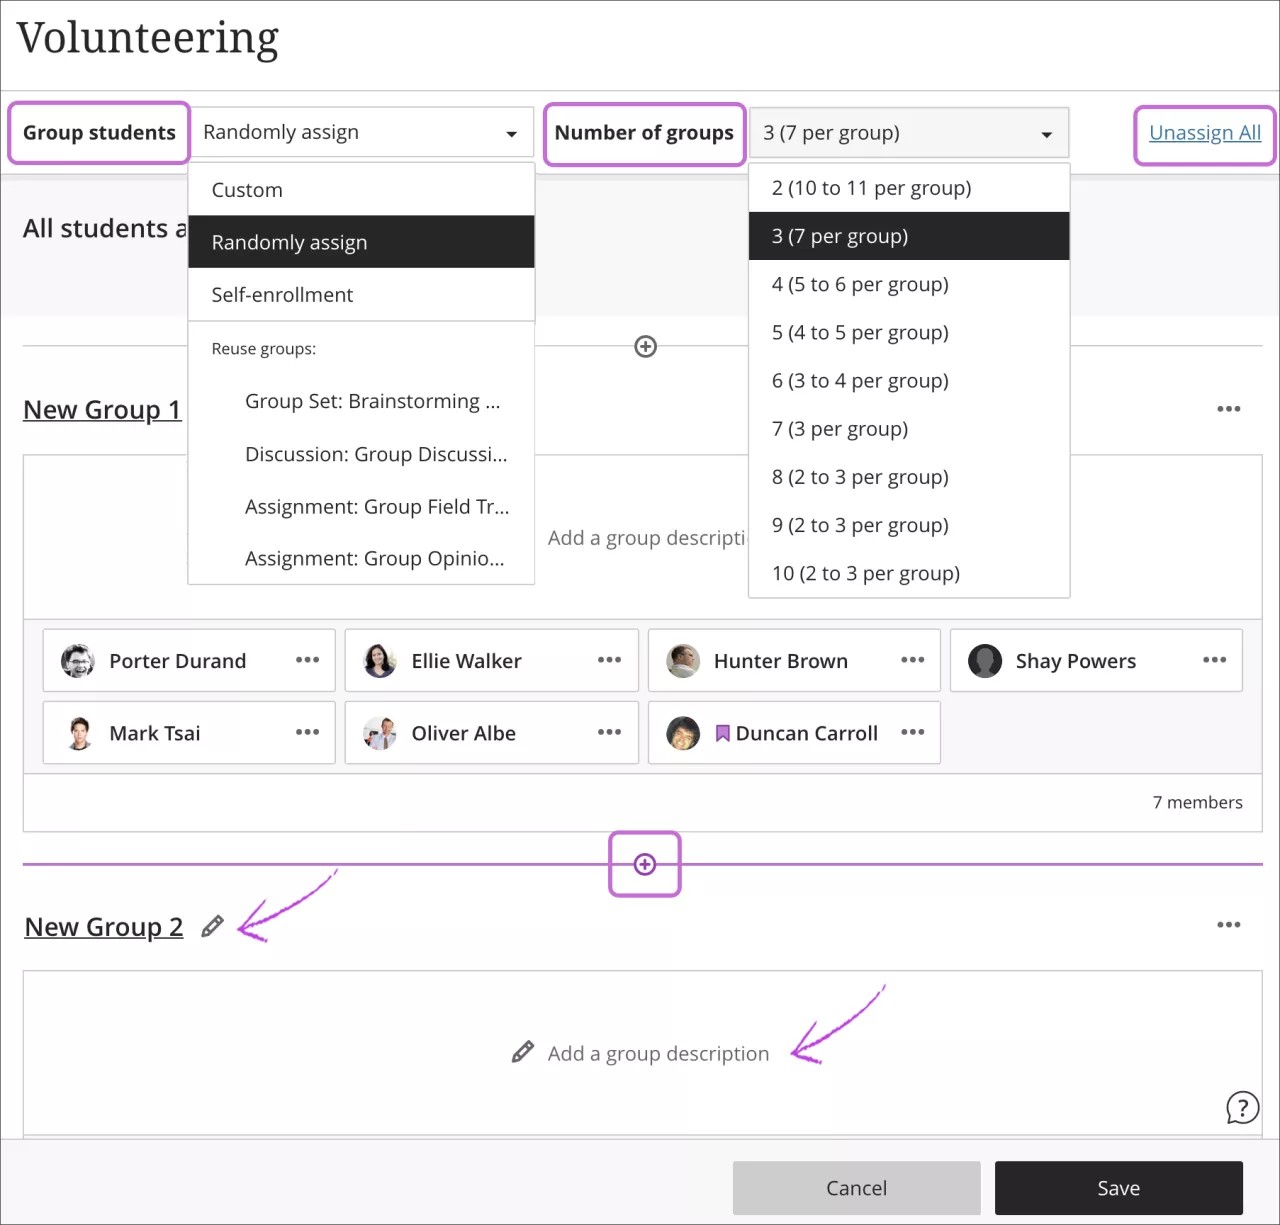
- In the Group students menu, select Self-enrollment.
- Your students are evenly divided among the groups listed next to Number of groups. Select the plus sign wherever you want to add another group. The Number of groups updates automatically. You can add and delete groups even after students have started to join. If you delete a group that students have already joined, they’re moved to the unassigned list. You’ll need to notify them to join one of the remaining groups or you can add them to a group. Reminder: You can’t delete groups with submitted work.
- Optionally, add an enrollment start and end date. Students can see the groups page and the assignment only after the enrollment period opens. Select the arrow next to Advanced options to collapse the enrollment section. Reminder: When the enrollment period ends, students can no longer join groups and need to ask you to add them.
- Optionally, change or clear the Maximum number of members per group that appears by default. The optional maximum must be 2 or greater. If you added or deleted groups, the maximum number doesn’t update.
Pay attention to the Maximum members per group and the Number of groups. For example, if you lower the maximum number, some students won’t be allowed to enroll in a group at the end of the enrollment period. You’ll need to create new groups and enroll the students so that they can access the group assignment.
To allow unlimited members per group, leave blank. Students see the maximum number allowed when they make their group selections. If you allow an unlimited number per group, students see the total number of students in their class. For example, if you've set up four field trips, you can allow all students to join all groups.
You can override the maximum membership for a group. For example, you can add a newly enrolled student to a group that hasn't submitted work.
- Select the Hide enrolled members check box if you don't want students to see who's already joined.
- Edit each group name if you want to change the default naming.
- Optionally, add group descriptions. If each group works on a different topic or meets at a certain time or destination, add that information to help students choose a group. You have no limit on the number of characters.
- Open the menu next to a group to access the management options.
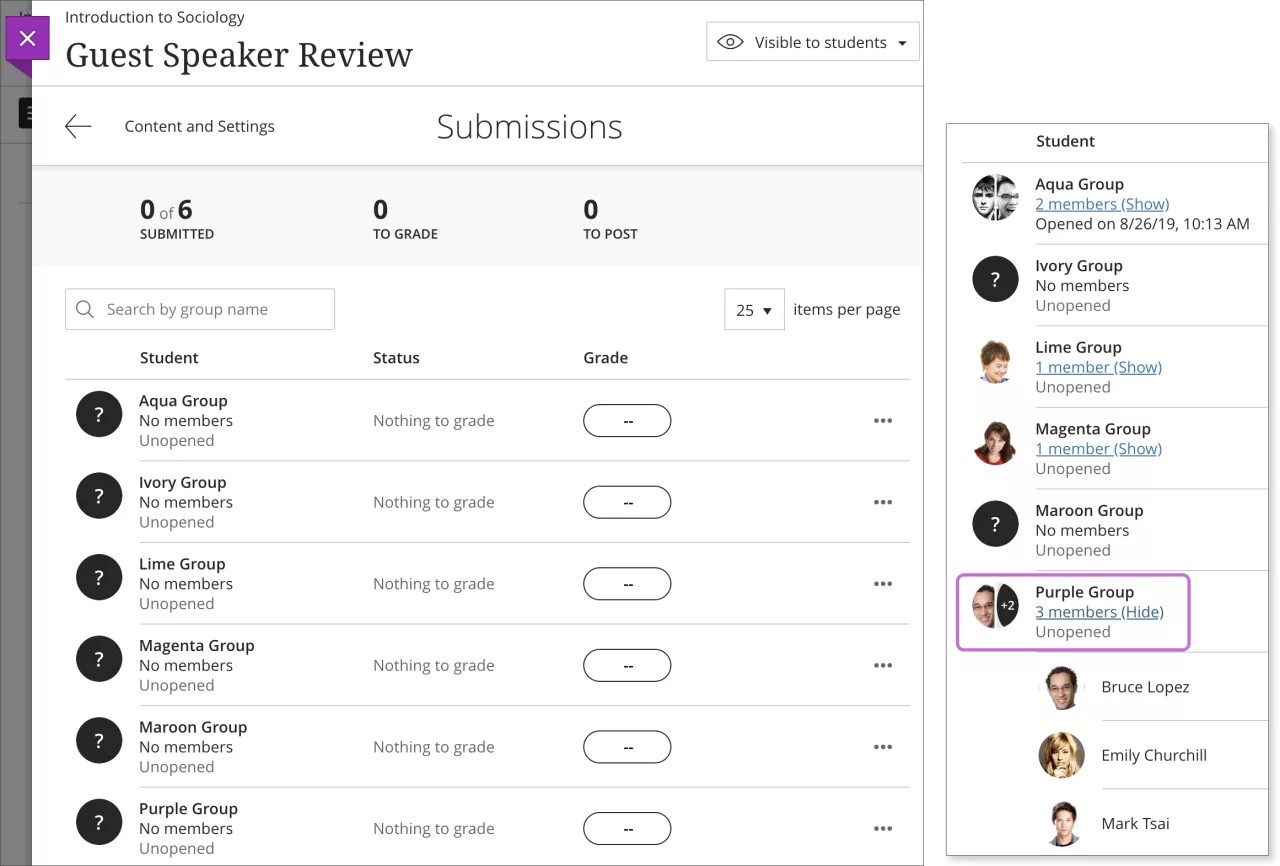
Self-enroll groups in the gradebook
After you create self-enroll groups, each group appears with a question mark icon on the Submissions page in the gradebook. After students join groups, select the members link to show or hide the list.
Learn about the student view of self-enrolling in groups—use your browser's back function to return to this topic
Reuse groups
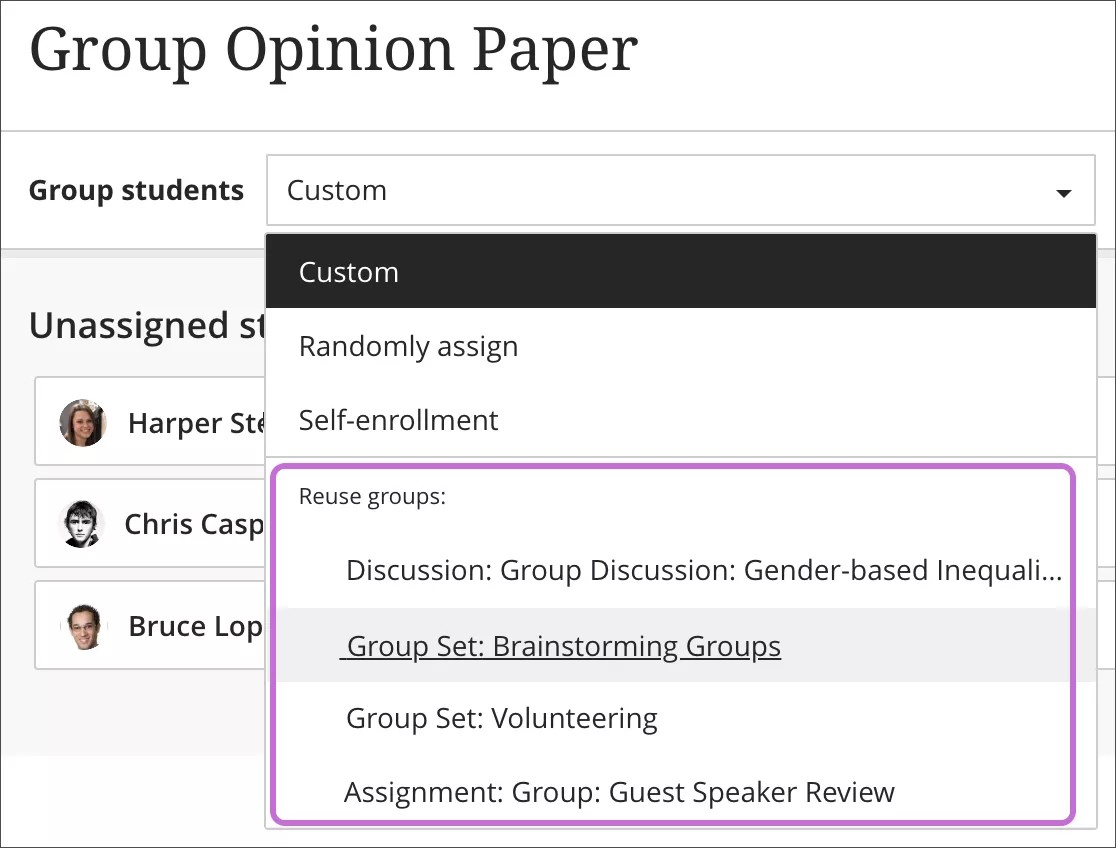
You can reuse groups from an existing group assessment, discussion, or course group set. Titles for your existing course group sets start with "Group Set."
If you reuse a group set and make changes to the group set, those changes affect the group assignment. Learn more about how group set changes affect the linked content items.
- In the Group students menu, select a title from the Reuse group section.
- The same students are added to your new assignment. If you move members, the membership changes wherever these groups appear, including the course group set.
- Edit the individual group names as needed.
- Optionally, add group descriptions that only appear to you at this time. You have no limit on the number of characters.
You may need to add new students added to your course to your new groups.
Manage individual groups
After you create a group assignment, you can add or delete individual groups and manage student membership. You can also edit group names, add or edit group descriptions, and send messages to your groups to kick off collaboration!
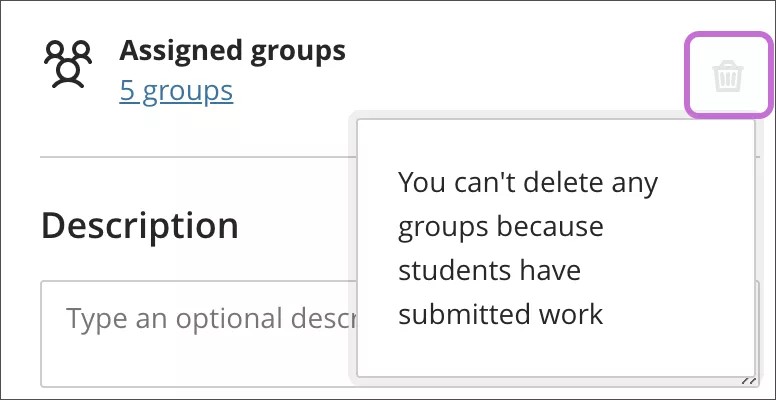
You can also remove groups from the assignment if the groups haven't started their submissions. Select the Delete icon in the Assignment Settings panel.
Add and delete groups
Select the plus sign wherever you want to add a group.
If you no longer need a group, open the group's menu and select Delete group. The students in that group are unassigned automatically and appear at the top of the page. You can manually assign these students to new groups. Or, you can randomly assign all students—not only the students you unassigned—to the number of groups you choose. You can't delete a group with submitted work.
Ramifications
- If you add or delete a group in a group set that you used to create a group assignment, the assignment's groups are updated. Edits to group titles and descriptions also affect the assignment.
- If you add or delete a group in a group assignment that's based on a course group set, the course group set is updated. Edits to group titles and descriptions also affect the course group set.
- If you delete an entire group set used to create a group assignment, the assignment’s groups are removed.
- If you delete a group assessment based on a course group set, the group set is unaffected.
Manage student membership
You can move students between groups and add new students added to your course. New members can access the work the group has saved up to that point. New group members can also submit work on behalf of the group.
When you move students who have grades to different groups, their grades move with them, but their work doesn’t. These new group members keep their existing grades. Their grades won’t apply to the rest of the group. However, if you haven't graded the group work, the new members' grades will update.
If a group has received a grade and you move students to this group, you need to manually assign grades to them.
Open the menu next to a student's name to access these options:
- Start a new group with the student as a member.
- Select Unassign to remove the student from the group. Unassigned students appear at the top of the page. Reminder: Students who aren't assigned to a group won't have access to the group assignment because it won't appear on their Course Content pages.
- Assign the student to a different group that already exists. Select the group's name in the menu. For self-enrollment groups, you can move selected students to other groups, even if the group limit is exceeded.
You can also move multiple students to a different group in one action, create a new group for them, or unassign them all from the group.
To remove all students from all groups, select Unassign All at the top of the page. Unassign All disappears after groups submit attempts.
If you change the number of self-enrollment groups, new groups are created, and all members are unassigned. Students who enrolled previously aren’t notified they need to enroll again.
Ramifications
- Membership changes in a group set affect everywhere the groups are used, such as in group assignments.
- Membership changes in a group assignment based on a course group set affect the course group set.
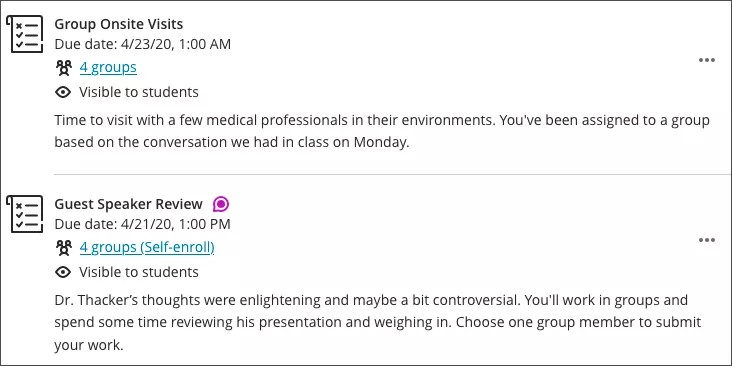
Group assignments appear on the Course Content page
You can view how many groups you assigned and open the link to view the members. If you've enabled group conversations, an activity icon appears for new activity.
Ready to grade?
You can assign one grade for each group or grade students on their individual contributions.
Student workflow
On the Course Content page, students can see their group names listed with the group assignment. When they access the group assignment, they can see their group members. Each group member can edit and update the draft saved in the group assignment.
Students who aren't assigned to a group won't have access to the group assignment because it won't appear on their Course Content pages.
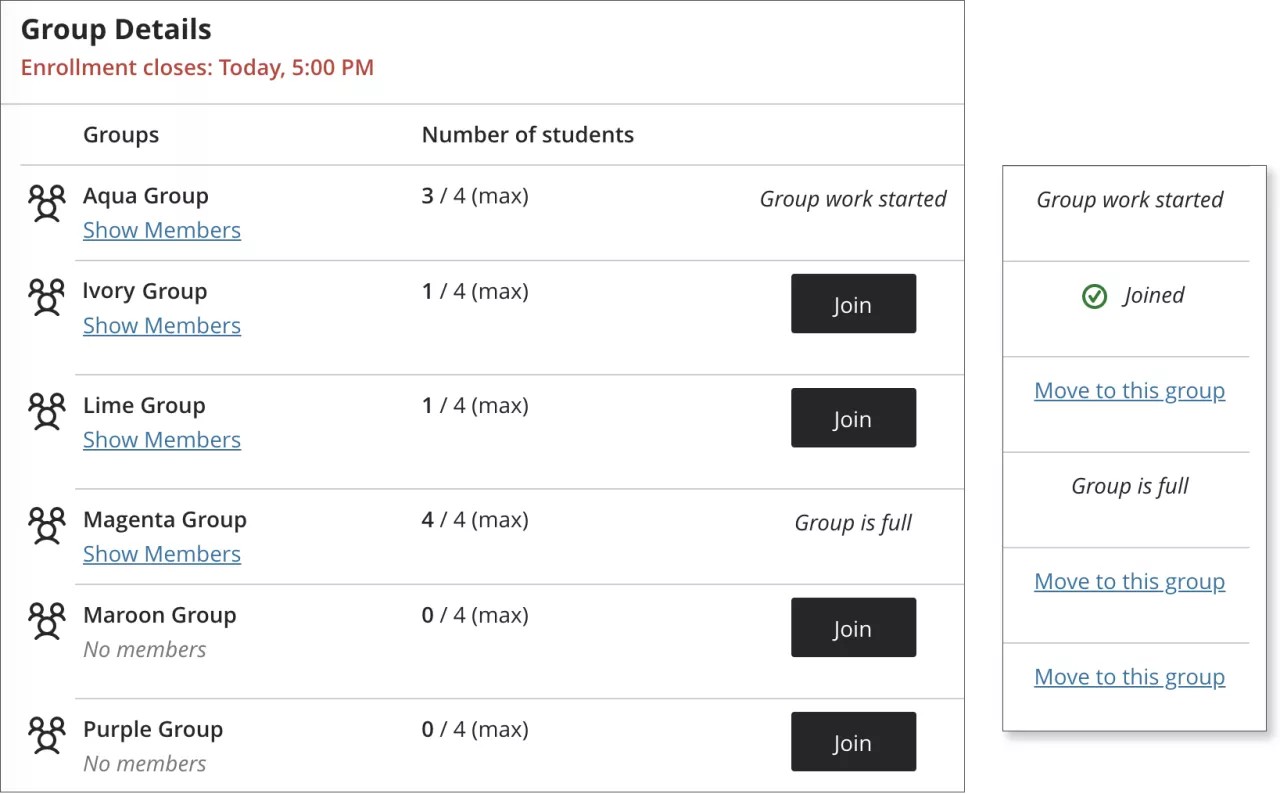
If Join a group to participate appears under a group assignment title, students select the link to choose a group. Students may see an enrollment period if you added one. Students need to join a group before the deadline. If they haven't joined a group, students are notified when the enrollment deadline approaches.
Reminder: When the enrollment period ends, students can no longer join groups and aren’t enrolled automatically. Students need to ask you to add them so they can view the group assignment.

Move to another group
Students may move to a different group if their present group or the new group hasn’t submitted work. If you’ve added an enrollment period, students may only move while the enrollment period is open.
Group assignment submission
Some students may have anxiety about opening a group assignment. They may think that they have to submit the group assignment if they open it. You might tell students that when they select View assessment, they can just view the assignment or add some work.
Group members can add work, save a draft, and let other members work on the assignment also. After a group member views the assignment or adds some work, the member selects Save and Close in the panel. Their work on behalf of the group is saved and not submitted. Another group member can resume working on the assignment later. Everyone in the group can keep track of the latest version of the work.
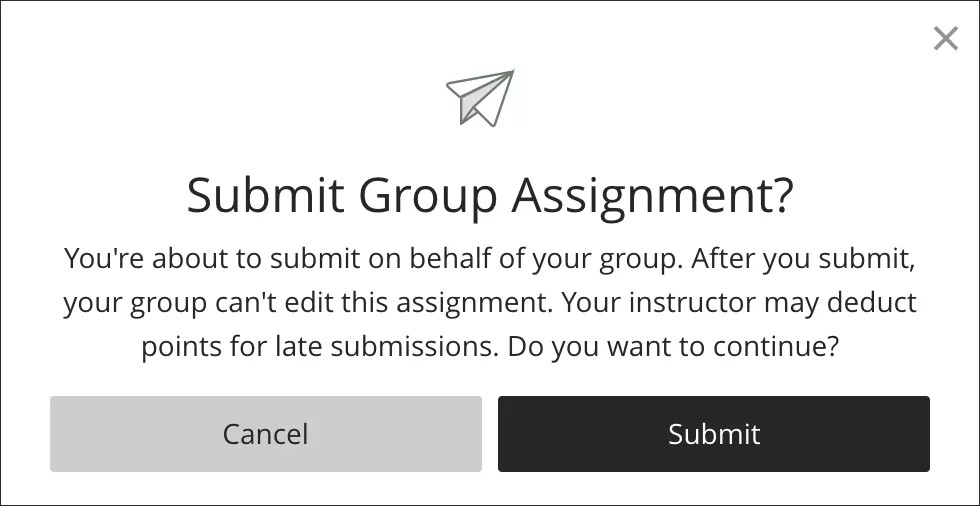
When the work is finished, only one student in the group needs to submit for the group.