This information applies only to the Original Course View. Your institution controls which tools are available.
Wikis allow course members to contribute and modify one or more pages of course-related materials and provide a means of sharing and collaboration. Course members can create and edit pages quickly, and track changes and additions, which allows for effective collaboration between multiple writers. You can create one or more wikis for all course members to contribute to and wikis for specific groups to use to collaborate.
All course members can use the wikis tool to record information and serve as a repository for course information and knowledge. A course wiki is a vast source of information compiled by course members. Wikis can help build a community of collaboration and learning. Social interaction increases during the exchange of information.
Students use a wiki to collaborate on shared content from different times and locations. They can view previous changes, comment on content or changes, include new content, and revise existing content. Similar to the discussion board, you act as a facilitator instead of the provider of all course content. Unlike a blog, which can be quite personal, wikis require intense collaboration, where information is linked to and built upon.
You can grade student contributions to a wiki or use it solely for course content review. In either instance, a student can contribute multiple pages to a single wiki and make unlimited revisions to pages submitted by any course member. You can also enable the group wiki tool to help groups share and interact.
You can view all changes to all pages in a wiki. You can view the changes at a high level, and you can drill down to see information about contributions by any individual.
Benefits of using wikis
Wikis can help course members build a shared repository of knowledge. As the knowledge base grows over time, you can expect the wiki to have some degree of seriousness and permanence.
With dedicated use, you can use wikis for these educational purposes:
- Provide an easy to use environment for communication
- Promote collaboration rather than competition
- Foster a social and interactive approach to learning
- Build partnerships where you can benefit from the strengths of others
- Increase network building, trust, and negotiation skills
- Provide support and prompt feedback
- Provide a one-stop area where information is searched, updated, and accessed easily and quickly
- Increase and enhance the possibility of creativity, spontaneity, and innovation through the application of reflective thinking
When should you use wikis?
You can use wikis as course content or graded assignments for these types of activities:
- A glossary
- A white paper
- Class summaries and outlines
- Connect student writing to form a book
- A resources repository
- Lab experiments
- Student solutions for scenarios and case studies
- A research notebook
- Group project presentations
Instructors can create course wikis to encourage students to collect their knowledge in an organized way. Any course member can create pages within a wiki unless you intend to be the sole author and use the wiki as course content. Groups can also use wikis.
Watch a video about how to use wikis
The following narrated video provides a visual and auditory representation of some of the information included on this page. For a detailed description of what is portrayed in the video, open the video on YouTube, navigate to More actions, and select Open transcript.
Video: Create and manage wikis shows the app features for Windows devices.
The parts of a wiki
These elements comprise a wiki:
- First, you create the wiki topic so that course members can contribute their ideas, research, and thoughts. The wiki topic is the theme that connects multiple wiki pages. In a wiki topic, related wiki pages are collected in one place.
- Next, you can create wiki pages within the topic. A wiki page is a more specific prompt or subject related to the more general theme of the wiki topic. For example, if a wiki topic is Mid-Century Architecture, one of the wiki pages in that topic might be Frank Lloyd Wright.
- The Wikis listing page shows all wiki topics created within a course or group.
Create a wiki topic
To get started, you need to create a wiki topic in your course. Your students and other course members can add pages to that topic.
- Go to Control Panel > Course Tools > Wikis and select Create Wiki.
- Type a name and optional instructions. Make the wiki available to students.
- Select the Display After and Display Until check boxes to enable the date and time selections. Display restrictions don't affect the wiki availability, only when it appears.
- Choose the Student Access option. You can change the student access at any time.
- Closed to Editing: Select this option when you're the only one who contributes pages or to prevent further page edits by course members. Select this option when you're ready to start grading the wiki contributions. All course members are allowed to view wikis that are closed to editing.
- Open to Editing: Allows course members to modify any wiki page. In a group wiki, you must be a member of the group to edit a wiki page.
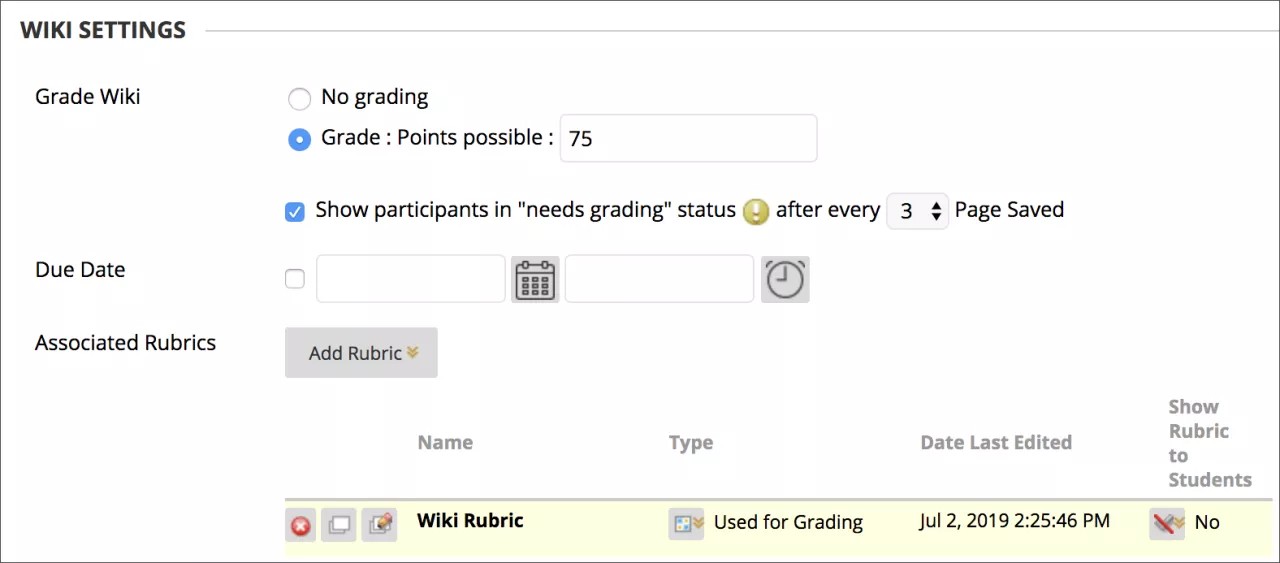
- In the Wiki Settings section, select No grading or the Grade option and type the number of Points possible.
If you set the points possible to a non-whole number, letter grades may not be assigned correctly.
After you enable grading, a column is created automatically in the Grade Center. The wiki is permanently gradable, and you can't change it to No grading.
- If you want, select the check box for Show participants in needs grading status and select the number of pages required. If you apply this setting, the Needs Grading icon shows in the Grade Center. The pages appear in the queue on the Needs Grading page after student activity meets this threshold.
- Add a rubric if you want.
- Select Submit.
Wiki topic page
A wiki topic page is the home page where all other wiki pages are collected. The home page is automatically displayed first when a student visits the wiki.
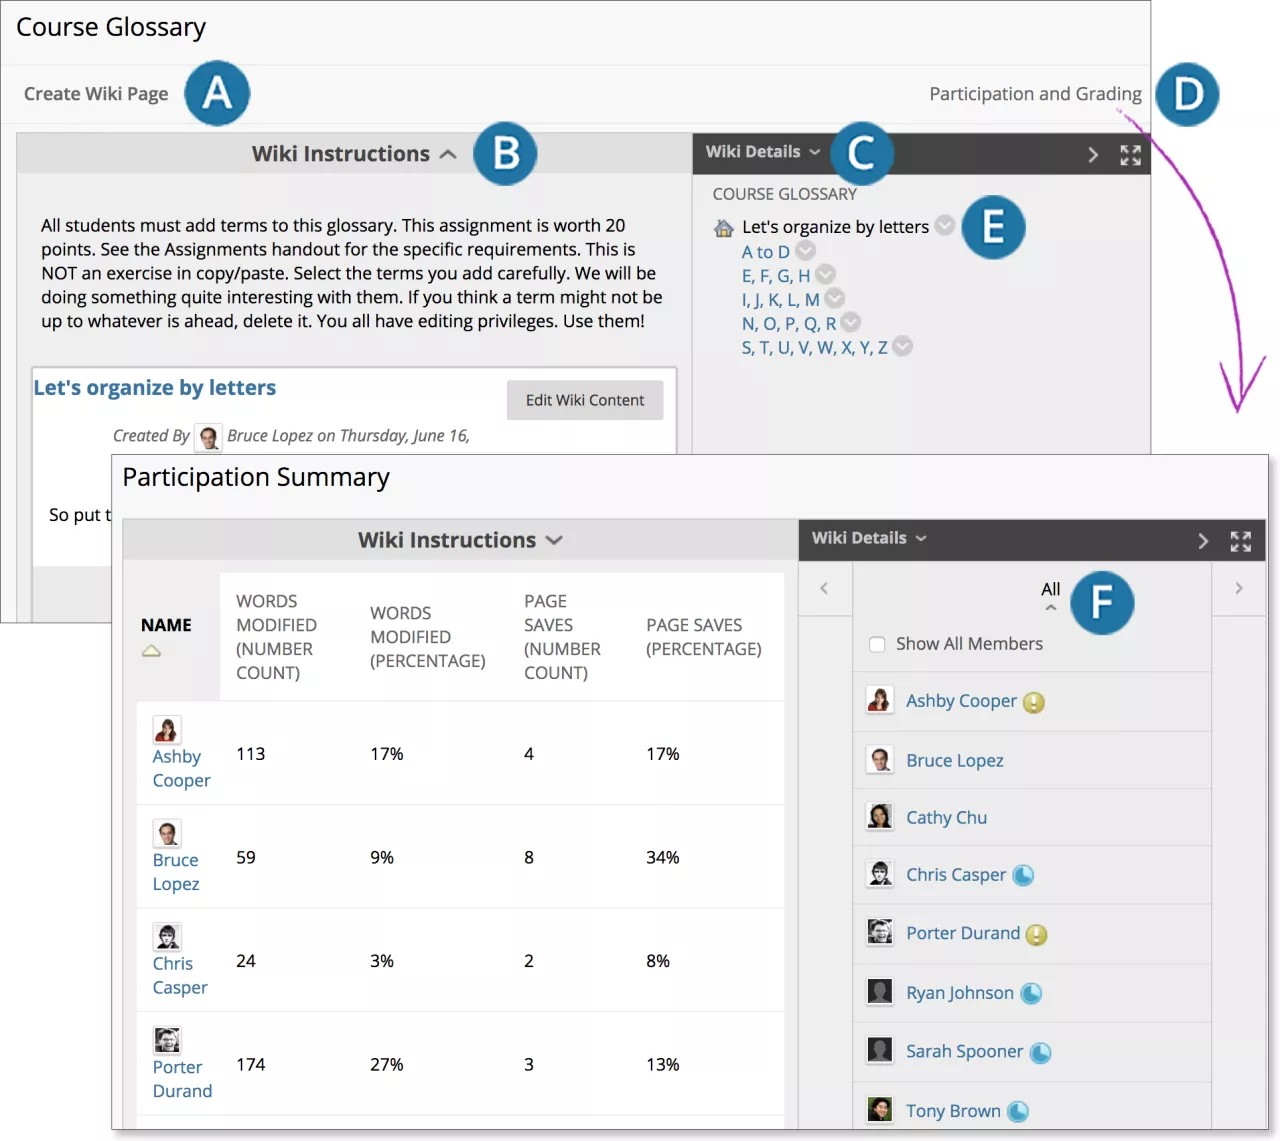
- Select Create Wiki Page to add a page to the wiki topic.
- Wiki Instructions are expanded by default, but you can minimize them.
- In the sidebar, you can expand the Wiki Details section to display information such as the type, creation date, and the number of pages and comments. Select the right-pointing arrow to collapse the sidebar. Select the four arrows icon to view the wiki in full screen.
- To view a summary of student activity, select Participation and Grading for graded wikis or Participation Summary for wikis with no grading. Both links open a Participation Summary page where you can view participation for the students who have contributed to the wiki.
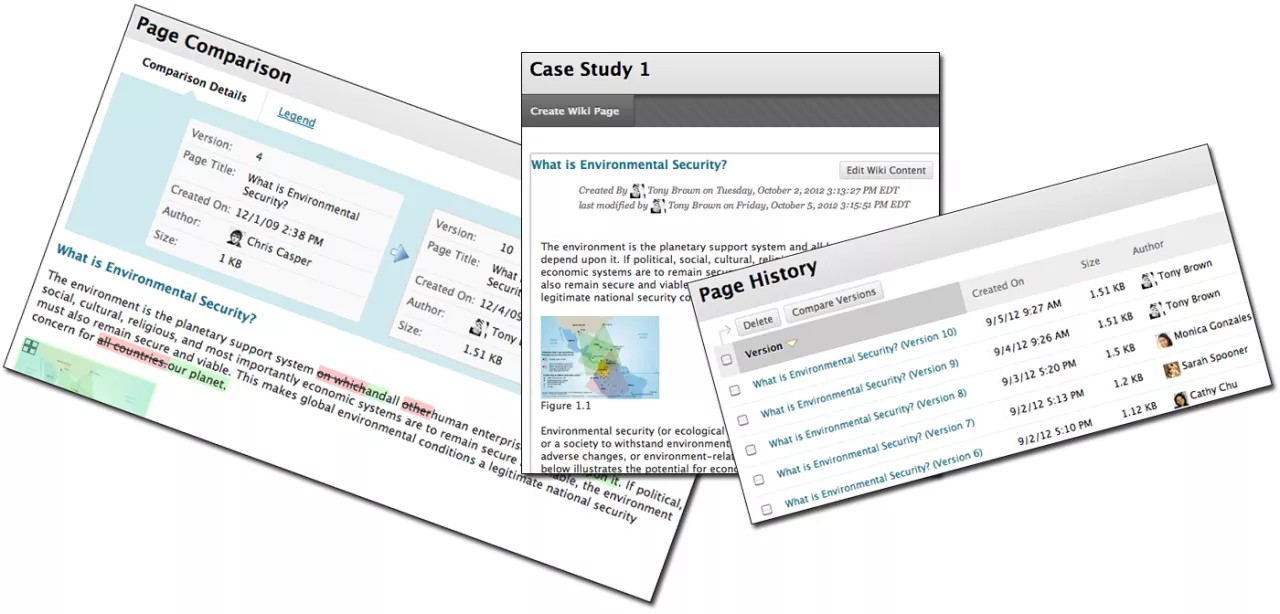
- In the sidebar, the wiki pages appear in alphabetical order after the home page, indicated by the house icon. The home page always appears first in the list. Select a wiki page title to view it in the content frame. Access its menu to view the page history. The Page History page displays all versions of a wiki page, with the most recent version first. From this page, you can delete versions. If you delete the latest version, then the version next in line becomes the most current version and is the page viewed in the wiki. You can delete more than one version of a wiki page, but at least one version must remain. When you delete a version, all participation history for that version is deleted.
- To view everyone who contributed to the wiki, select All to expand the menu and select a member. Optionally, select Show All Members to also view who hasn't contributed to the wiki.
- For graded wikis, icons designate the status of a student’s activity. The Needs Grading icon indicates that a student has met the minimum activity for grading you set for the wiki. The In Progress icon appears when a student has some activity but hasn't yet met the minimum number required to trigger needs grading status.
Wikis listing page
After you create a wiki, the wiki topics appear in alphabetical order on the Wikis listing page. Select a column title to sort the contents.
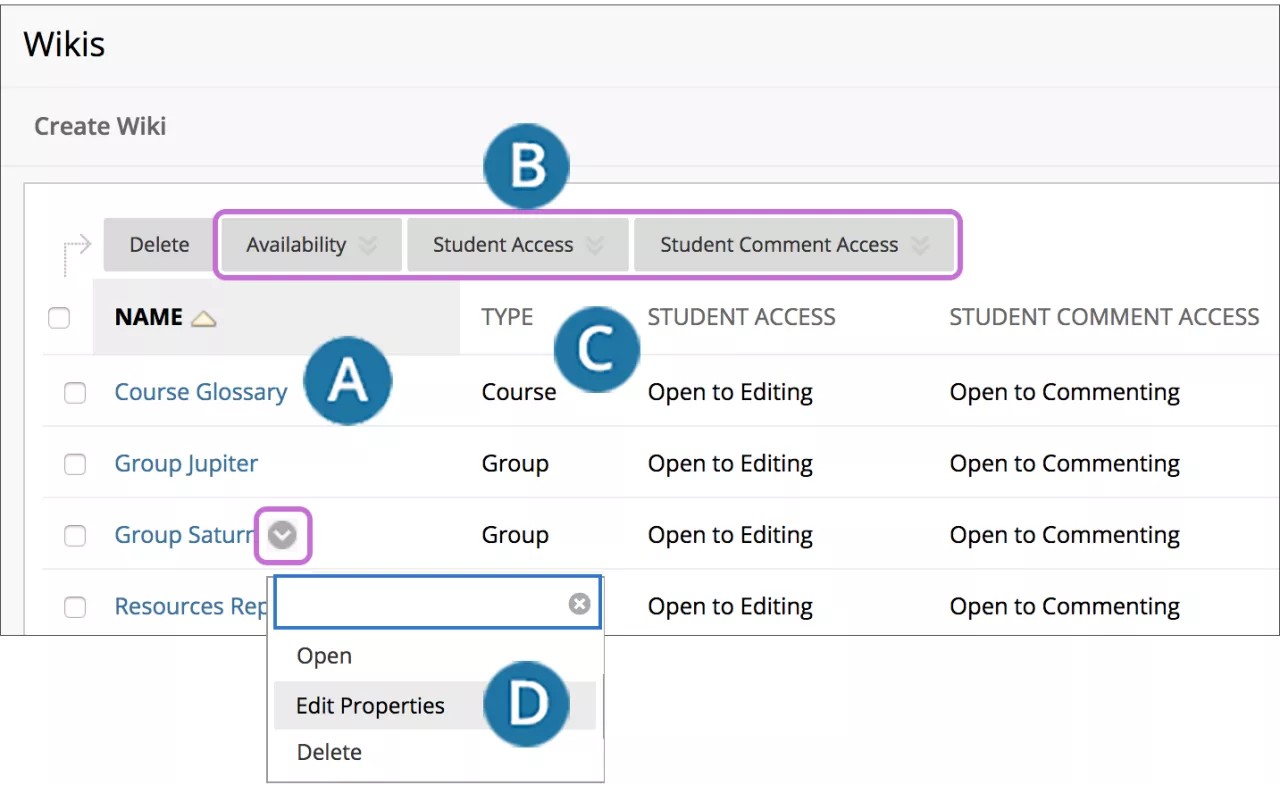
- On the Wikis listing page, select a wiki title or select Open in a wiki's menu.
- To change a wiki's availability or student access, select one or more check boxes and use the Availability and Student Access lists.
- The Type column lists whether a wiki is for the course or for a group.
- Select Edit Properties in a wiki's menu to change a wiki's name, instructions, and settings.
Wiki pages
Each newly created course or group wiki requires a home page. When you access a new wiki topic for the first time, you're prompted to create a home page. The home page always appears first in the wiki page list and the content appears when someone navigates to the wiki. Because the home page is first, you may want to add instructions here.
You or any course or group member can create the home page. No one can delete the home page, but if the wiki is open to editing, any course or group member may edit it.
Watch a video about wiki pages
The following narrated video provides a visual and auditory |representation of some of the information included on this page. For a detailed description of what is portrayed in the video, open the video on YouTube, navigate to More actions, and select Open transcript.
Video: Create and edit wiki pages explains working with wiki pages.
Create wiki pages
- On the Wikis listing page, select a wiki title.
- On the wiki’s topic page, select Create Wiki Page.
- Type a title and a description or instructions.
- Select Submit.
You can delete an entire wiki or pages within a wiki, but you can't delete the wiki home page by itself. Students don't have the ability to delete wiki pages.
Link to other wiki pages
If a wiki has many pages, you can link to another page to help organize information for easy access. You can only create links to other wiki pages when at least two pages exist.
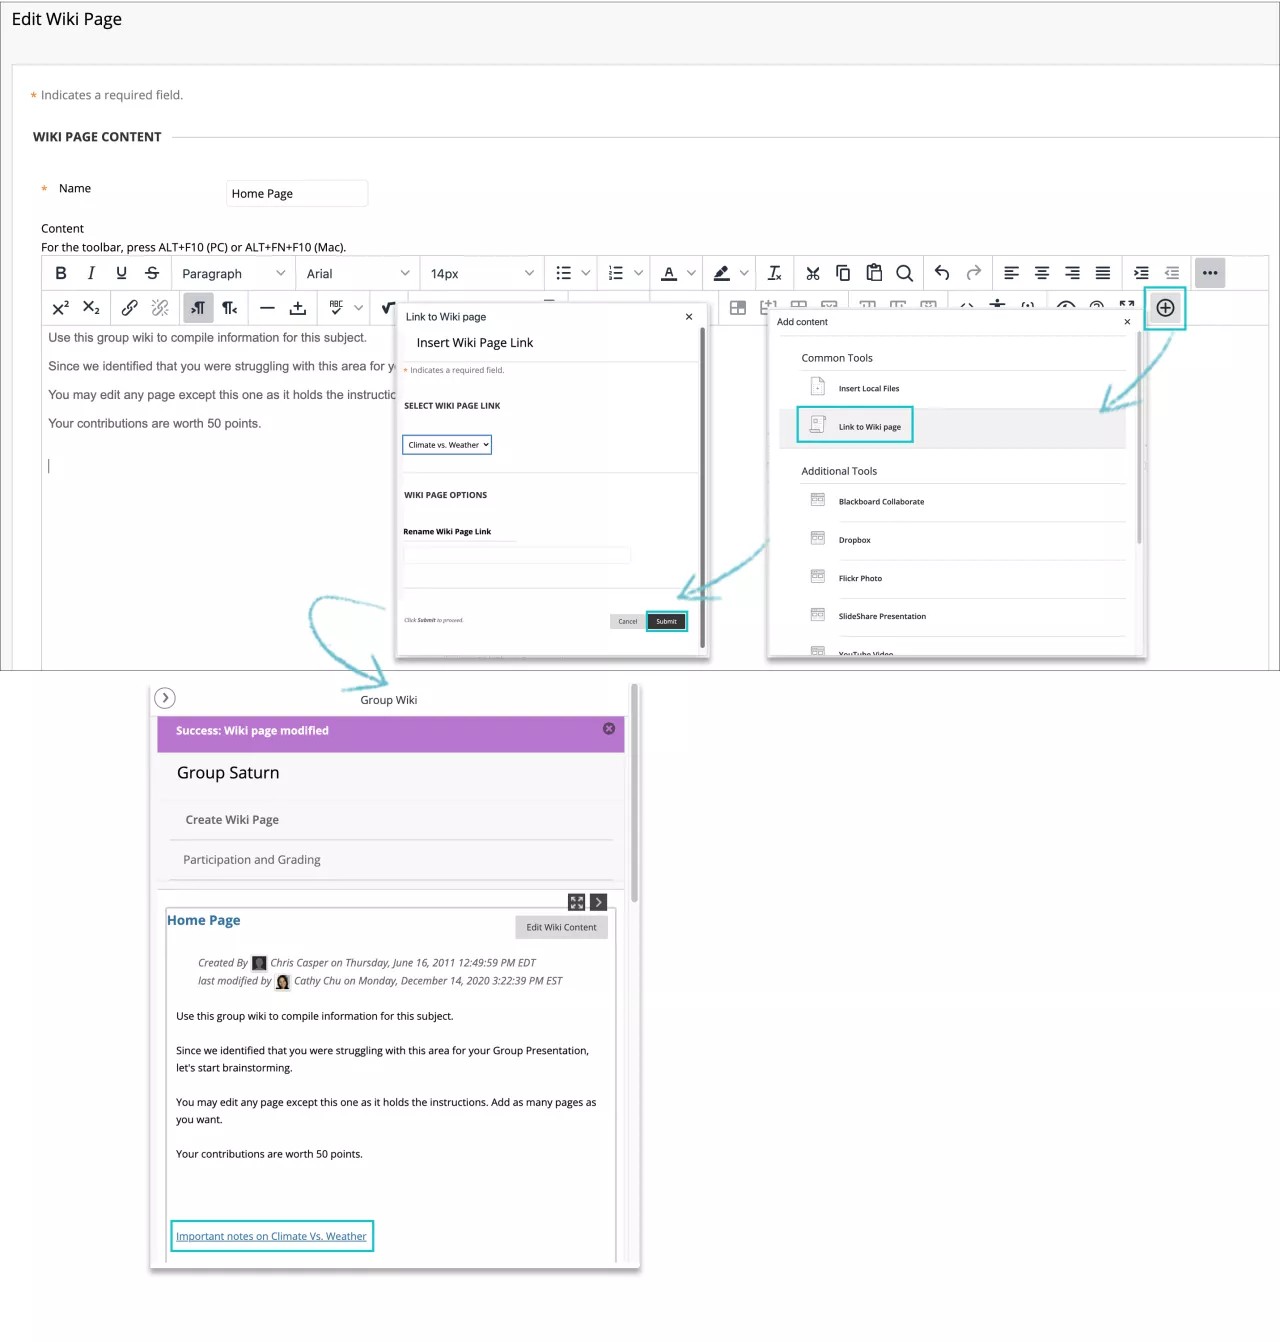
- On the Create Wiki Page, put your cursor in the Wiki Page Content area where you want to add the link.
- Select the Add Content icon in the editor, which will open a window where you can select the Link to Wiki page option. If only one page exists in the wiki, this function is disabled.
- In the Link to Wiki Page pop-up window, select the wiki page to link to from the list.
- Optionally, type a name for the link in the Rename Wiki Page Link text box. If you don't rename the link, the original page title is used as the link.
- Select Submit. The link appears in the editor.
- On Create Wiki Page, select Submit. The link appears in the wiki page.
You can edit an existing wiki page to insert a link to other wiki pages. Edit the wiki content and use the same steps as above.
Comment on a wiki page
Course members can comment on wiki pages. Comments provide a way for you and your students to offer feedback and suggestions. Comments are visible to all course members. The total number of wiki comments are counted in the Wiki Details section in the sidebar.
No one can edit comments after they're posted. Course members can delete the comments they wrote.
All course members can read group wikis by default but you must be a member of the group to make a comment. You can change the default setting to allow only group members to view a group wiki.
- Access a wiki topic and select the page to view in the sidebar. The wiki page opens in the content frame.
- Select Comment below a contribution and type a comment. You can use the spell check function at the bottom of the box as needed.
Comments have a 2,000-character limit. A pop-up message notes that comments over 2,000 characters must be edited and resubmitted.
- Select Add.
- To view all comments, select the numbered Comments link.
Edit and manage wikis
On the Wikis page, access a wiki's menu and select Edit. Make your changes and select Submit.
Any course member can edit a course wiki page and any group member can edit a group wiki page unless you have disabled this function. You might choose to disable editing when you want to grade the wiki pages. However, you can still edit student pages. All course members, including instructors, edit in the same way.
When someone edits a wiki page, the page is locked for two minutes to prevent others from editing the same page. You're informed that someone is currently editing the page. The lock expires regardless of activity/inactivity. After two minutes, another course member can start editing the page and a new lock is placed on the page.
The lock feature or duration can't be changed.
Edit wiki content
Because a wiki stores each version and editor in its history, you can retrieve information about the development and contributions for any individual. You can select History in a page’s menu to see how a page was modified, view any version, and compare two versions side by side.
- Navigate to the wiki topic page.
- Select the page to review and edit. The wiki page opens in the content frame.
- In the sidebar, access the page’s menu and select Edit Properties. Or, select Edit Wiki Content next to the page’s title in the content frame.
- On the Edit Wiki Page, you can make changes to the name and content of the page.
- Select Submit to save your changes.
Delete a wiki
If you no longer need a wiki, you can delete it. The delete action is permanent and irreversible.
If a wiki is gradable, the Delete Confirmation page appears. You need to perform extra steps to remove a graded wiki.
- On the Wikis listing page, open a wiki's menu and select Delete.
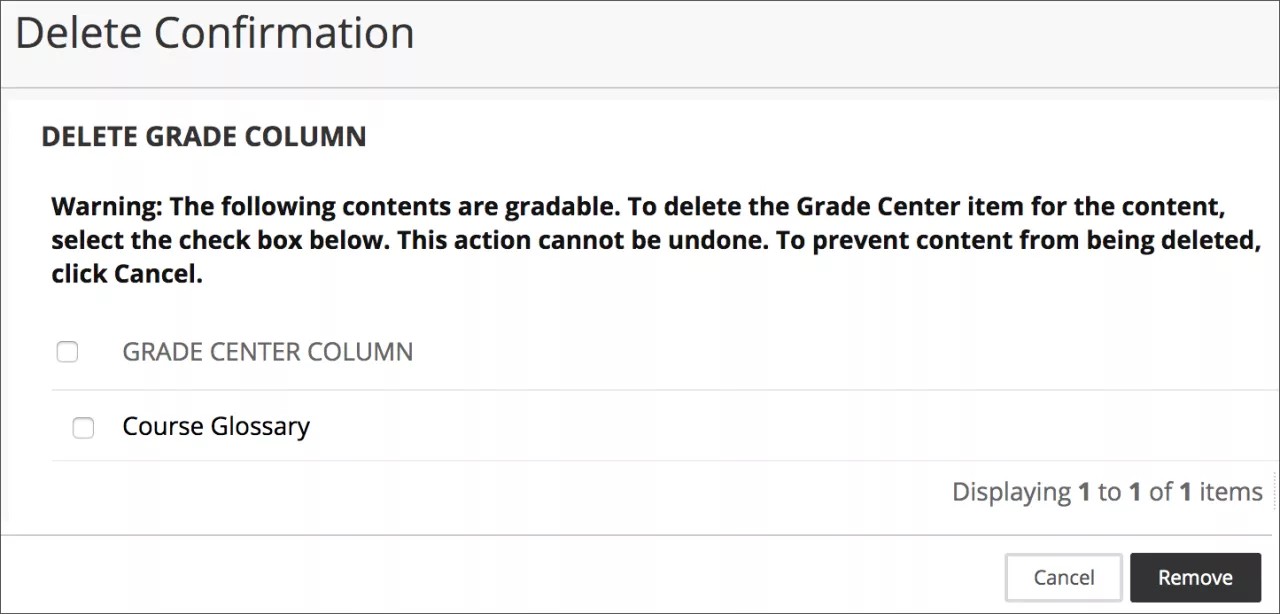
- Select OK in the pop-up warning. If the wiki is gradable, the Delete Confirmation page appears. You have two options:
- Retain Grade Center information (do not check any boxes): The wiki is deleted, but the Grade Center column and scores you have assigned are retained. For example, all student contributions are graded and you want to keep the Grade Center column for the final grade calculations. If you delete a wiki, yet retain the Grade Center column, you can delete that column from the Grade Center at any time.
- Delete Grade Center information (select which ones to delete using the check boxes): The grade column in the Grade Center and the wiki are deleted. For example, if you don't want to include the grade column for the wiki contributions in the final grade, you can safely delete all.
- Select Remove to complete the deletion.
Add a wiki link to the course menu
You can add a link to the course menu for instant access to the wikis tool. You can also customize the name of the link.
- Select the plus sign above the course menu. The Add Menu Item list appears.
- Select Tool Link and type a Name for the link.
- From the Type list, select Wikis.
- Select the Available to Users check box.
- Select Submit.