Journals are personal spaces for students to communicate privately with you. Students can also use journals as a self-reflective tool. They can post their opinions, ideas, and concerns about the course, or discuss and analyze course-related materials.
You can create journal assignments that are broad and student-directed. Students can reflect on the learning process and document changes in their perceptions and attitudes. Students can describe the problems faced and how they solved them. You can also create instructor-directed journal entries that are more formal in nature. You can narrow the focus with a list of topics for discussion.
How to use journals
Journals are ideal for individual projects. For example, in a creative writing course, each student creates entries and you provide comments. In this manner, a student can refine a section of a writing assignment over a period of time, with your guidance and suggestions. Students can also comment on their own entries to continue the conversation.
You can choose to make journal entries public, allowing all course members to view all entries. For example, you may choose to make a journal public when you ask for opinions on how to improve the evaluation process. Students can read what other students wrote and build upon those ideas.
When used in the group area, members of a group can view and comment on each other's entries for the group journal. The group, as a whole, can communicate with you and all members benefit from the comments.
You can grade journal entries or use them solely for communication. In either instance, a student can make multiple entries for one journal topic.
Watch a video about creating journals
The following narrated video provides a visual and auditory representation of some of the information included on this page. For a detailed description of what is portrayed in the video, open the video on YouTube, navigate to More actions, and select Open transcript.
Video: Creating a Journal shows how to create journals for your class.
Create a journal
You can create one or more journals for your students to use in your course. You must create journal topics before students can add their entries.
- Go to Control Panel > Course Tools > Journals and select Create Journal.
- Type a name and optional instructions. Make the journal available to students.
- Select the Display After and Display Until check boxes to enable the date and time selections. Display restrictions don't affect the journal availability, only when it appears.
- In the Journal Settings section, select Monthly or Weekly Index Entries. If you want, you may select check boxes to allow users to edit and delete entries, or delete comments.
- Optionally, select the check box to Permit Course Users to View Journal. If selected, the journal becomes public. All users can view all journal entries made to the journal topic.
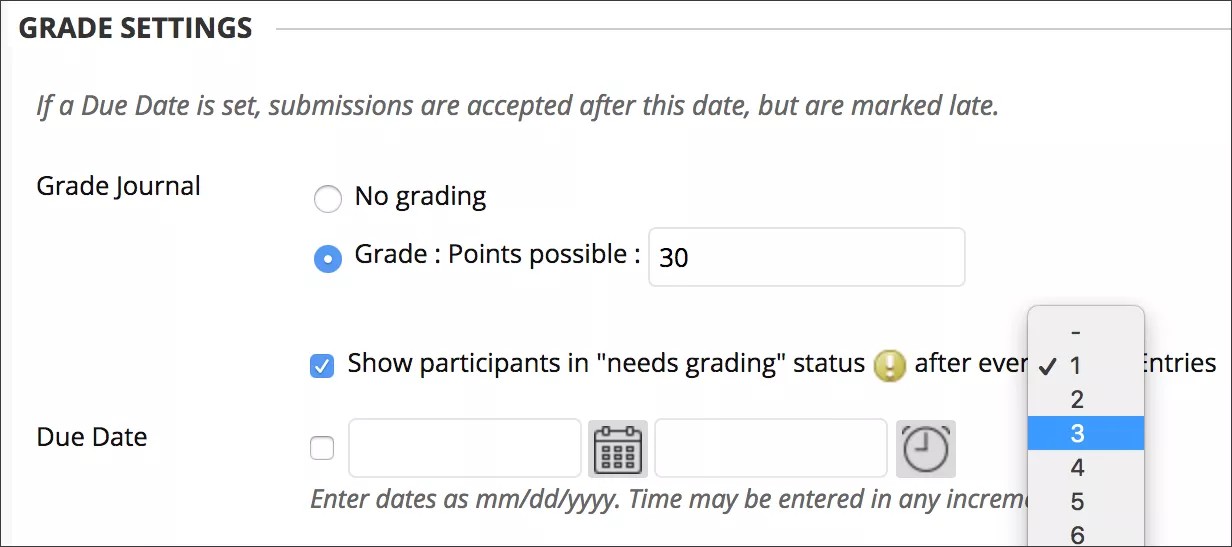
- In the Grade Settings section, select No grading or the Grade option and type the number of Points possible.
If you set the points possible to a non-whole number, letter grades may not be assigned correctly.
Points possible will apply to one or more entries made by a user to the journal topic. After you enable grading, a column is created automatically in the Grade Center. The journal is permanently gradable, and you can't change the setting to No grading.
- If you want, select the check box for Show participants in needs grading status and select the number of entries required. If you apply this setting, the Needs Grading icon will show in the Grade Center. The entries will appear in the queue on the Needs Grading page after student activity meets this threshold.
- Optionally, add a due date.
- Add a rubric if you want.
- Select Submit.
The journal topics appear in alphabetical order on the Journals listing page. Select a column title to sort the contents.
You can also add links to journals in course areas, such as content areas and folders.
Journal topic page
Access the journal topic page in these ways:
- In the Journals tool, open a journal and select a user from the All Course Members menu.
- On the Needs Grading page, access a journal’s menu and select Grade All Users.
- In the Grade Center, locate the column for the journal you want to grade. Hover over a cell with the needs grading icon to access the journal’s menu. Select Grade User Activity.
The journal topic page is divided into two main sections. In the content frame, you can view journal entries. In the sidebar, you can view information about the journal topic or entry, expand the Index, and grade the entry if the journal is gradable. You can select an individual user’s name to view the entries alone in the content frame.
If you don't see the grading feature in the sidebar, your institution hasn't turned this feature on.
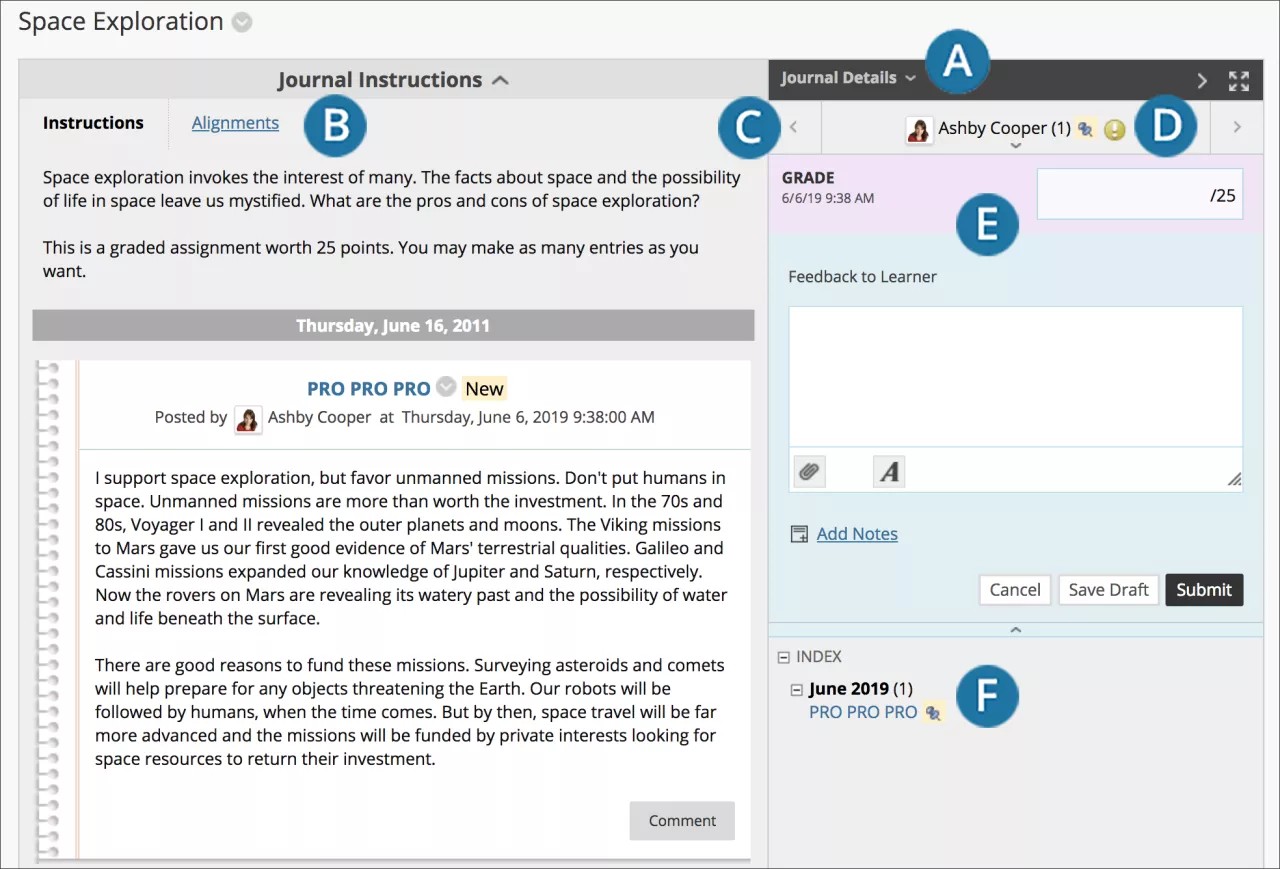
- In the sidebar, you can expand the Journal Details section to display information about the current selection, including the author and number of entries and comments. Select the right-pointing arrow to collapse the sidebar for more viewing room for entries. Select the four arrows to view the journal entries in full screen.
- Journal Instructions are expanded by default. You can minimize them. Select Alignments to add alignments.
- For All Course Members, select the down-pointing arrow to view a list and select a member. The selected member’s entries appear in the content frame. Use the left- and right-pointing arrows to navigate to the previous or next student. Select Show Empty Journals to see which students haven't contributed.
- For graded journals, icons designate the status of a user’s activity. The Needs Grading icon indicates that a user has met the minimum activity for grading you set for the journal. The In Progress icon appears when a user has some activity but hasn't yet met the minimum number required to trigger needs grading status.
- In the grading sidebar, provide a grade and feedback for the student. In the Feedback to Learner box, select the editor icon represented by the letter A to open the pop-up editor window.
- The Index displays the titles of the entries created by an author during the selected time period. Select the minus sign to collapse the title list.
Create journal entries
You and your students can create journal entries. You're the only one who can comment on students' private entries. You and group members can comment on group entries. On the Journals listing page, information is provided about each journal. Students can see if their entries are private—between the student and you—or public.
- On the Journals listing page, select a journal title.
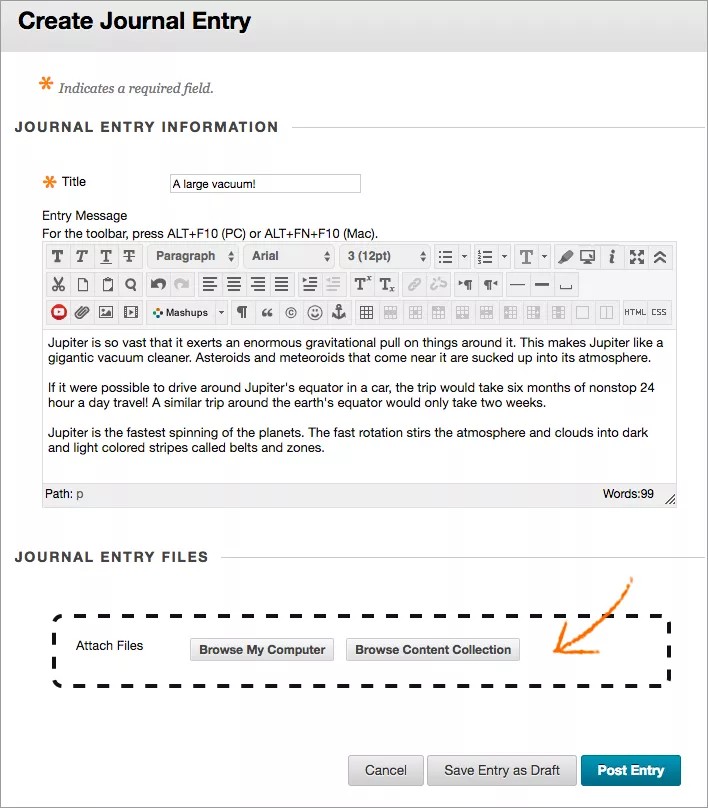
- On the journal's topic page, select Create Journal Entry.
- Type a title and entry.
- Select Browse My Computer to upload a file from your computer. You can also attach a file from the repository: Course Files or the Content Collection.
-OR-
Drag files from your computer to the "hot spot" in the Attach Files area. If your browser allows, you can also drag a folder of files. The files will upload individually. If the browser doesn't allow you to submit your assignment after you upload a folder, select Do not attach in the folder's row to remove it. You can drag the files individually and submit again.
You won’t be able to drag files to upload if your institution uses an older version of Blackboard Learn.
You can use the file name or provide another name for the file.
- Select Post Entry to submit the journal entry or select Save Entry as Draft to add the entry later.
View journal drafts
To view or add to saved drafts, select View Drafts on the Journals listing page.
Comment on a journal entry
You and your students can use journals for essential interaction, especially in a web-based course. Student entries and your comments can help build rapport and create a healthy intellectual exchange.
A student can make a comment after you comment on an entry to continue the conversation. Students can't make comments on another student’s journal entry, even if you made the journal public. Students can only comment on another student’s entry when they're members of the same group. For group journals, you and all group members are allowed to make comments on individual entries.
- On the Journals listing page, select a journal title.
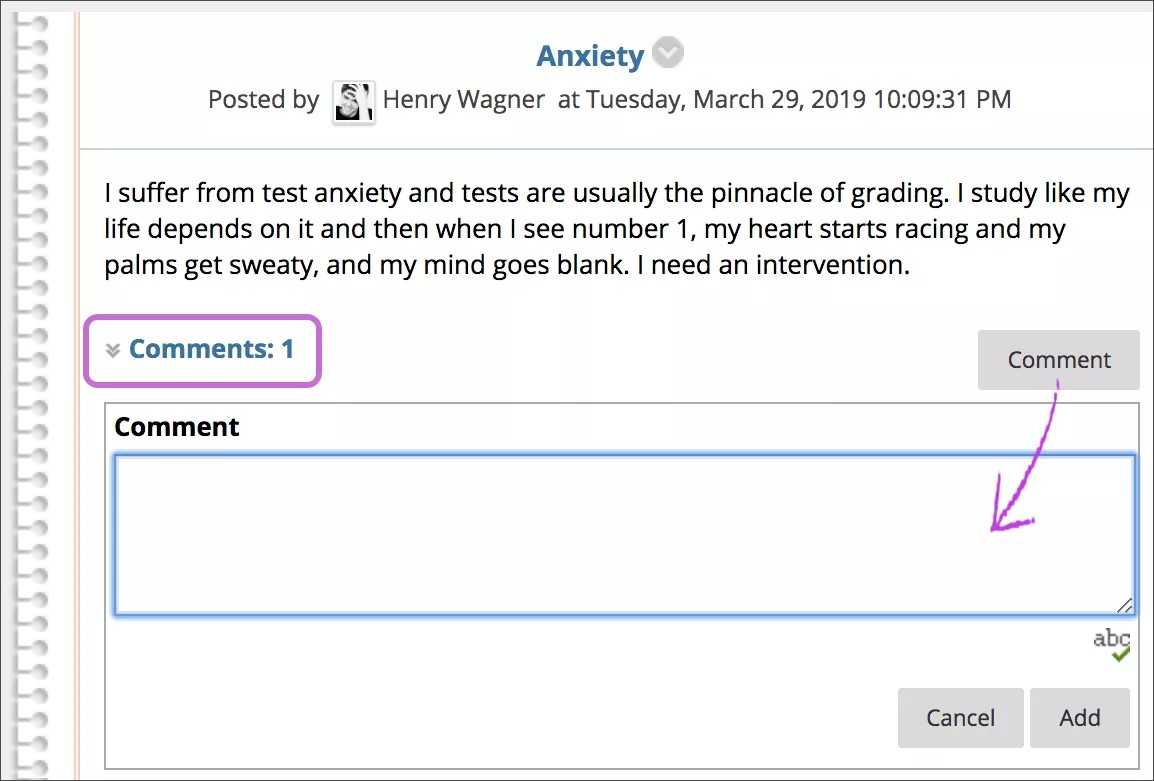
- Select the journal entry to view by selecting the user’s name in the list in the sidebar. The user's journal entry opens in the content frame.
- Select Comment below the user’s entry and type a comment.
- Select Add.
- To view all comments, select the numbered Comments link.
Edit and manage journals
You can edit basic properties of a journal topic, including the name, instructions, availability, and some settings. You can also edit any user's journal entries, and delete journal topics and comments.
On the Journals page, access a journal's menu and select Edit. Make your changes and select Submit.
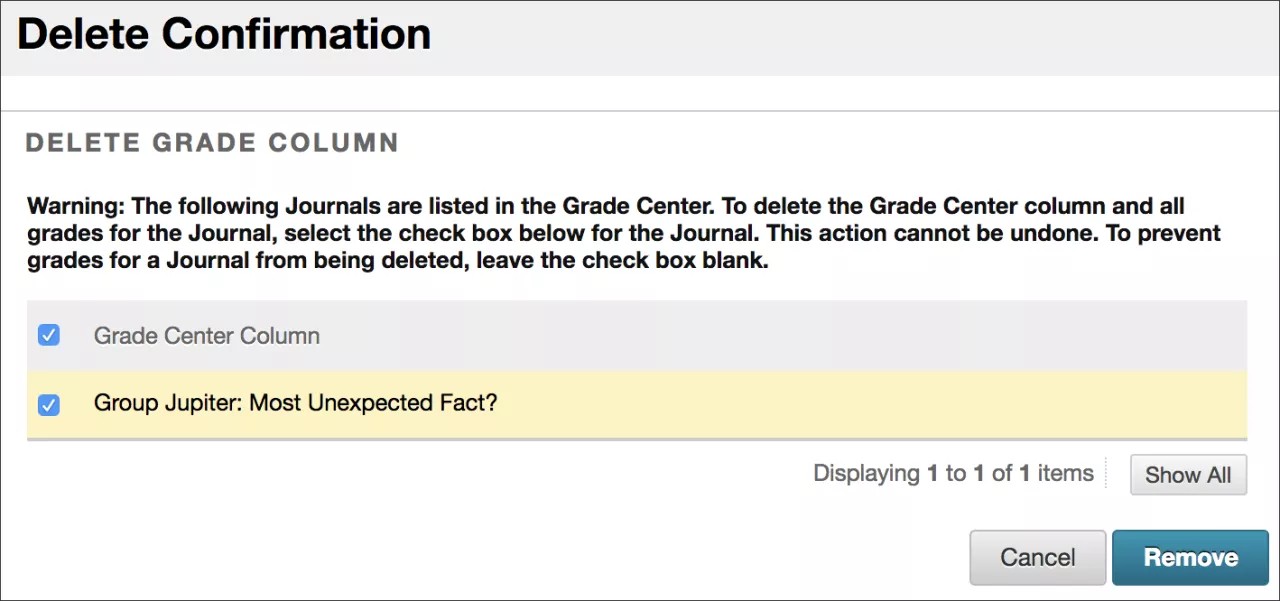
Delete a journal
If you no longer need a journal, you can delete it. The delete action is permanent and irreversible.
- On the Journals listing page, open a journal's menu and select Delete.
- Select OK in the pop-up warning. If the journal is gradable, the Delete Confirmation page appears and you're asked if you want to delete the Grade Column associated with this journal:
- Retain Grade Center column (do not select check boxes): The journal is deleted, but the Grade Center column and scores you've assigned are retained. For example, all student entries are graded and you want to keep the Grade Center column for the final grade calculations. If you delete a journal, yet retain the Grade Center column, you can delete that column from the Grade Center at any time.
- Delete Grade Center column (select which ones to delete using the check boxes): The grade column in the Grade Center and the journal are deleted. For example, if you don't want to include the grade column for the journal entries in the final grade, you can safely delete all.
- Select Remove to complete the deletion.
Add a journals link to the course menu
You can add a link to the course menu for immediate access to the journals tool. You can also customize the name of the link.
- Select the plus sign above the course menu. The Add Menu Item menu appears.
- Select Tool Link and type a Name for the link.
- From the Type list, select Journals.
- Select the Available to Users check box.
- Select Submit.
Troubleshoot journal management
- If you delete a journal while users are posting, the journal and all comments are deleted.
- If you make a journal unavailable while users are posting, the journal remains visible to you in Edit Mode but doesn't appear to users.
- If you change the Allow Users to Edit and Delete Entries setting, entries remain, but users can't edit them.
- If you change the Allow Users to Delete Comments setting, comments remain, but users can't delete them.
- If you enable journal grading, you can't change this setting. Delete the journal and the Grade Center column to remove it. If you need the journal entries, but not the grades, you can decide not to include the Grade Center column for the journal in Grade Center calculations.