Your institution controls which tools are available in the Original Course View. The gradebook is always available to instructors in the Ultra Course View.
Assign grades in the Grade Center
Grades are assigned automatically for online tests and surveys that have no questions that require manual grading. You can manually edit these grades.
You can assign grades in the Grade Center in these ways:
- Access items to grade from the Grade Center or the Needs Grading page. For some items, such as gradable blogs or discussions, you're taken to the tool where you assign the grade.
- Manually assign grades in the Grade Center.
- Upload grades from an external source, such as a comma-separated values (CSV) file or an Excel spreadsheet. You can work offline and then upload grades into the Grade Center.
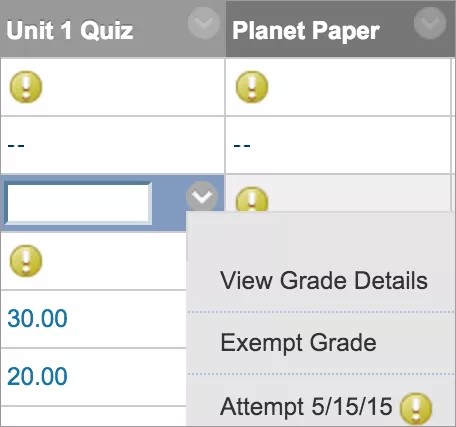
You can assign grades in any cell in the Grade Center or from the Grade Details page accessed from a cell's menu. When you type in a cell, the grade may be an override grade. Press the Enter key to save your entry. If you don't, you're reminded.
Why does the grade value include decimal points?
Assign a grade on the Grade Details page
On the Grade Details page, you can view a student's attempts and grade history, assign and edit a grade, and clear and exempt grades.
- Access a grade cell's menu and select View Grade Details.
- On the Grade Details page in the Attempts tab, select Grade Attempt and type a grade.
- Select Save and Exit to return to the main Grade Center page.
-OR-
Select Save and Next to display the next attempt.
More on the Grade Details page
Watch a video about the Grade Details page
The following narrated video provides a visual and auditory representation of some of the information included on this page. For a detailed description of what is portrayed in the video, open the video on YouTube, navigate to More actions, and select Open transcript.
Video: Viewing Grade Details shows how to access the Grade Details page. You can view a student's attempts and grade history, assign and edit a grade, and clear and exempt grades.
Send reminders about missing coursework
You can send email reminders from Grade Center columns to students and members of groups who have missing coursework. Students receive a system-generated email that lists the course, coursework, and the due date if you assigned one. You receive a success message at the top of the screen when the email is sent and a copy of the email for your records.
You can also send reminders for assignments with anonymous or delegated grading enabled. To protect anonymity, students' names and attempt statuses aren't revealed.
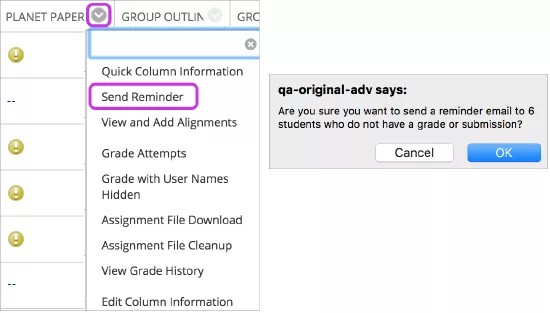
You won't see this menu option if your institution uses an older version of Blackboard Learn.
Can I grade assignments right in the browser?
You can use Bb Annotate for inline grading in both the Original Course and Ultra Course Views. Bb Annotate offers a more robust feature set to provide customizable feedback to students. Features include a sidebar summary view, freehand drawing tools, various color selections, and much more.
Grade and manage multiple attempts
You enable multiple attempts when you create tests and assignments. You can also choose which attempt to use for the grade that appears to students.
More on multiple attempts for assignments
On the Grade Details page
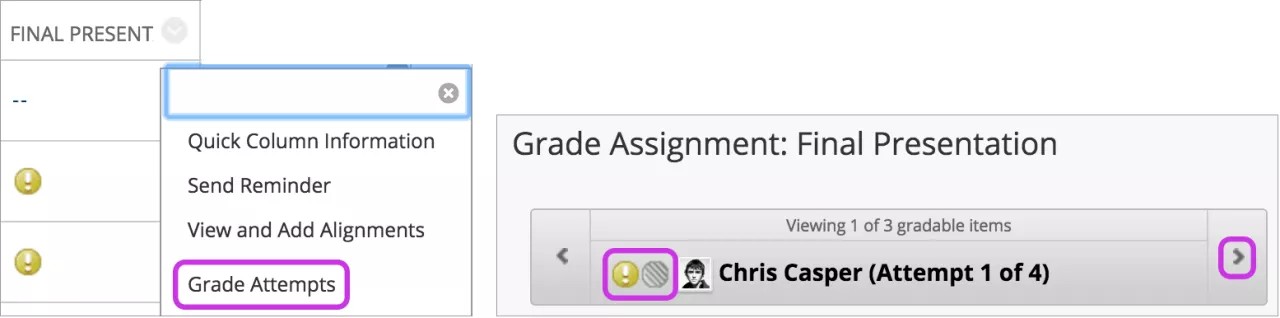
Access the Grade Details page from a cell's menu. The Attempts tab lists all submitted attempts so you can grade and clear attempts. You can also allow additional attempts. Grades for all attempts are tracked in the Grade History tab.
You can also ignore an attempt to keep it but omit the score from Grade Center calculations. The attempt isn't counted toward the number of allowed attempts. You may also edit an assignment grade.
Use the Delete menu to select one or all attempts to delete.
In the Grade Center grid
You can view a list of completed attempts from a grade cell's menu in the Grade Center grid. You may exempt a grade, but you can't clear or delete attempts from the menu.
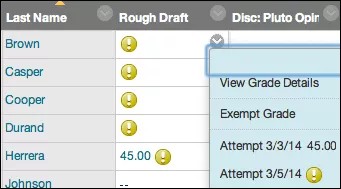
Example:
You allow two attempts for an assignment. After submission, both attempts appear in the cell's menu.
If you grade one attempt, the score appears in the cell and the menu, along with the Needs Grading icon for the ungraded attempt.
Choose which attempt to grade
When you allow multiple attempts, you may not need to grade all of them. In the grade cell's menu, each attempt appears with one or two icons. If you chose to use the first or last attempt for the grade, the attempt you need to grade appears with only one icon—the Needs Grading icon. If you have a large class and grading workload, you'll know which attempts need your attention.
The other attempts in the grade cell's menu appear with the Does not contribute to user's grade icon and the Needs Grading icon.
You won't see the "Does not contribute to user's grade" icon if your institution uses an older version of Blackboard Learn.
You can also use the Filter function to control which attempts appear in each grade cell's menu. The default view shows each attempt made. Open the Filter field and clear the check box for Show attempts that don't contribute to user's grade. Then, you'll see only the attempt you need to grade in each grade cell's menu.

Important: If you allow four attempts and choose to use the last attempt for the grade, only the Needs Grading icon appears with the last submitted attempt. So, if a student has made three attempts, the third attempt appears with only one icon—the Needs Grading icon. If you grade that attempt, the student can still make another attempt. The next attempt will appear with only the Needs Grading icon because it's the fourth and last attempt.
For some gradable items such as assignments, you can also select Grade Attempts in a grade column's menu and start grading. Attempts that aren't part of a student's grade calculation appear with the Does not contribute to user's grade icon. You can navigate to the attempt that appears with only the Needs Grading icon.
You can also filter your grading workload for multiple attempts on the Needs Grading page and view attempts on the Grade Details page. If you enabled anonymous or delegated grading for an assignment, multiple attempts are managed in the same ways. To protect anonymity, students' names and attempt statuses aren't revealed.
More on multiple attempts and anonymous grading
More on multiple attempts and delegated grading
Choose an attempt for the grade
When you allow multiple attempts, you can choose which attempt to use as the grade. You can choose the attempt when you create the gradable item.
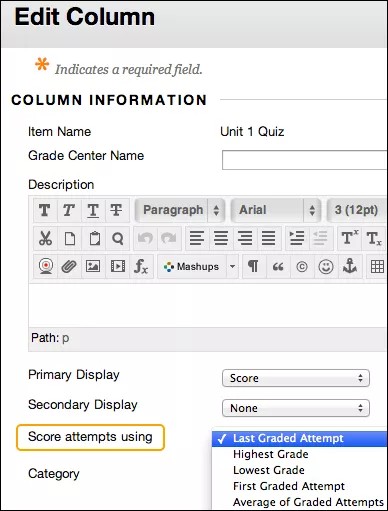
To change which attempt to use, access the column's menu and select Edit Column Information. Select from the options in the Score attempts using menu:
- Last Graded Attempt
- Highest Grade
- Lowest Grade
- First Graded Attempt
- Average of Graded Attempts
Include comments
You can provide feedback while you grade. You can also return to the item's cell and include comments with any grade entry.
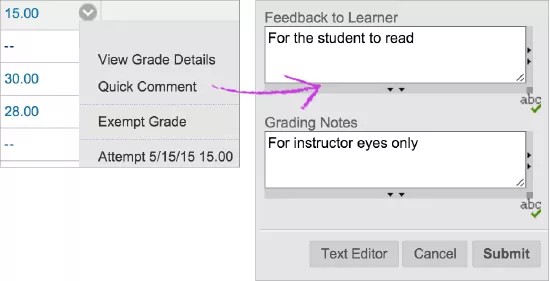
Comments you provide in the Feedback to User section are visible to students. Comments you provide in the Grading Notes section are for your eyes only.
Access the cell's menu and select Quick Comment. Type text-only comments in the Feedback to Learner or Grading Notes sections. Select Text Editor to access the full set of features, such as attaching files.
You can also provide comments on the Manual Override tab on the Grade Details page when you assign an override grade.
Add feedback recording
You can embed an audio or video recording with your feedback as you grade attempts. Students watch or listen to your feedback alongside any text you include.
Recordings can help you connect with students in courses with little to no face time. When paired with text feedback, video and audio recordings can help provide students with useful, actionable, and more personal feedback regarding their submissions.
Audio and video feedback isn't supported in grading with rubrics at this time. This feature isn't supported on all browsers. For the best experience, use Chrome or Firefox.
More on audio/video recordings
Grade with student names hidden
You can grade items without viewing student information. The students appear in random order without identifying information. Anonymous grading is helpful to reduce bias when grading.
- Access a column header's menu and select Grade with User Names Hidden.
-OR-
Access a grade cell's menu and select an attempt. On the Grade Details page, select Hide User Names. Select OK. A new attempt opens.
- Provide grades.
- Select Save and Exit to return to the main Grade Center page.
-OR-
Select Save and Next to show the next student.
-OR-
Navigate to the next or previous student with the Grade Next Item and Grade Previous Item icons.
More on anonymous grading for assignments
Delete a grade
You can delete a grade. You can set grades to null by typing a dash (-) in the cell or press the Delete or the Backspace key to delete the grade. Press the Enter key to save your entry. If you don't, you're reminded to save the grade entry.
Delete Grade Center columns
You can't delete default columns—First Name, Last Name, and Username—or columns generated automatically for gradable items. You also can't delete the external grade column. If you set a grade or calculated column as the external grade column, you must select another column as the external grade column before you can delete the first one.
More on the external grade column
When you create gradable items in your course, these grade columns are created automatically in the Grade Center:
- Tests, surveys, and Self and Peer Assessments
- Assignments
- Discussion posts
- Journal and blog entries
- Wiki contributions
The only way to delete these auto-created grade columns is to first delete the gradable items in your course. For some, if no student submissions exist when you delete the item, the column is deleted automatically or you can choose to delete the column.
Before you delete gradable content in your course, carefully consider the ramifications. Student work is deleted along with the deletion of the content item in your course, such as assignment submissions. The action is final. In some cases, you can choose to save the grades assigned in the Grade Center. Even if you retain grade columns, you can't access the student submissions because they were deleted with the item in your course. Or, make the gradable item unavailable in your course to preserve the submissions and the scores in the Grade Center.
Example: Delete an assignment
When you delete an assignment that has student submissions, you also delete all the submissions. You have two options:
- Preserve the scores in the Grade Center, but delete the assignment and all submissions. Though the scores remain in the Grade Center, you can't access the students' submissions again. This action can't be reversed.
- Delete the assignment, the Grade Center column, all assigned grades, and all submissions. This action can't be reversed.
Exempt grades
You can exempt a grade from a student's record and the grade is ignored in all Grade Center calculations. The grade cell displays the Exempt icon. You can also apply an exemption before a grade is assigned.
If you assigned a grade and then exempted it, the grade remains available on the Grade Details page. You can also exempt a grade on the Grade Details page.
Access the cell's menu and select Exempt Grade. You can clear the exemption with the Clear Exemption option in the cell's menu.