This information applies only to the Original experience.
Administrators can download login page templates supplied with Blackboard Learn and configure them for their system. If a login page template breaks or is not appropriate for the institution, the default login page can be restored so that users can access the system with minimal interruption.
You can also manage different login pages and login names for different brand hosts.
All the relevant styles for any custom login pages must be included within the <head> tags of the login page to render properly.
Manage the Login page
- On the Administrator Panel, under Communities, select Brands and Themes.
- Select Customize Login Page. The following table describes the available tasks.
Customize Login Page Available Tasks Operation Description Download a template for the login page Next to Use System Default > Default Login Page, select Download. Download the current customized login page Next to Use Custom Page >Current Custom Login Page, select Download. This operation downloads the current customized login page. Upload a customized login page Next to Use Custom Page > Upload Custom Page, you can browse your computer or the Content Collection. Locate the file and complete the upload. The customized login page is then set as the login page. Reset the login page to the default Select Use System Default.
Customize the Login page
- On the Administrator Panel, under Communities, select Brands and Themes.
- Select Customize Login Page. Under Use System Default > Default Login Page, select Download to download and customize a copy of the JSP login page.
- Open the file with a text editor. The colors, style of text, and the text itself can be edited. It is also possible to create a link to an image.
- Save the login file to your local machine or the Content Collection. To learn more, see Content Collection.
- Back in Blackboard Learn, return to Customize Login Page.
- Select Use Custom Page, and then select one of the following options:
- Select Browse My Computer to search for an existing JSP login page saved on your local system.
- Select Browse Content Collection (available only if your institution has access to content management features) to search for a JSP login page within Content Collection.
- Select Preview to view the login page. Note that the Preview option shows the current login page. If you upload a new custom login page, you'll need to save changes before you select Preview to view the changes.
- Select Submit to save changes.
- Log out to test the new login page.
If the page fails and you are unable to log in, type the following address in your web browser to bring up the default login page: http://domain_name.host_name/webapps/login?action=default_login. After logging in, go back to Customize Login Page and select the link to restore the default login page. This will allow users to once again log in.
Customize a brand login page
- On the Administrator Panel, under Communities, select Brands and Themes.
- Select Manage Brands.
- If you have already created host name brands, search the list of brands for those that have the Everyone role selected. The role for the hostname must be set to Everyone to customize a brand login page.
- Select the arrow next to the host name brand to display a pop-up menu.
- Select Login Page. This option is available only if you set the role for the host name to Everyone in step 3 above.
- Select Use Custom Page, and then select one of the following options:
- Select Browse My Computer to search for an existing JSP login page saved on your local system.
- Select Browse Content Collection (available only if your institution has access to content management features) to search for a JSP login page within Content Collection.
- Select Preview to preview your login page. If everything looks good, select Submit.
- Log out and test the new login page.
If the page fails and you are unable to log in, type the following address in your web browser to bring up the default login page: http://domain_name.host_name/webapps/login?action=default_login. After logging in, go back to Customize Login Page and select the link to restore the default login page. This will allow users to once again log in.
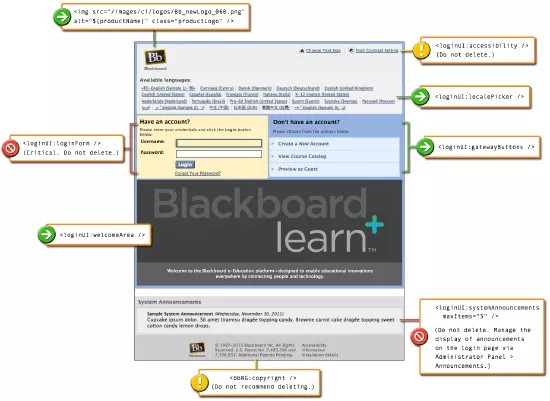
Anatomy of a login page
The Learn 2008 theme is deprecated and no longer supported by Blackboard. The theme is still available in Blackboard Learn but Support is unable to assist in troubleshooting.
Anatomy of a Login Page
Refer to the visual keys to understand the elements of the login page, and whether or not you can remove or edit the elements. Use the following recommendations as you consider customizing your login page.


2012 Theme
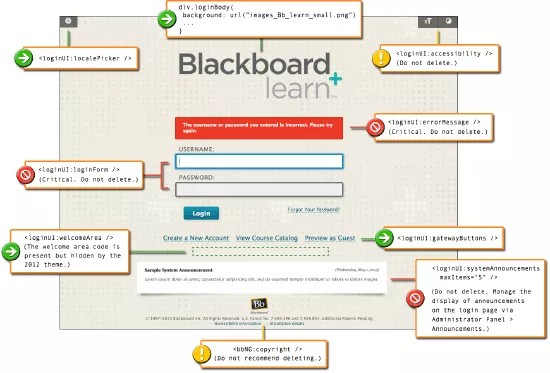
2008 Theme