The course catalog groups courses into categories. When a course is assigned to a category, it appears automatically in the course catalog. Courses that are set to Unavailable don't appear in the course catalog.
You can use categories and subcategories to create a catalog hierarchy that matches the departmental structure of your institution.
For example, the History category might have numerous subcategories, including Ancient History and World History. The World History category might contain African History, American History, Asian History, and European History. The American History category might contain North America and South America categories.
Example:
History
>World History
>>American History
>>>North America
>>>South America
You can have multiple categories with the same name. However, the category ID must be unique. For example, every top-level category can have a subcategory with a category name of Advanced Courses and a category ID of adv_01, adv_02, adv_03 and so on.
View subcategories
- On the Administrator Panel in the Courses section, select Course Catalog.
- Select the name of the parent category. The next level of the hierarchy appears.
- Continue to select category names to drill down through the levels.
- To return to a higher category, select its name in the hierarchy path. For example, if the hierarchy path displays Top Level > Language Arts > Comparative Literature > Myths and Legends, select Language Arts to return to the second level.
- To return to the top level, select the Top Level link in the hierarchy path.
Create or edit a category
- On the Administrator Panel in the Courses section, select Course Catalog.
- Select Create Category. This table describes the available fields. [r] indicates a required field.
Category Available Fields Field Description Create/Edit Category Category Display Name[r] Provide a name for the category. The category name doesn't have to be unique. For example, you can have three categories called Advanced Courses. You can change category names at any time. Category ID [r] Provide a category ID. The category ID must be unique within Blackboard Learn. For example, if you have three categories called Advanced Courses, create three different category IDs, such as adv_01, adv_02, and adv_03. Category IDs can contain numbers, letters, hyphens (-), underscores (_), and periods (.). All other characters, including spaces, are prohibited.
You can't change category IDs after they've been set.
Description Provide a detailed description of the category. Display Category on Top in Catalog View Select this check box to display the category on the first page of the course catalog. Availability Select Yes to make the category available to courses throughout Blackboard Learn. Select No to make the category unavailable. To If you selected Everyone, skip to the next step. If you selected Specific Roles, in the Items to Select list, select the roles to make this module available to. Select the right-pointing arrow to move the items into the Selected Items list. To reverse the selection in either box, select Invert Selection.
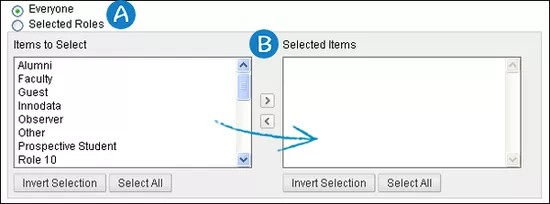
- Make this category available to all users (Everyone)or restrict access by user's institution role (Selected Roles).
- If you restrict access by role, select a role to select it. Then select the arrow to move it to the other list.
- Select Submit.
Enable or disable the course catalog link on the start page
- On the Administrator Panel in the Security section, select Gateway Options.
- In the Gateway Functionality section, select one of these options:
- Disable: Removes the link to the course catalog from the user start page.
- Enable: Includes a link to the course catalog on the user start page.
- External Catalog URL: Includes a link to an external catalog rather than the Blackboard Learn course catalog. Provide the full URL, including http.