Closed Captioning
Two closed-captioning windows
With the closed-captioning feature, session attendees can transcribe audio information for users who are deaf and hard of hearing. During the live session and in a recording of the session, you can view the transcribed text. You can also save the transcription in a text file.
You can view two types of closed-captioning windows:
- Input window: Type the text others can read.
- View-only window: Read the text others have typed.
Closed-captioning windows always stay on top of other windows for easy access.
Anyone in the session can view the closed-captioning text. However, moderators must give one or more session attendees the permission to provide closed-captioning text.
Activity and permission indicators
In the participants list, you can monitor the state of closed-captioning activity and permissions through indicators described in the following table.
| Activity Indicator | Description |
|---|---|
|
|
User is typing closed-captioning text. |
|
|
Moderator granted the closed-captioning permission to this user. |
Open and close the closed-captioning window
Open the closed-captioning window:
- Click the closed-captioning icon
at the top of your Audio & Video panel.


- Use Ctrl+F8 (Command+F8 on Mac).
- From the Window menu, click Show Closed-Captioning.
Close the closed-captioning window:
- Click the closed-captioning icon again.
- Click the window's close function on the title bar.
- Use Ctrl+W (Command+W on Mac).
- Use Alt+F4 (Windows only).
Input window: As a writer of captions, when you close the caption input window, it is cleared of all content. When you reopen window, it is blank.
View-only window: As a reader of captions, when you close the view-only window, it keeps a history of the captions. When you reopen window, it will contain the captions that you received when the window was previously open. However, the window will not display any captions entered by a captioner while you had the window closed.
Closed-captioning text
All moderators and participants have the permission to view the text in the closed-captioning window. If no one is currently providing closed-captioning text, the closed-captioning window states No caption source available.
If someone is typing closed-captioning text, the window shows who is providing the text. In the following example, Lucy provided the text.

After a moderator grants you permission to provide text, open the input window and type or paste text.
Change the closed-captioning source
If more than one person is providing closed-captioning text at the same time, their names appear in the Preferred Source drop-down list. You can change whose text you want to read.

When you first open the view-only window, the source is set to None. The first person who starts typing automatically becomes the source. When users are typing text, the closed-captioning icon appears next to their names in the participants list.
If your preferred captioner leaves the room, you receive the captions of the next captioner in the list, if available. If your preferred captioner returns to the room, you receive those captions again.
Save closed-captioning text

You can save the closed-captioning text. Click Save in the Options menu in either the input or view windows.
Window display options
Window Display Options
In the input and the view-only windows, you can customize the display. You can change the font, size, and color of the text and the background color.
When you configure preferences, Blackboard Collaborate remembers your settings for all sessions you join on the same computer.
Background Color: Click the Background color square to open the color window. The default color is white.
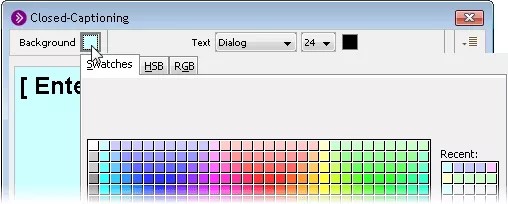
Text Font: Click the Text font drop-down list and make a selection. The default font is Dialog.
Text Size: Click the Text size drop-down list and make a selection. The default text size is 24.
Text Color: Click the Text color square to open the color window. The default color is black.
Invert: To reverse the text and background colors, click the options menu and click Invert.

Inverted Example
In the following example, the dark blue text changed to light blue and the light blue background changed to dark blue.

Granting the closed-captioning permission
Granting the Closed-Captioning Permission
The Closed-Captioning permission is not included in the default set of Global permissions - not even for Moderators (including yourself). Before Moderators and Participants can enter text in the Closed-Captioning input window, you must explicitly grant them the Closed-Captioning permission.
Moderators and Participants do not need the Closed-Captioning permission to read another person's Closed-Captioning text.
To grant the Closed-Captioning permission to an individual Moderator or Participant, select the Closed-Captioning permission in their Participant Options menu.
When users are granted the Closed-Captioning permission, they will see the Closed-Captioning button added to the title bar of their Audio & Video panels. This is the button they will use to open the Closed-Captioning window to enter caption text.