Make Content Collection items easier to find with the learning objects catalog.
If your institution has a large Content Collection, you may find it hard to quickly find the most important files or folders. To make it easier, you can nominate items to be included in the Learning Objects Catalog, a repository within the Content Collection. After the item is approved by a catalog manager, other users can browse or search for these important or notable entries.
Add a catalog entry
The Add Entry option is only available if categories have been added to the learning objects catalog.
- In the Content Collection, find the folder that contains the item you want to add to the learning objects catalog.
- Select Create Catalog Entry from the item's menu.
- Type in the information and select Submit.
The information in the description section is pulled from the general metadata. If you edit this information on this page, it will only be used for this catalog entry and the general metadata for the item won't be changed. If a Content Collection item is added to the catalog multiple times, each entry may have different information.
When an entry is submitted to the internal catalog, all system accounts are granted read permission for that item. When an entry is submitted to the public catalog, public users are granted read permission for that item.
Administrators determine which catalogs are available and which system roles have permission to add entries.
Manage entries
Catalog managers review, accept, and reject catalog entries on the Manage Catalog Entries page. All submitted entries appear on this page. A catalog manager must accept an entry before the item appears in the catalog.
A catalog manager can change the status of catalog entries multiple times. One catalog manager may approve an entry, and then a different catalog manager may decide the entry isn't appropriate and reject it. The entry will be removed from the catalog, and the status will be Rejected on the Manage Catalog Entries page.
If you have access to community engagement features, administrators may grant access to the catalog manager options to users with specific roles in the system. Only these users may access the Manage Catalog pages.
- To manage an entry, select Manage Catalog under the Learning Objects menu.
- Select Manage Catalog Entries.
-OR-
Select Manage Catalog Entries from a specific folder's menu.
On this page, you can change an item's status or delete items. Use the Filter by option to view items based on their status or category. To delete an item, check the box and select Delete.
This action is permanent. If you delete an item on this page, it still exists in the Content Collection.
To change an item's status, select the check box. In the Mark As menu, choose one of these statuses:
- Approved: The item is added to the catalog.
- Rejected: The item is not added to the catalog. If the item was approved before, it will no longer appear in the catalog.
- Pending: No decision has been made about the item.
Manage categories
Catalog managers organize the learning objects catalog based on the institution's needs or other hierarchy. On the Manage Catalog Categories page, catalog managers add categories to the top level of the catalog and add sub-folders within these categories. When entries are added to the catalog, they may be added to a top-level folder or to any sub-folder. Entries to multiple categories may be created for any single item.
- To manage categories, select Manage Catalog in the Learning Objects menu.
- Select Manage Catalog Categories.
On this page, you have these options:
- To add a top-level category to the catalog, select Create Category. Name the category and select Submit.
- To add a sub-category, select a top-level category and select Create Category on the page that opens. Name the category and select Submit. This new category is contained within the top-level category.
- To change an existing category, select Edit in the category's menu.
- To delete a category, select the category's check box and select Delete. If you delete a top-level category, the sub-categories are deleted as well. Any items contained in the category or sub-category are changed to Uncategorized.
Reusable objects
Reusable objects are course elements you create and store in the Content Collection to reuse and share with others. You can add reusable objects to any area of your course where you can create content, such as the discussion board or in journals. If you're a teaching assistant, reusable objects are available to use in the Grade Center and when you create content in a content area.
Your institution controls if this tool and select features are available.
Create HTML objects in the Content Collection
- In the Content Collection, find the folder where you want to create the reusable object.
- Select Build.
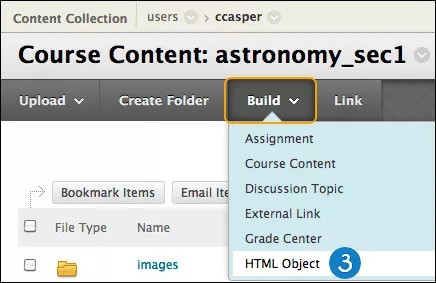
- Select a reusable object type. For this example, select HTML Object.
- On the Create Reusable Object page, type a name, which becomes the file name in the Content Collection.
- Type information in the Content box. You can use the editor to format the text and include files, images, web links, multimedia, and mashups. The files you upload from your computer are saved in the Content Collection in the same folder.
- Select Submit. The reusable object appears in the selected folder in the Content Collection. The system adds the .html extension to the file name. In the Content Collection list, note that all reusable objects have the same icon except for External Links. When you add an HTML object to your course, the actual content appears. The HTML object doesn't appear as a file link that users must select to view the content.
View a list of reusable objects in the learning objects catalog
In the learning objects catalog, you can view the entire collection of reusable objects that you created and those shared with you by other users at your institution.
- In the Content Collection, go to the Jump To... menu.
- Expand the Learning Objects section and select View Catalog.
- In the content frame, in the Browse Reusable Objects section, you can view the categories of reusable objects. Expand a category to see its contents.
You can't add reusable objects to your course from this area.
Set permissions for reusable objects
To share reusable objects in the Content Collection, set permissions for an individual reusable object or its folder. When setting permissions, select which users or groups have access to the item or folder and determine their level of access—read, write, remove, or manage.
You can assign permissions to predefined groups of users:
- All members of a course in which you're enrolled or a teaching assistant.
- All users with specific roles in one of your courses, such as all students.
- All users assigned to select groups in one of your courses.