This information applies only to the Original Course View. Your institution controls which tools are available.
Create an achievement
Your achievements appear in content areas and in the achievements tool.
- Open the achievements tool. You can find it in the Course Tools section of the Control Panel or in the Tools menu in a content area.
- On the Create Achievement page, type a name.
- Select a location in your course. Students are notified.
- Select the type of achievement:
- Course Completion: The certificate reward is required. An additional badge is optional.
- Milestone: The reward is a badge.
- Custom: The reward is a badge, certificate, or both.
- Decide if students can see the achievement before they earn it:
- Select Yes for rewards meant to motivate all students.
- Select No for special rewards for specific students that all course members don't need to see.
- Optionally, type a description that clearly defines what you expect students to complete to earn the reward.
- Select Define Triggers to continue.
An achievement isn't presented to students until you define a trigger rule and select a reward.
Define achievement reward criteria
For an achievement, you can define one or more rules that trigger the release of the reward. You must define at least one rule.
The achievements tool uses Blackboard Learn's adaptive release technology, including these items:
- Attempts on test, surveys, and assignments
- Grades on tests, surveys, and assignments
- Graded discussion posts, graded wikis, graded blogs, and graded journals
- Manually created Grade Center columns
- Marked reviewed statuses on course content
- Group membership or specific users
- Start date to earn an achievement
If you set a Display After date, students can't earn the reward before that date, even if they have already met the criteria. Display After isn't the same as an end date and isn't a deadline.
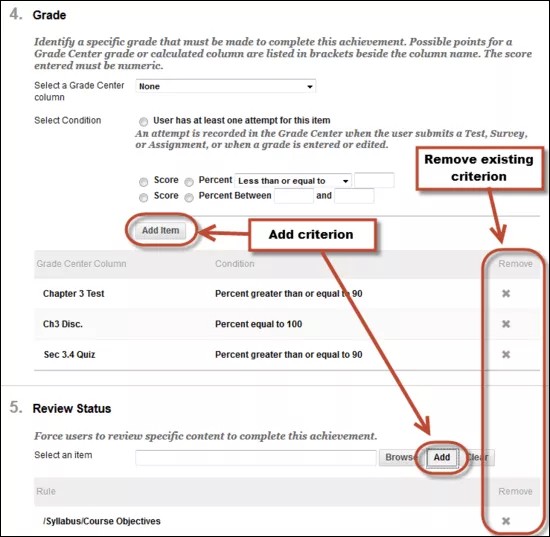
To create a rule, name it and set criteria necessary for fulfilling the requirements of the achievement. Use the add functions to create additional criteria for grade and review status.
Example:
If students must complete four exams in your course and have a final grade of 70%, you will create these:
- Attempt on exam A
- Attempt on exam B
- Attempt on exam C
- Attempt on exam D
- Grade for the running total column of at least 70%
If different criteria are possible, select Add Another Rule. You may find this valuable if you have a group of learners who need accommodations and have different performance requirements to receive the reward.
To manually award an achievement, use the membership criteria options to select the recipients. For example, you can award a mayor badge for students who lead discussions.
Use Select Reward to continue.
Choose the reward
On the final page, choose the reward, which is based on the achievement type:
- Course Completion: The certificate reward is required. An additional badge is optional.
- Milestone: The reward is a badge.
- Custom: The reward is a badge, certificate, or both.
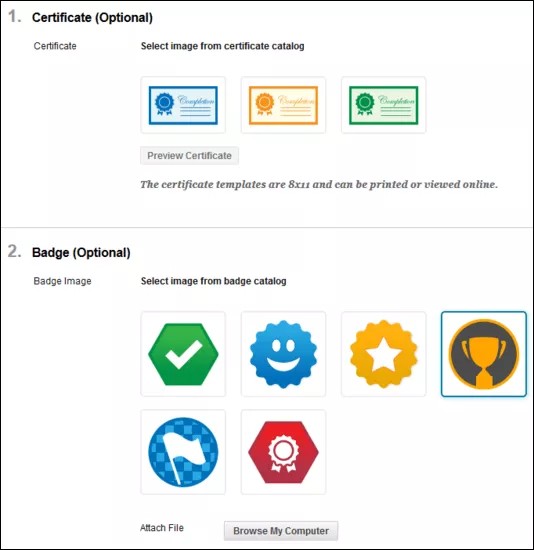
You can preview how a certificate will appear to students. The certificate includes your institution, the student's name, the course name, and the date the criteria were met.
For badges, you can select an image from the catalog or upload a custom image. An uploaded badge image is available for reuse within your course. If you uploaded an image and need to remove it, you can delete the file from your course's storage repository in the achievements directory. Uploaded images are automatically resized.
The issuer name is prepopulated based on the administrator's settings. If allowed, you can modify the issuer name. You can also specify an expiration date for the badge. If allowed, you can make badges available for publishing to recipients' Badge Backpacks.
Select Submit to issue the achievement.
Depending on your version, some areas within Learn may still refer to the Badge publisher as Mozilla rather than Badgr.
View achievements and recipients
In the achievements tool, you can see all of the achievements defined in your course, as well as a count of recipients for each of the achievements.
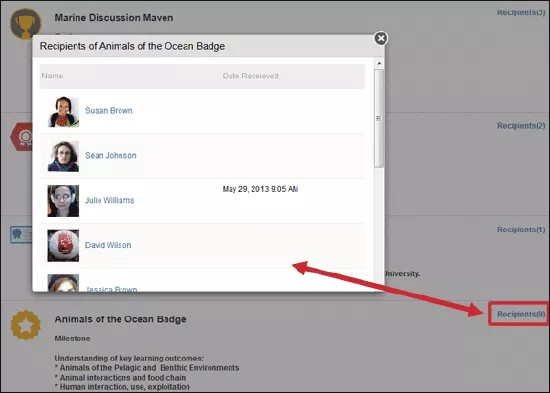
Select Recipients for details about those students who earned each of the achievements. Select a student's name for that student's view of the My Achievements page.
The Date Received shows when students saw the notification that they earned an achievement. In cases where instructor grading or manual awarding is involved, the date received is when students were shown their achievement rewards.
Delete achievements
To delete an achievement, access its menu and select Delete.
If you choose to delete an achievement that a student has already earned, the associated reward is also deleted.
Student view
Students can access the achievements tool on the Tools page, from a tool link on the course menu, or from a link in a content area.
On the Recipients page, select a student's name to see that student's view of the My Achievements page.
You can visit the student topic to see how they view achievements. Use your browser's back function to return to this topic.
Goals and goal alignment
You can align goals to the content items created with the achievements tool, and they will appear in the Goal Coverage reports.
In a content area, open an achievement's menu and select Add Alignments.
Copy, import, export, archive, and restore processes
In the course copy, import, export, archive, and restore processes, achievements aren't handled as distinct objects. Achievements depend on both content and adaptive release rules. If you copy content only between courses, the trigger rules are lost. If you don't include content in a copy or export/import, achievements aren't captured. As long as you select both content and adaptive release rules in the process, achievements will be handled properly.