This information applies only to the Original Course View. Your institution controls which tools are available.
Occasionally, student performance is lower than expected on a test. Instructors can choose to modify the student scores to equalize the scores.
A simple method for curving grades is to add the same amount of points to each student's score. A common method: Find the difference between the highest grade in the class and the highest possible score and add that many points.
Example: Curve a test score
- If the highest percentage grade in the class was 88%, the difference is 12%. You can add 12 percentage points to each student's test score.
- If the test is worth 50 points and the highest score is 48 points, the difference is 2 points. You can add 2 points to each student's test score.
You can curve grades in Blackboard Learn in two ways:
- Method 1: In the Original Course View, download the test's Grade Center column, apply the appropriate curving calculations in a spreadsheet program, and upload the resulting grades into a new Grade Center column.
- Method 2: Manually override each student's original test grade.
Method 1: Download grades, adjust test scores, and upload to Grade Center
This method requires no manually typed grades and is preferable for large classes. These steps use Microsoft® Excel® to modify the downloaded file. The simple formula adds points to the original test grade. You can use more complex formulas if needed.
You upload the adjusted grades. Then, change the column settings for the original test grade so that it's no longer included in any calculated grade totals. The new adjusted test grade column is used instead. Instructions for this task are included in these steps. You can also remove the original test grade from students' My Grades pages.
Download grades
Before you begin, make note of the first few values from the total column. After you upload a new Grade Center column, you can check it's included correctly in calculations.
- In Full Grade Center view, access the Work Offline menu and select Download.
- On the Download Grades page in the Data section, choose Selected Column. Select the name of the column from the menu.
- In the Options section, set the Delimiter Type to Tab.
- In the Save Location section, select My Computer.
- Select Submit.
- Select Download. In the pop-up window, select Save File and select OK. Note the file name and location. If the file automatically saves to your Downloads folder, you can move it to a different folder and rename it.
Adjust test scores
- Locate the XLS file that you downloaded and open it in Excel.
- Select the first cell in the column to the right of the test grade column. Type a column name that you can easily identify when you upload it to your course's Grade Center. Choose a name that is different from others in the Grade Center.
- Select the cell below the new column's title and type a formula that will add a certain number of points to the original test grade.
Type this formula, replacing the number 7.5 with the number of points you want: =D2+7.5
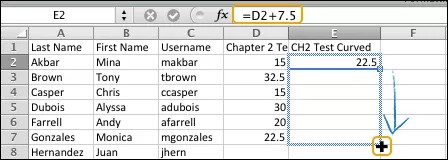
- Press the Enter key. The cell updates to show the original test grade with the additional points added to it.
- Point to the cell's bottom right corner. The fill handle (+) appears.
- Drag the fill handle to the last cell in the column that you want to copy the formula to. Release the mouse to copy the formula to the selected cells and update their contents with new point totals. The formula automatically recognizes that the cell contents are part of a series and adjusts the formula for all cells in the column.
- In Excel, select Save. A pop-up message appears that warns you that saving the file as TXT may remove some features. Select Continue to save your changes to the file.
Upload adjusted scores to Grade Center
- Return to your course's Grade Center and access the Work Offline menu and select Upload.
- Select Browse My Computer and open the XLS file you saved in Excel.
- Set the Delimiter Type to Auto.
- Select Submit.
- On the Upload Grades Confirmation page, notice that the original column has no data updates and your new column is listed for uploading. Select Submit.
- Scroll to the far right side of the Grade Center grid to view the newly uploaded column. By default, the new column is shown to students in My Grades and included in Grade Center calculations, such as the total column.
- By default, the new column's Points Possible is set to zero. Access the column header's menu and select Edit Column Information. Type a new value for Points Possible and select Submit.
The Points Possible value must be equal to the points possible from the original test. If you use percentages, the points possible must equal 100.
- Change the settings for the original test column so that it is NOT included in the total column's calculations and NOT viewable by students. Access the original test column's menu and select Edit Column Information.
- On the Edit Column page in the Options section, select No for Include this Column in Grade Center Calculations -AND- select No for Show this Column to Students. Select OK in the pop-up window that verifies that you want to exclude the column from calculations.
Check the first few values in the total column to verify its calculations. The difference between the original values and the new values should be an increase by the number of points you added to each test score.
Method 2: Manually override each test grade
If you have a small number of grades to adjust, you can override each score in two ways:
- In the Original Course View, we recommend that you assign an override grade from the Manual Override tab on the Grade Details page. You can add feedback for the user and notes for yourself about the grade change. You'll have a record of why you chose to override any future attempts.
-OR-
- Type in a cell to assign an override grade for a test attempt.