This information applies only to the Original Course View. Your institution controls which tools are available.
About smart views
A smart view is a focused look at the Grade Center that shows only the columns that match a set of criteria. The view is saved for continued use. When the Grade Center includes a great number of students and columns, you can use smart views to quickly find data. Several smart views are available by default, but you can also create your own.
With smart views, you can view the progress of these items:
- An existing group
- Student performance for a particular item
- Individual students
- Category and status of items
- Custom combination of attributes
Example: Tracking low scores
You create a smart view to track students with low scores to quickly see which students need help. You can email these students from the Grade Center.
Example: Assessment comparison
You create a smart view to display only two columns in the Grade Center grid: a calculated total column for tests and a calculated total column for assignments. You can compare the two columns to gauge how students are performing.
Watch a video about smart views
The following narrated video provides a visual and auditory representation of some of the information included on this page. For a detailed description of what is portrayed in the video, open the video on YouTube, navigate to More actions, and select Open transcript.
Video: How to Create a Smart View of Grade Center Data explains how to access, view, and create smart views in the Grade Center.
View smart views in the Control Panel
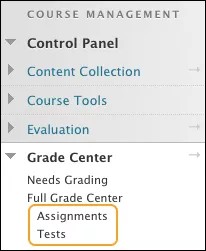
In the Control Panel, favorite smart views appear in alphabetical order as an indented list in the Full Grade Center section. In a new course, the Assignments and Tests smart views appear in the list by default. When you select the Assignments link, the Grade Center page opens and only assignment columns appear. When you select the Full Grade Center link, all the columns appear.
You can add smart views to the favorites list so that you can access them easily. In the Grade Center, access the Manage menu and select Smart Views. On the Smart Views page, select the icon in the Add as Favorite column.
If you don't want a smart view to appear, select the icon to remove it from the list.
Access the smart views list
Several default smart views appear in a new course. Use a smart view to access a set of columns in the Grade Center grid. For example, when you access the Tests smart view, only test columns appear. When you enable grading for blogs, journals, and discussions, those grade columns appear when you access the appropriate smart view.
The default smart views include these groups of columns:
- Assignments
- Blogs
- Discussion Boards
- Final Grade View: Displays all columns, including the default total and weighted total columns
- Journals
- Preview of My Grades: Displays all columns visible to students
- Self and Peer Assessments
- Tests
- Wikis: When the tool is available and you create a wiki
Create smart views
You can create five types of smart views in the Grade Center:
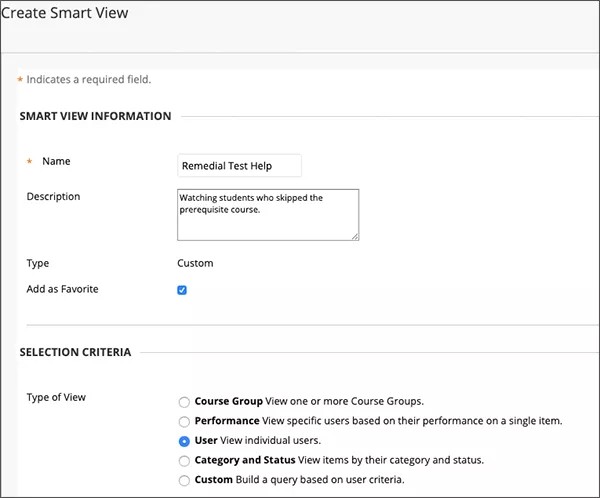
Course Group: Choose from sub-sections of students. You must create course groups before you can use them as selection criteria.
Performance: View student performance on a single item, such as a test.
User: Choose individual students.
Category and Status: Choose a category, users or groups, and grade status. For example, you can select the Blog category, four groups, and the Completed status.
Custom: Select students with a combination of attributes.
The process for creating the five types of smart views is similar.
- In the Grade Center, access the Manage menu and select Smart Views.
- On the Smart Views page, select Create Smart View and provide a name and an optional description.
- Optionally, select the Add as Favorite check box.
- For Type of View, make a selection.
- In the Select Criteria section, set the requirements.
- In the Filter Results menu, select which columns, categories, statuses, or grading periods you want to appear in the Grade Center grid.
Smart view filters Options Description All Columns All Grade Center columns that are not hidden on the Column Organization page appear, including columns that you have hidden from users. None (Show user information only) No grade columns are selected. Only user columns appear, such as Last Name. If you chose to hide some user columns from view, they don't appear. All columns shown to users All columns set to appear to users and those that you haven't hidden on the Column Organization page appear. All columns hidden from users All columns appear that are hidden from users. Columns that you hid on the Column Organization page don't appear. Selected Columns Only Select columns from the list of columns that appears. Selected Categories Only Select the categories from the list of categories that appears. Selected Grading Periods Only Select grading periods from the list of grading periods that appears. - If the Include Hidden Information check box appears, you can select it to display hidden columns that pertain to the filter. When you view the smart view, the columns you hid on the Column Organization page appear in the grid also.
- Select Submit.
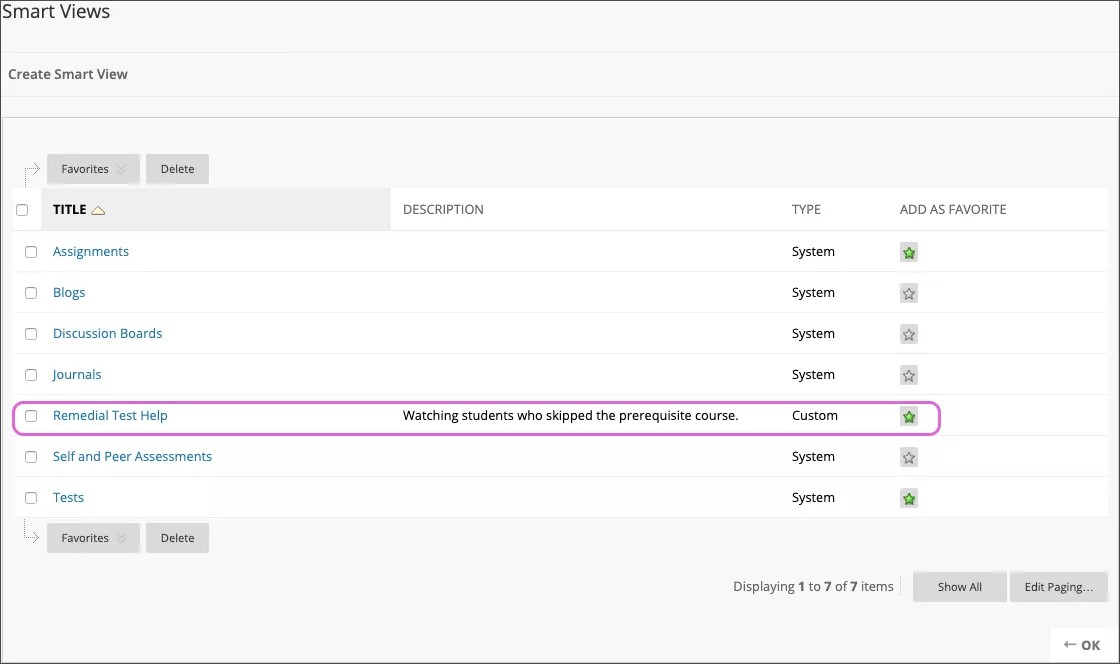
The smart view appears on the Smart Views page. Select the title to display it in the Grade Center grid.
Course group smart views
You can create smart views that are based on groups you create in your course. You can use course group smart views in two ways:
- Students use the groups to collaborate with other students and complete group assignments. You create smart views to track their progress.
- You create a group to track a set of students who aren't performing well on assignments and tests. You hide the group from students and use it only to view data in the Grade Center.
Performance smart views
You can create smart views that are based on student performance for a single item such as a test.
- In the User Criteria menu, select a Grade Center column.
- In the Condition menu, select an option such as Equal to or Greater than.
- In the Value box, type a score or scores, or select a status such as Needs Grading or Completed.
User smart views
You can create smart views to display all or selected grade columns for specific users.
Example: Track student progress
If several students are taking your course without completing a prerequisite course, you can create a smart view to track their work as the term progresses. You can use this data to determine if you will allow students to enroll in your course without the required foundation course in the future.
In the Users menu, select an option:
- All Users to include results for all students.
- Selected Users to select individual students.
To select multiple users or items in a list, press the Shift key and select the first and last users. To select users out of sequence, press the Ctrl key and select each user needed. For Macs, press the Command key instead of the Ctrl key.
Category and status smart views
You can create smart views that display columns based on a specific category, selected users or groups, and a grade status.
Example: Assignments not attempted
Use a smart view to display only the assignment columns in the Grade Center grid with a Not Attempted grade status. You can contact those students and remind them of deadlines and offer help.
Example: All unit tests
For a specific group in your course, create a smart view to display all the unit test columns in the Grade Center grid with a Completed grade status. Then, you can determine if a study session is needed before the final test.
In the Users menu, select an option:
- All Users to include results for all students. Select the Include Hidden User Information check box to display the user rows you have hidden from view in the Full Grade Center.
- Selected Users to select individual students.
- Selected Groups to select individual groups. If no groups exist, the selection box is empty.
For Windows, to select multiple users or items in a list, press the Shift key and select the first and last users. To select users out of sequence, press the Ctrl key and select each user needed. For Macs, press the Command key instead of the Ctrl key.
In the Filter Results menu, select a grade status such as Needs Grading.
Custom smart views
You can create custom smart views to use a variety of criteria in one formula. Custom smart views are based on complex search queries provided in the formula editor. Detailed smart views can help you build a comprehensive organization of Grade Center data.
About the formula editor
When you create a custom smart view, you can use multiple user criteria. By default, as you add each criterion, it is assigned a number and appears in the Formula Editor box. The numbers are connected by AND. Each criterion you add can have a condition such as Equal to, Greater than, and Less than. Each condition requires a value to compare with the condition. For example, you can view scores that are Less than (condition) 60 (value) on a test.
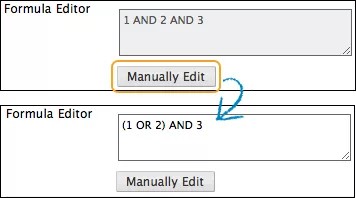
After you add the criteria, the formula for the query is represented by a statement: 1 AND 2 AND 3. Use the Manually Edit function after the Formula Editor box to change the operators (AND and OR) and to insert parentheses to change the way the formula is completed.
Criteria and the formula editor
In the Select Criteria section, set the requirements:
- In the User Criteria menu, make a selection such as a group, a grade column, or last access.
- In the Condition menu, make a selection such as Equal to or Less than, or select Status Equals.
In the Value box, type scores or select a grade status for the condition.
As you select data, a query formula is built in the Formula Editor box. The first set of criteria is labeled "1."
To add a second set of criteria, select Add User Criteria and set additional requirements. The second set of criteria is labeled "2." Continue to add more criteria as needed.
Edit, copy, and delete smart views
You can edit and copy default system smart views, but you can't delete them. For example, you can edit the Tests smart view so that only test columns with a Completed status appear in the Grade Center grid.
If you create a smart view, you can delete it.
- On the Smart Views page, access a smart view's menu.
- Select Edit to make changes to a smart view, such as renaming or selecting different criteria.
-OR-
Select Delete to remove a smart view you created. When you remove a smart view, no data is deleted from the Grade Center.
-OR-
Select Copy to create a copy of an existing smart view. "Copy of" appears in the title of the copied smart view on the Smart Views page. Select Edit to make changes to the copy.
If you copy a smart view that is a favorite, your copy is added automatically to the favorite list and appears in the Control Panel. Select the icon in the Add as Favorite column to remove it from the favorite list.