Access an item's options
After you build content containers, such as content areas, learning modules, lesson plans, and folders, you create content within them. You edit and manage all of the items and content containers, except content areas, in the same way. You can't copy or move a content area into another content area or set release criteria.
Be sure Edit Mode is ON so you can access all of the instructor's functions.
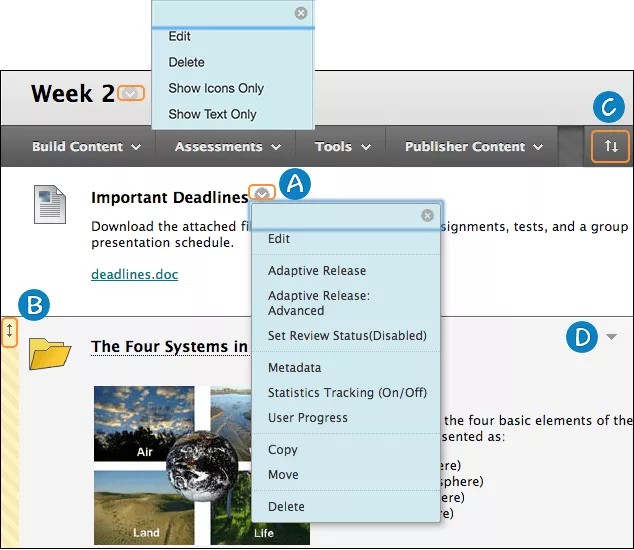
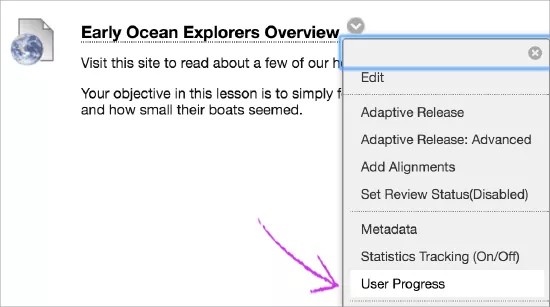
When you access an item's menu, you can change settings, modify availability, and create metadata. You can turn on options such as review status, adaptive release, and statistics tracking. You can also copy, move, and delete content. You can reorder content and hide content details to save screen space.
- Access an item's menu for a list of options, such as Edit. If the option doesn't appear, it's not available for that content type. For a content area, access the menu next to the title and select Edit and Delete.
- Use the drag-and-drop function to reorder content.
- Or, use the keyboard accessible reordering tool to reorder content.
- Select Hide Details to collapse the description and save screen space. Select the icon again to expand the description. When several items and descriptions exist, you have to scroll to see the entire page. A collapsed description remains collapsed even after you log out and log in again. Students can't collapse descriptions.
If you see a gauge icon next to your files, your institution uses Blackboard Ally to measure the accessibility of your course content. To learn more, visit Ally help for instructors.
Edit content containers and content
To change the name, description, appearance, options, or availability for an item, access the item's menu and select Edit. For content areas, access the menu next to the title and select Edit.
On the Edit page, make your changes.
Ally ב-Learn Original - מרצה
הצגה ושיפור של נגישות קבצים
לא נראה מוכר? עבור אל העזרה של "Ultra" אודות שיפור נגישות הקבצים.
המוסד שלך קובע אילו כלים זמינים.
הכיתה שלך מלאה בתלמידים מגוונים בעלי יכולות למידה ייחודיות. מתן תוכן נגיש יותר לתלמידים פירושו שכל אחד יכול לבחור תבניות שמתאימות לו בצורה הטובה ביותר. אם המוסד שלך משתמש ב-Blackboard Ally, באפשרותך להשתמש בכלי שיעזור לוודא שתוכן הקורס שלך נגיש לכל תלמיד.
Ally סורקת אוטומטית את תוכן הקורס שלך ומבצעת שלבים להפיכת הקבצים לנגישים יותר.
- בקןרס שלך, מצא את הקובץ שברצונך לשפר.
- לצד שם הקובץ, מופיע סמל כדי להציג במהירות את ניקוד הנגישות של הקובץ. רחף מעל הסמל כדי להציג את הניקוד. סמלי נגישות קבצים ממוקמים תמיד לצד הקובץ שלך, אבל המיקום הספציפי משתנה באזורים השונים בקורס. ב-Blackboard Learn, רוב סמלי הנגישות מופיעים משמאל לקובץ.
- כדי ללמוד כיצד לשפר את נגישות הקובץ, בחר את סמל הניקוד.
- Ally נפתחת ומציגה את השלבים בנוגע לאופן העריכה של הקובץ שלך עבור נגישות משופרת וממטבת אותו עבור תבניות חלופיות.
תלמידים אינם רואים את ניקוד הנגישות של הקובץ. במקום זאת, תלמידים יכולים לבחור מבין התבניות החלופיות שיוצרת Ally עבור הקובץ. באפשרותך לעזור ל-Ally ליצור תבניות חלופיות טובות יותר על-ידי ציות לשיטות העבודה המומלצות ליצירת קבצים נגישים.
הצגת תבניות חלופיות
לאחר שאתה מצרף קבצים לקורס, Ally יוצרת תבניות חלופיות של הקובץ בהתבסס על המסמך המקורי. לדוגמה, אם הקובץ המקורי הוא PDF, Ally יוצרת תבניות שמע, ברייל אלקטרוני ופרסום אלקטרוני של אותו תוכן. תבניות אלה הופכות לזמינות עם הקובץ המקורי כך שהכל נמצא במיקום נוח אחד.
התבניות החלופיות שנוצרו תלויות בסוג הקובץ המקורי. אם אינך רואה אפשרות להורדת תבניות חלופיות, Ally אינה מופעלת עבור קורס זה או שהקובץ אינו בעל סוג תוכן נתמך.
מצא קובץ בקורס שלך. בחר את התפריט לצדו ובחר תבניות חלופיות. בחר את הגרסה המתאימה ביותר לצרכים שלך! בחר הורד כדי לשמור את התבנית החלופית בהתקן שלך.
Control availability of content
You can make content unavailable to students or apply date and time restrictions to control when it appears. You can also apply rules to an item to control which students can access it and when.
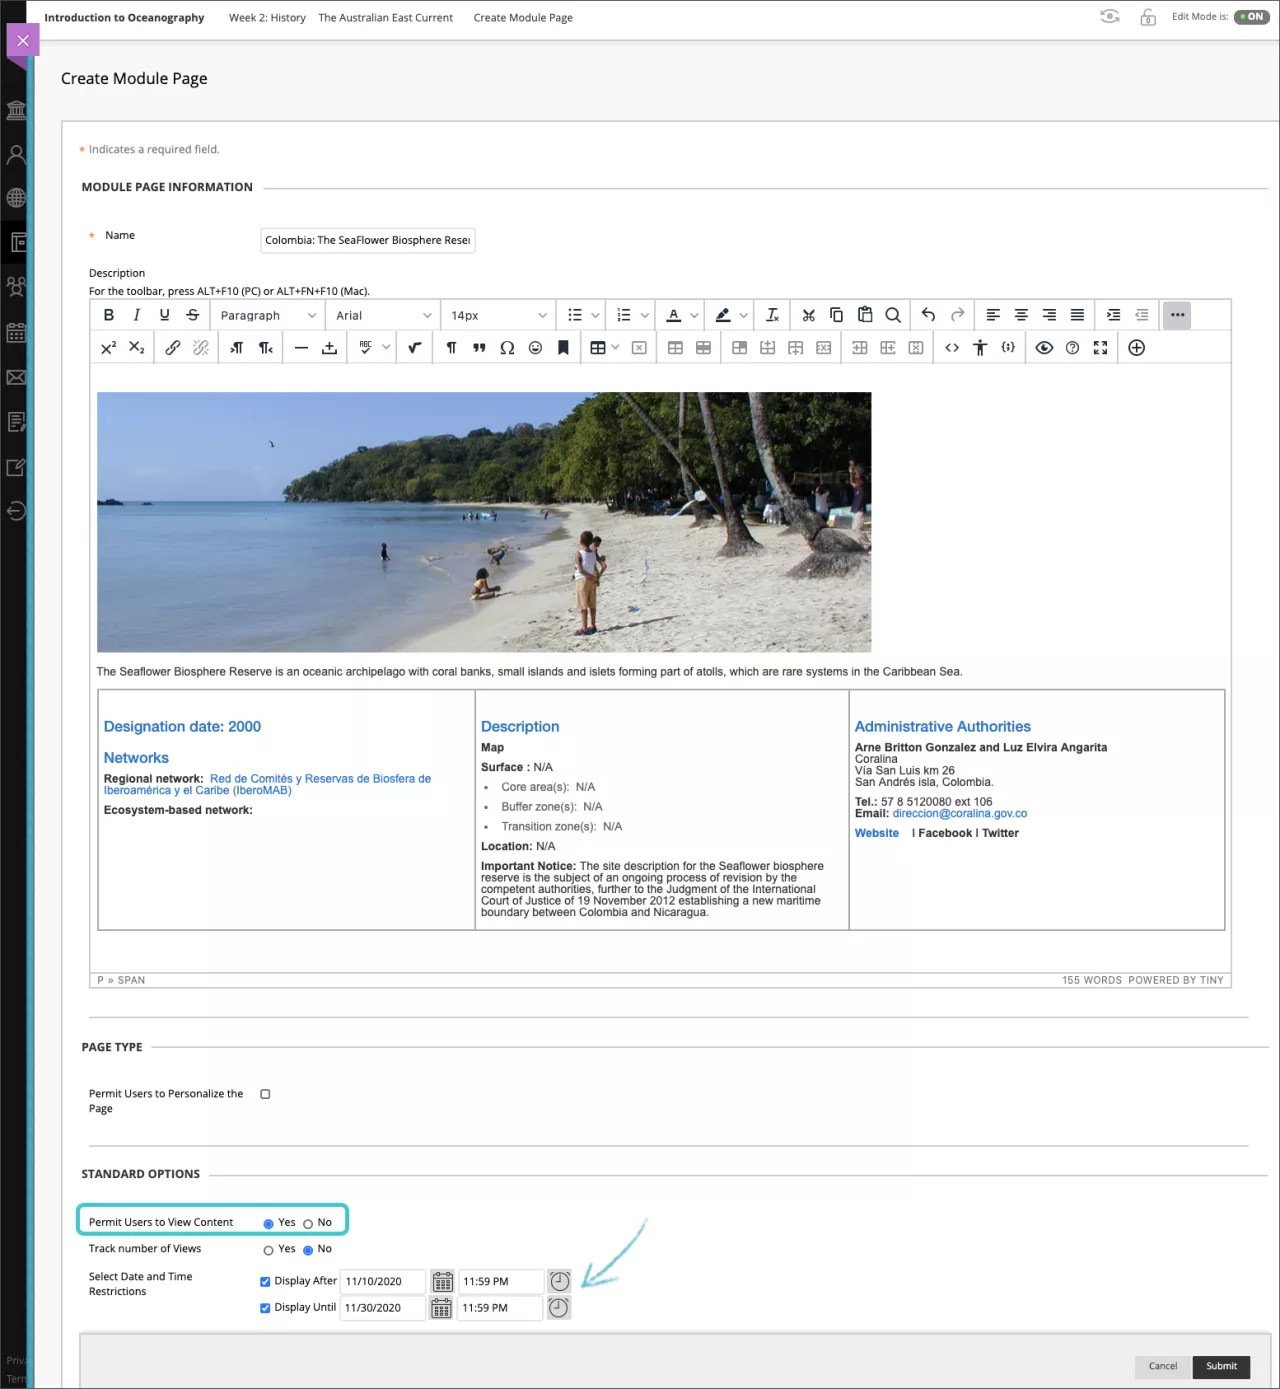
You set the availability of items on an item-by-item basis. You can also make entire content containers unavailable. For example, if you edit a learning module, lesson plan, or folder and select No for Permit Users to View this Content, the container is no longer visible to students. All items within the unavailable container are also unavailable to students, regardless of their individual availability settings. Therefore, the display of an item to students is contingent on the availability of the container.
You make content areas unavailable in a different way than other containers. On the course menu, access the content area's menu and select Hide Link.
Items in an unavailable content container aren't visible to students in that location. However, students are able to access those items if other links to them exist in different places in your course. For example, if you have an available URL in content area A that you copied to content area B, the link exists in both locations. If you make content area A unavailable, students can still access the URL in content area B. Links to tools work in the same way. If you link to a discussion forum in content area A and make content area A unavailable, students can still access the discussion forum linked in content area B.
Reorder content
Content appears in the order you added it, but you can change the order. Use the drag-and-drop function or the keyboard accessible reordering tool to rearrange content.
Drag-and-drop function
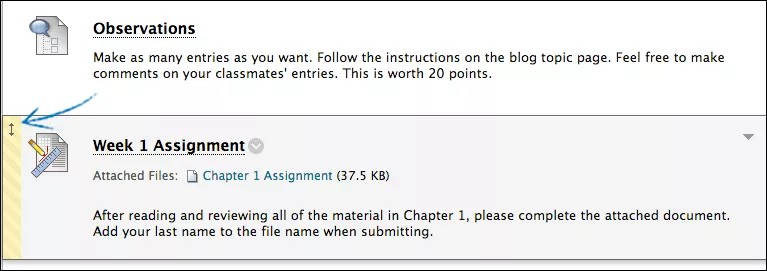
To move an item with the drag-and-drop function, press the arrows next to the item.
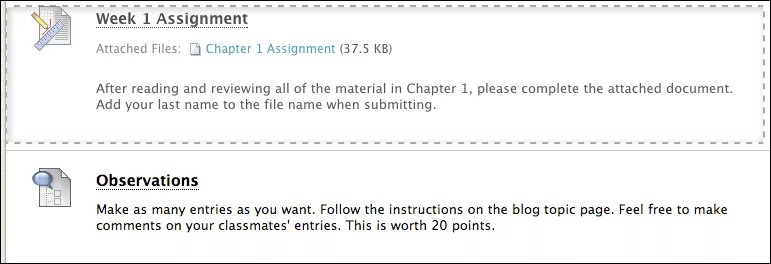
Drag the item to the new location.
Keyboard accessible reordering
You can use an accessible tool to reorder items.
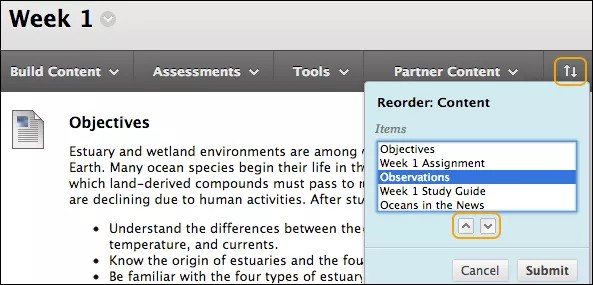
- In the content area, select the Keyboard Accessible Reordering icon.
- In the Reorder: Content box, select an item in the list.
- Use the Move Up and Move Down icons to adjust the order.
- After you submit, a pop-up box states: Items have been reordered.
- Select OK.
Copy and move content containers
You can copy and move content containers such as folders, learning modules, and lesson plans from one area or course to another area or course. To copy and move between two courses, you must be enrolled in both courses.
- Copying a content container doesn't remove it from the original location in your course.
- Moving a content container removes it from its original location in your course.
Use these steps to copy and move content containers.
- In Edit Mode, access a content container's menu and select Copy or Move.
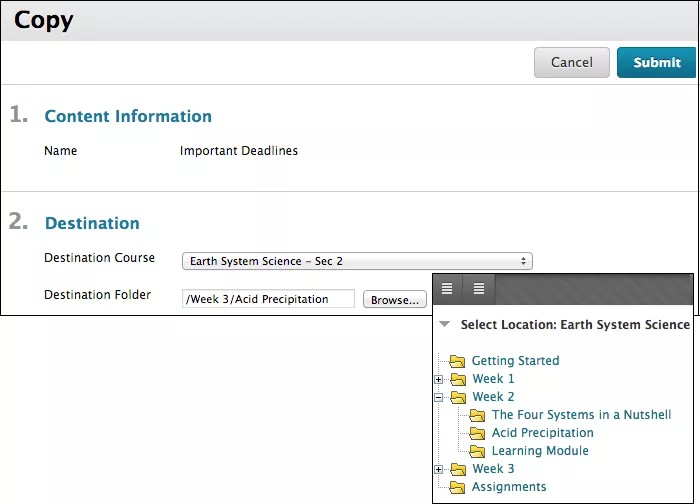
- On the Copy or Move page, select the Destination Course from the menu. The default setting is the current course. Only courses where you have a role that permits the action appear in the list.
- Select Browse and select the Destination Folder. For copy only, select Yes or No for Create links for items which cannot be copied.
- If a container contains items you can't copy, such as a test, survey, or assignment, a link is created to it instead. After the copy action is complete, a message appears: "Some items copied. The following items were created as links." The specific items are listed.
- If a container contains items you can't move to another course, such as a test, a message appears: "The move operation has completed but the following items could not be successfully moved." The specific items are listed.
- Select Submit.
Copy and move content
You can copy and move content to organize and rearrange your course materials. For example, if one of your content areas contains a large number of items, organize them with folders to help users navigate your content. If you create folders after you create content items, you can move items to the new folders.
Some content items have copy and move restrictions. For example, you can only copy and move a course link to another area in the same course. You can't copy assignments, tests, and surveys, but you can move them within the same course.
- Copying content doesn't delete it from the original location in your course.
- Moving content removes it from its original location in your course.
For items you can't copy, such as a test, survey, or assignment, the copy option doesn't appear in the item's menu.
If a content container contains items you can't move to another course, such as a test, the option to move it to another course doesn't appear on the Move page.
- In Edit Mode, access an item's menu and select Copy or Move. If Copy or Move isn't available for the item, it doesn't appear in the menu.
- On the Copy or Move page, select the Destination Course from the menu. The default setting is the current course. Only courses where you have a role that permits the action appear in the list. For items you can't move out of the current course, Destination Course is already listed as the current course and the menu doesn't appear.
- Select Browse and select the Destination Folder.
- Select Submit.
Delete containers and content
You delete folders, learning modules, lesson plans, and content items in the same way. Sometimes the content is permanently removed from the system. When you delete a content container, you permanently remove it.
- In Edit Mode, access a container or item's menu and select Delete.
- Select OK to confirm the deletion. This action is final.
You can make a container or item unavailable rather than delete it.
What happens to items in a content container I delete?
- If you delete a content folder in a content area that contains graded items with no attempts, the corresponding columns are also deleted from the Grade Center.
- Files you added to a container from Course Files remain in Course Files and aren't deleted from the system.
- Any files uploaded from your computer to the container are stored automatically in Course Files. You can link to them again.
- Items you created within a container with the Build Content menu are permanently deleted.
- Test or survey links are deleted, but the test or survey remains available in the tests or surveys tool. You can link to them again.
- For assignments, a Delete Confirmation page appears. You decide what to delete: the assignment, submissions, and the Grade Center column.
- Links to tools, such as discussions, blogs, wikis, or journals are deleted, but the tools themselves aren't deleted.
- Links to assigned textbooks are permanently deleted.
About metadata
Metadata stores information about a content item, including bibliographic, lifecycle, and copyright information. With metadata, you can import content from and export content to other applications that use IMS (Instructional Management Systems) standards, creating interoperability for learning content.
You can't track or report on the information provided in metadata. You can view it on the Content Metadata page and use it as reference information for the content item. You can edit metadata for a content item.
You can add four types of metadata to an item:
- General Information: Includes the title, catalog entry, source, entry, language, and a description of an item.
- Lifecycle Information: Includes the creation date and time, contributors, name and role of author or editor, organization, and date of latest changes or updates.
- Technical Information: Includes the format of a content item and its location.
- Rights Management Information: Displays copyright restrictions and a description of any conditions on item usage.
Create metadata for content
- In Edit Mode, access an item's menu and select Metadata.
- On the Course Item Metadata page, type a New Catalog Entry:
- Type a Source: Name of the catalog or source of the content
- Type an Entry: Number or version of the catalog
- Select Add Catalog Entry to implement your changes
- Select Mark for Removal to delete the catalog entry
- Select a language from the menu.
- Type a description and information for a New Contributor. List the name, role, organization, and date a person contributed to this content item. Select Add Contributor. The contributor information is now listed. Select Mark for Removal to remove a contributor when you submit the page.
- Select the Resource Format from the menu.
- In the Rights Management Information section, select Yes for Free Resource to indicate that the content was free. For Copyright/Restriction, indicate if the content is copyrighted or has restrictions for use. Use the Description box to comment on conditions for use of this item.
- Select Submit.
When you attach items from the Content Collection to your course, you can select associated metadata from the Content Collection to display with the linked item. You can't modify the Content Collection metadata.
Statistics tracking and reports
Item statistics provide detailed usage information about your content, such as how many times students viewed an item and when it was accessed. You can enable statistics tracking at any time, and begin collecting data from that moment on. If students access an item before you enable statistics tracking, their access isn't recorded.
If students are unenrolled, their data is deleted from all course statistics. To retain their statistics, change their availability to No rather than unenroll them.
Statistics tracking is a type of course report for individual content items. To obtain course reports on overall user activity as well as activity in content areas, forums, and groups: Control Panel > Evaluation > Course Reports.
- In Edit Mode, access an item's menu and select Statistics Tracking.
- Select On to enable statistics tracking for the item.
- Select Submit. Enabled: Statistics Tracking appears after the item name.
Watch a video about item statistics
The following narrated video provides a visual and auditory representation of some of the information included on this page. For a detailed description of what is portrayed in the video, open the video on YouTube, navigate to More actions, and select Open transcript.
Video: How to Create an Item Statistics Report explains what item statistics are and how to enable them to collect data.
Statistics reports
The report displays three sections of data:
- Access by Date
- Access by Hour of the Day
- Access by Day of the Week
The Access by Date section displays information for all enrolled users. Access information for system guests and unenrolled users—previously enrolled users who were deleted from your course—is displayed under the guest user. Observer access to content items isn't tracked.
- In Edit Mode, access an item's menu and select View Statistics Report. This link doesn't appear if you didn't enable statistics tracking for the content item.
- On the Course Reports page, access the Content Usage Statistics menu and select Run.
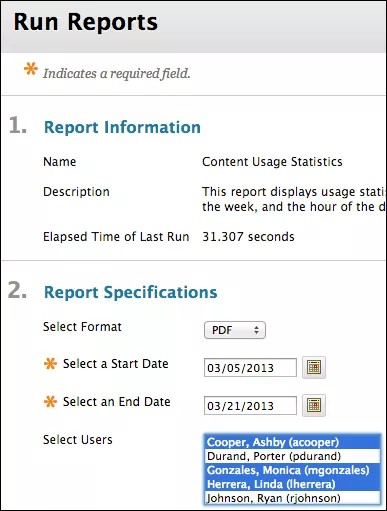
- On the Run Reports page, select a format for the generated report from the menu.
- Select dates.
- If you don't select users, the report automatically runs with all users. Or, you can specify users in the Select Users list.
For Windows, to select multiple users in a list, press the Shift key and select the first and last users. To select users out of sequence, press the Ctrl key and select each user needed. For Macs, press the Command key instead of the Ctrl key.
- Select Submit to run the report.
- On the Successful Run: Content Usage Statistics page, select Download Report to view the results. Based on the format you selected, you may be prompted by your browser to open or save the file. Use your browser's print function to print the report. Or, select Run a New Report to change the parameters for the report and run it again.
Review status
When you enable review status for an item, you can check who has reviewed the item, and you can use review status as adaptive release criteria. Students can use review status to keep track of their progress.
For students, a Mark Reviewed link appears with the item. After they review the item, students select the link to mark it Reviewed. You can check the item's review status on the User Progress page.
If you or your institution disables the review status tool, the Mark Reviewed links for all affected items are no longer shown. If review status is enabled again, the links reappear and any data associated with review status, such as an individual's progress, is restored.
- In Edit Mode, access an item's menu and select Set Review Status.
- On the Review Status page, select Enable. To turn off review status, select Disable.
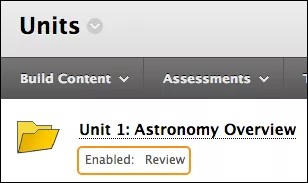
- Select Submit. In your view, Enabled: Review appears after the content item's title.
Review status settings and information are included during a full course copy with users, and during archive and restore operations. Review status settings and information aren't saved during a copy of course materials into a new or existing course, or for exporting and importing.
Check user progress
You can check whether or not students can access your content.
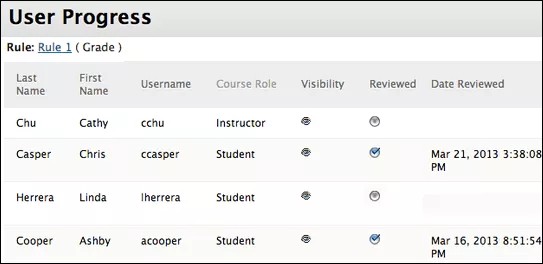
If you made an item unavailable, the User Progress page indicates the item isn't visible to students. The User Progress page also lists adaptive release rules that affect the visibility of an item. If you enable review status for an item, you can check which students have reviewed the item and when.
- In Edit Mode, access an item's menu and select User Progress.
- On the User Progress page, select a column title to sort the contents.
- When you finish the review, use the breadcrumbs to navigate to a previous page.
User Progress page
The icons in the Visibility column indicate whether or not the item is visible to students. The Not Visible icon indicates the item isn't visible to students because of an adaptive release rule or the item's availability settings.
A check mark in the Reviewed column indicates the student has selected the item's Mark Reviewed link.
Check user progress from the Performance Dashboard
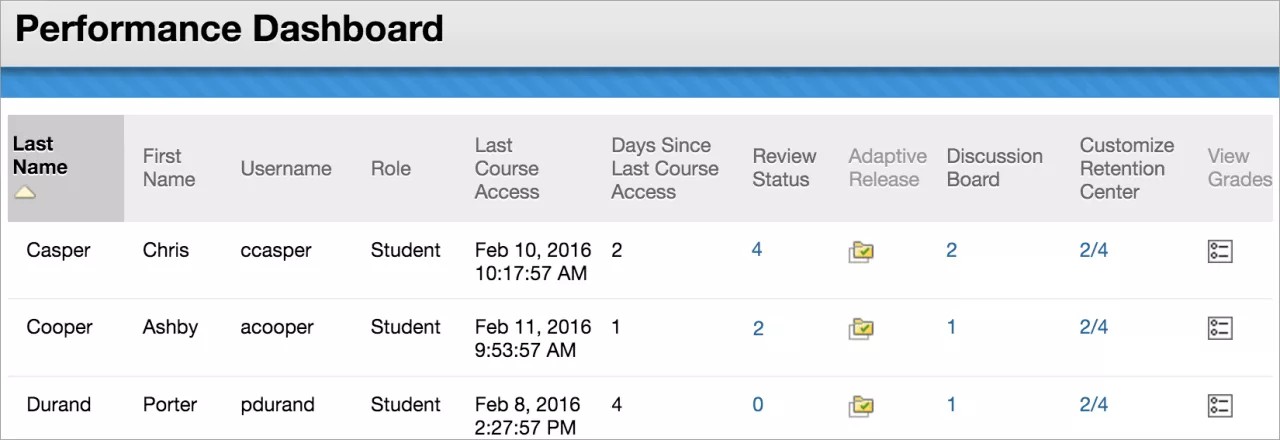
Review status is also available on the Performance Dashboard.
Control Panel > Evaluation > Performance Dashboard
The numbers in the Review Status column indicate the number of items a student has marked as Reviewed.
Or, select the adaptive release icon for any student. In the pop-up window, view which course content is available to that student, as well as which items the student reviewed.

