You can create a link to an existing area, tool, or item in your course. Provide links next to relevant course materials to create a seamless experience for students.
What is a course link?
A course link is a shortcut to an existing area, tool, or item in a course.
Example: Link to assignments
You can create all assignments in their own content area. Then, you can create course links to individual assignments in other areas of the course, such as in a unit folder or learning module.
If you create a course link to a tool that isn't turned on, students who access the course link see a message that the tool isn't turned on. The same is true of a course link to a content item that you applied release criteria to. For example, if you applied a rule that releases content after a certain date, students can't access the content until after that date.
Create a course link
Be sure Edit Mode is ON so you can access all of the instructor's options.
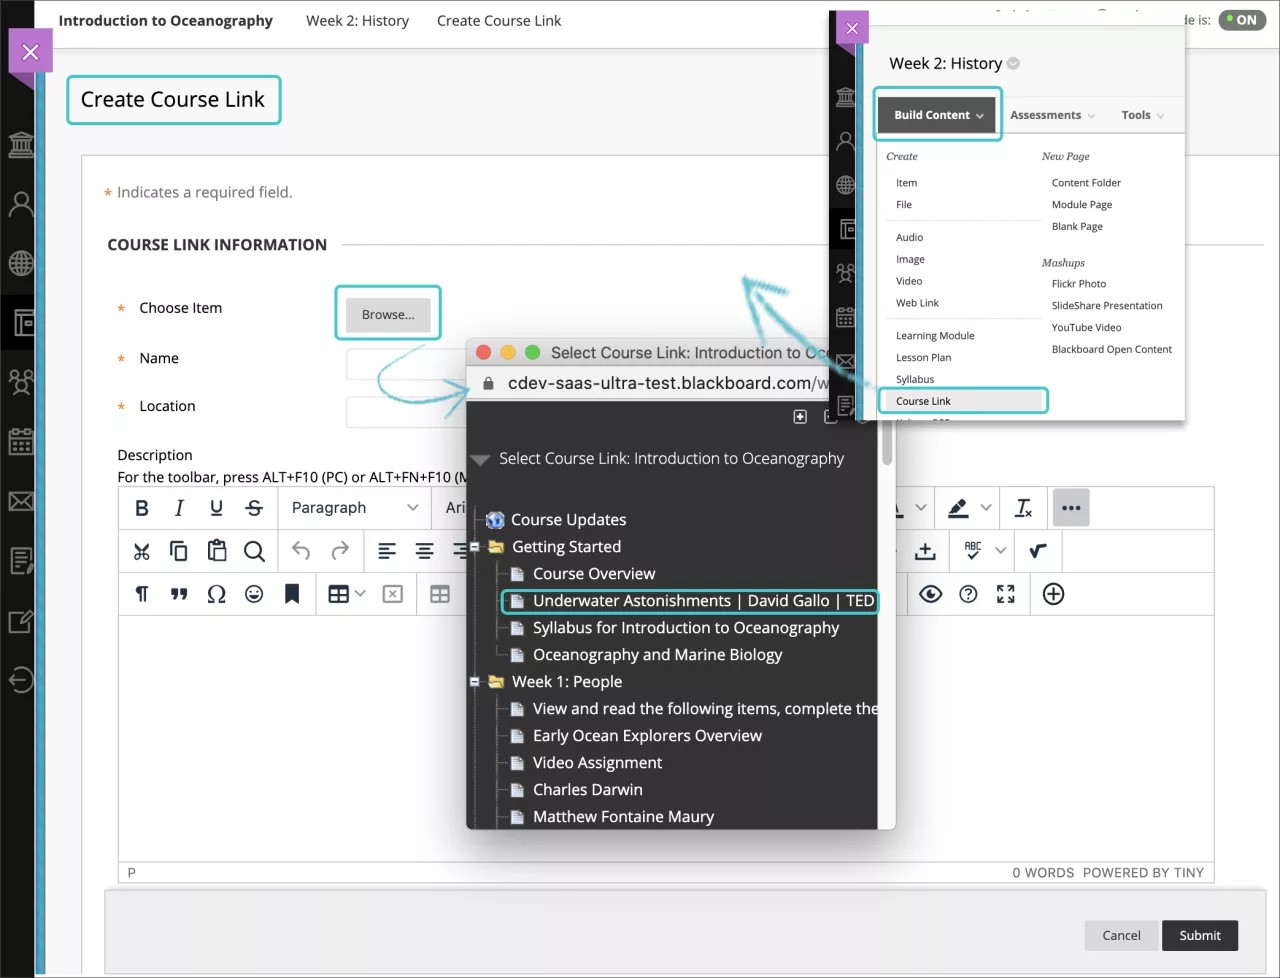
In a content area, learning module, lesson plan, or folder, select Build Content to access the menu and select Course Link. On the Create Course Link page, select Browse. In the pop-up window, select the item you want to link to.
The Name and Location boxes are populated automatically. Optionally, edit the name and type a description. You can format the text with the options in the editor.
Select the appropriate options for availability, tracking, and display dates. Display dates don't affect a course link's availability, only when it appears.
After you submit, the course link appears in the content list. You can change the content at any time. Access the course link's menu and select Edit.
You can change where the course link appears in the list with the drag-and-drop function or the keyboard accessible reordering tool.
What is a tool link?
You can provide the relevant tools for a lesson near related content or on the course menu. For example in a content area, you can provide discussion and journal links alongside multimedia, lecture files, and tests.
When you include a link to a tool in a content area, you can describe the tool, provide instructions, and attach necessary files. For example, you can link to a blog, attach a file to read, and explain that students need to post to the blog next week.
Your institution controls which options and tools are available in all Original courses. You can control tool availability in your course on the Control Panel > Customization > Tool Availability.
Create a tool link
You can link to an entire tool, such as the main blogs page, or drill in and choose a specific blog. You can also create a new blog while you create a tool link.
From the Tools menu, you can also select Tools Area so that students can access a list of all available tools in your course.
Be sure Edit Mode is ON so you can access all of the instructor's options.
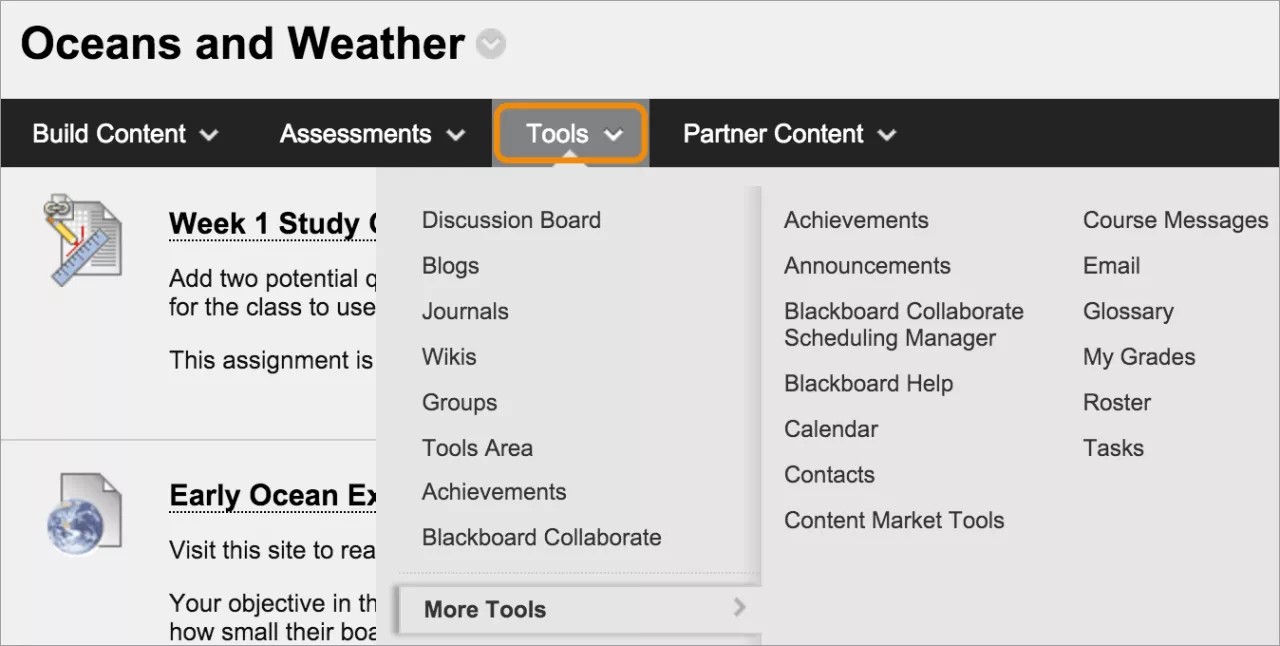
In a content area, learning module, lesson plan, or folder, select Tools to access the menu and choose a tool to link to. Select More Tools to show or hide additional tools.
These steps detail how to create a blog link. The steps are similar for other tools.
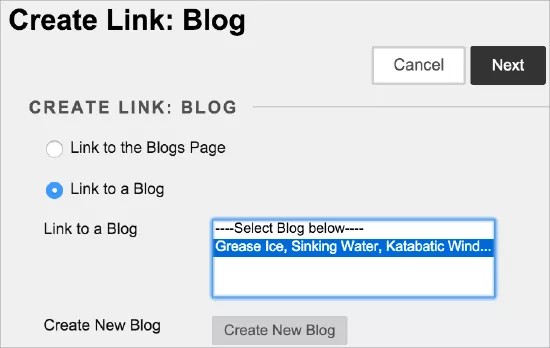
On the Create Link: Blog page:
- Select Link to the Blogs Page to link to the page where all blogs appear.
-OR-
- Select Link to a Blog and select a specific blog from the list.
-OR-
- Select Create New Blog to add a link to a blog you create at this time. On the Create Blog page, type a name and select settings for the new blog. After you submit, the newly created blog appears in the list of blogs to choose from.
Select Next. On the Create Link page, type a name and an optional description. Select the appropriate options for availability, tracking, and display dates. Display dates don't affect a tool link's availability, only when it appears.
After you submit, the tool link appears in the content list. You can change the content at any time. Access the tool link's menu and select Edit.
You can change where the tool link appears in the list with the drag-and-drop function or the keyboard accessible reordering tool.


