Blackboard Learn provides several methods for creating courses. The privileges assigned to your user account determine which methods are available to you.
Users with privileges to create courses can do so in the Courses section on the Administrator Panel. You can also copy existing courses or create multiple courses at once by using a batch file.
Create a course
- On the Administrator Panel, in the Courses section, select Courses.
- Point to Create Course and select New.
You can merge existing sections, allowing instructors to manage multiple sections of the same course through a single master course. To learn more, see How to Merge and Separate Child Courses. - Provide the course information. This table describes the available fields. [r] indicates a required field.
Course Information Available Fields Field Description General Information Course
Name [r]Type a name for the course. The course name does not have to be unique. For example, you can have three courses called "Beginning Composition." You can change course names at any time. This field is searchable. More on searching for Courses.
Course ID
[r]Type a course ID. The course ID must be unique within Blackboard Learn. For example, if you have three courses with course names of "Beginning Composition," create three different course IDs, such as comp01, comp02, and comp03. Course IDs can contain numbers, letters, hyphens (-), underscores (_), and periods (.). All other characters, including spaces, are prohibited.
You can't change course IDs after they have been set.
This field is searchable. More on searching for courses.
Description Type a description of the course. Include a course summary and enrollment instructions. The description appears in the course catalog listing. This field is searchable. Include keywords that users would be likely to use when searching for a course. More on searching for courses.
Subject
AreaSelect a subject area from the list. Subject areas group related courses together for easier searching and browsing. Discipline Select a discipline from the list. Disciplines group related courses together for easier searching and browsing. Term
Select a term from the list. Terms assign course availability to specific periods of time, such as sessions and days from end of enrollment. To manage terms, go to the Administrator Panel > Courses > Terms. More on managing course terms. Select Courses to Merge Select the check box to display the Child Courses section. From there, add (merge) existing courses into the master course set. More on how to merge and separate child courses. Availability Available Select Yes to make the course available. Select No to make the course unavailable. Users can't see, access, or self-enroll in unavailable courses. Duration Define the time period that the course will remain available. Available courses are open to students to see and access content or to self-enroll, if the course allows self-enrollment. Select Continuous to keep the course constantly available, with no date restrictions.
To limit the course availability to specific dates, select Select Dates and provide a Start Date and End Date in the appropriate fields. The start and end times are set automatically. The start time is midnight and the end time is 11:59:59.
To limit the course availability to a specific number of days after a student enrolls, select Days from the Date of Enrollment and enter the number of days.
Guest Access Guests Permitted To allow unauthenticated users to enroll in the course, select Yes. Settings inside the course can limit what content and tools are available to guests. To prohibit unauthenticated users from enrolling in the course, select No.
Categories Select Course Catalog Category The category determines where the course description appears in the course catalog. Select a category to select it and select the right-pointing arrow to move it to the Selected Items list. To remove a category, select it and select the left-pointing arrow to move it back to the Items to Select list. You can assign the course to multiple categories. Administrators create categories on the Course Catalog page.
Multi-Institution Nodes Add Node Available only to schools using Institutional Hierarchy. Institutional Hierarchy is available only if your school licenses Community Engagement. To make this course available in more than one institution, select Find Node.
Select whether to search for the node by Name, Description, or Identifier. Select a search condition from the list: Contains, Equal To, Starts With, or Not Blank. Provide the search term and select Go. In the search results, select the check box of each institution to add this course to. Select Submit.
Administrators create nodes on the Hierarchy page.
Banner Current Banner Image Shows the current image that appears at the top of the course's Announcements page. Banner images can be in JPEG, GIF, or PNG format. Blackboard recommends a banner image size of approximately 480 by 80 pixels.
Users can resize their browser windows, expand and collapse the course menu and use monitors with different screen sizes and resolutions. After uploading a banner, view it under varying conditions to ensure that it looks the way you intended.
New Banner Image To replace the image with another, select Browse. Navigate to the image file and select OK. The new image does not display until after you select Submit to save the course. To delete the existing image without replacing it, select the Delete the Current Banner check box. The image will be deleted when you select Submit.
Enrollment Options Instructor/
System AdministratorSelect Instructor/System Administrator to require an instructor or administrator to handle all enrollments. Select the Allow Students to Email Enrollment Requests to the Instructor check box to enable students to email enrollment requests for approval. Clear the check box to disable email enrollment requests. Self
EnrollmentSelect Self Enrollment to allow users to enroll themselves in the course. To limit enrollment to a specific time period, select the Start Date and End Date check boxes and enter the dates and times between which users can enroll in the course
To limit enrollment to users with an access code, select the Require an Access Code to Enroll check box. Provide the text to use for the access code.
Language Pack Language
PackSelect a language pack from the list. The language pack defines the text that appears on buttons, titles, and other navigation items within Blackboard Learn. It does not change content created by instructors, students, or other users. More on language packs. Enforce Language
PackBlackboard Learn users can set their individual language preferences in their user accounts. Select the Enforce Language Pack check box to override individual language preferences with the language pack assigned to the course. This setting only controls what users see within the course. Their language preferences will still apply in other areas of Blackboard Learn.
Select Menu Style Preview You can design the course to have text-only navigation links or to use images from the Blackboard Learn button library. Each time you change the text or button style, the preview updates to show the current design. Style (Text) Select Text to create text navigation links for the course. To define colors, open the menu for Background Color or Text Color. select a swatch to select a color or provide a Color Value in hexadecimal format (for example, 00FF00 for bright green). If you provide a hexadecimal code or select Skip, the swatch selection closes. Select Preview to view the color you provided. Select Apply.

- Provide a color value in hexadecimal code.
- Select a swatch to select a color.
- View a preview of the selected color.
Style
(Buttons)Select Buttons to create image navigation links for the course. If necessary, select the plus sign (+) to expand the Button Library. Use the drop-down lists to filter the buttons by Button Type such as Pattern or Solid and by Button Shape such as Rectangular or Rounded Corners.
To filter by Button Color, provide a search term and select Search. For example, type "blue" to find all buttons with "blue" in their names. You can also search by partial word. For example, type "bl" to find all buttons with "bl" in their name, such as Lace Black or Solstice Blue.
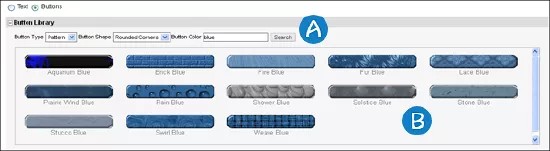
- Use the lists and search box to filter the button library.
- View buttons that match the filter criteria.
Default Content View Content View This setting controls how course files appear. Select Icon Only to show only a file type icon, Text Only to show only the file name, or Icon and Text to show both icon and file name. - Select Submit. Blackboard Learn creates the course but does not add instructors, students, or other users to it. To learn more about adding users, including instructors, see Managing Enrollments.
Course Creation Wizard
The Course Creation Wizard guides users through the process with an easy step-by-step approach. Administrators control whether the Course Creation Wizard module is available on a system-wide level where it can be added to the My Institution tab by users, or course-wide level where instructors can add the module to course home pages. Institutions that have access to Community Engagement can also control availability for specific roles.
Making the Course Creation Wizard widely available is not recommended when enforcing a course ID naming convention because Blackboard Learn does not validate course IDs against naming conventions.
You can modify the Course Creation Wizard settings and availability:
- On the Administrator Panel, under Communities, select Tabs and Modules.
- Select Modules.
- Open the Course Creation Wizard module's menu and select Edit Properties.