View details about different messages being sent.
The Messages Reports are listed on the Reports page. Only the reports available to your district or school will be displayed.
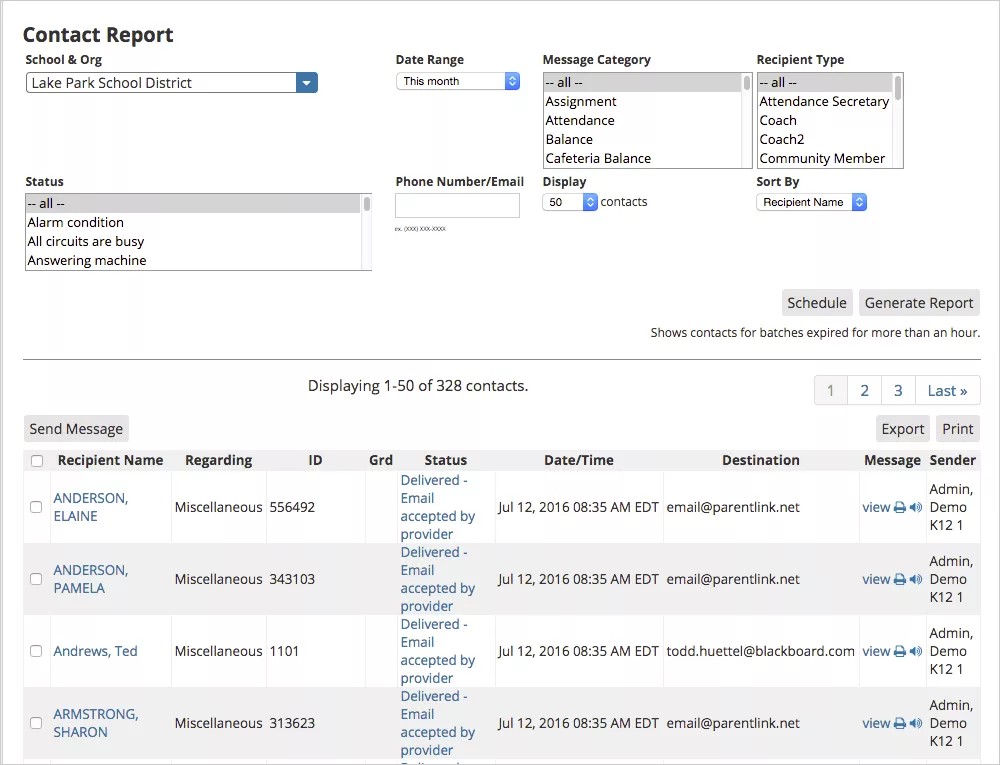
Contact Report
Use the Contact Report to see specific people that were contacted, how they were contacted, what the message was regarding, and who sent the message. This report will populate the message information an hour after the message expired.
You can schedule this report on a regular basis!
- From the Blackboard Communications HQ interface menu, select Reports > Contact Report.
- Set your report criteria:
- Select the School to track a specific school's messages. You must select a specific school.
- Select the specific Date Range to track the messages sent during a specific time frame up to 30 days.
- Select the specific Message Category to track, such as Grades or Cafeteria Balance.
- Select the type of delivery Status of the message to track, such as Delivered - Confirmed and Not delivered - SMS number rejected.
- Type a specific Phone Number/Email to track a recipient.
- Select how many results to Display per page, and which information to Sort By.
- Select Generate Report.
The report will display the recipient name, the reason for the message, student identification and grade level, message status, date and time of the delivery, how the message was sent, a link to view or hear the message, and the name of the sender.
You can select a message and resend from this report.
Excused Absences Report
Use the Excused Absences report to see the excused absences, the date of the absence, date of the excuse, and the phone number called regarding the absence.
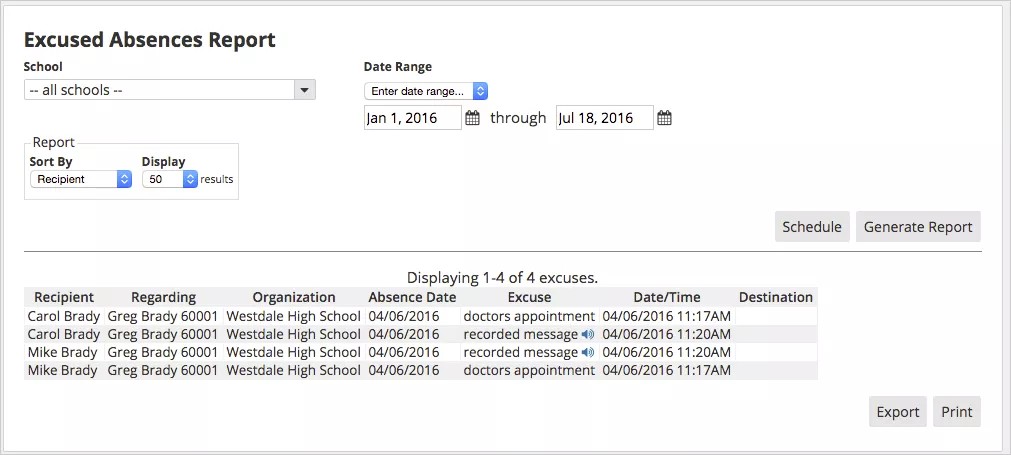
You can schedule this report on a regular basis!
- Select Reports > Excused Absences.
- Set your report criteria:
- Select the School to track a specific school's absences.
- Select the specific Date Range to track the absences during a specific time frame.
- Select which information to Sort By when displaying results, and how many results to Display per page.
- Select Generate Report.
The report will display the message recipient, the reason for the message, the school name, the date of the absence, the excuse for the absence, the date and time the absence what reported, and how the absence was sent.
Message Tracking Report
Use the Message Tracking report to see the details of all the messages that have been sent through each school. From this report you can view when the messages were sent, who received the messages, plus you can cancel or resend messages.
You can schedule this report on a regular basis!
- Select Reports > Message Tracking.
- Set your report criteria:
- Select the School to track a specific school's messages.
- Select the specific Message Category to track, such as Grades or Cafeteria Balance.
- Select the specific Date Range to track the messages sent during a specific time frame.
- Select the types of Delivery Addresses to track - All, Phone, Email, Text/SMS, App, Facebook, Twitter, and Website.
- Select the current Status of the message - Current, Future, or Expired.
- Select which information to Sort By when displaying results, and how many results to Display per page.
- Select Generate Report.
The report will display a link to the message, the delivery methods used to send the message, the abbreviation of the school that sent the message, the start time for the message delivery, the current message status, the total number of recipients, and the delivery progress.
For live deliveries, the percentages represent the message delivery completion, NOT the number of recipients that received the message. For each attempt at delivering a message, the percentage of completion will increase. A delivery attempt marked as 100% complete, means the attempts are complete.
- Select Message to see more information about that message.
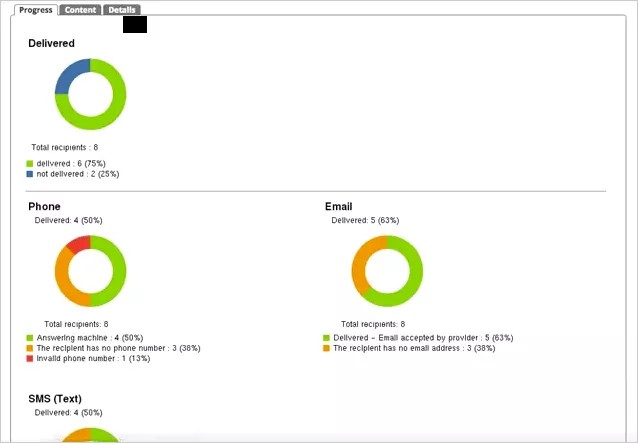
- This page includes the total number of recipients, the percentages of messages delivered per method, the ability to cancel the message, and the ability to resend the message.
- Select the Content tab to display the actual content of the message both in the written form and the audio recording.
- Select the Details tab to see all the options the message had when it was created and sent.
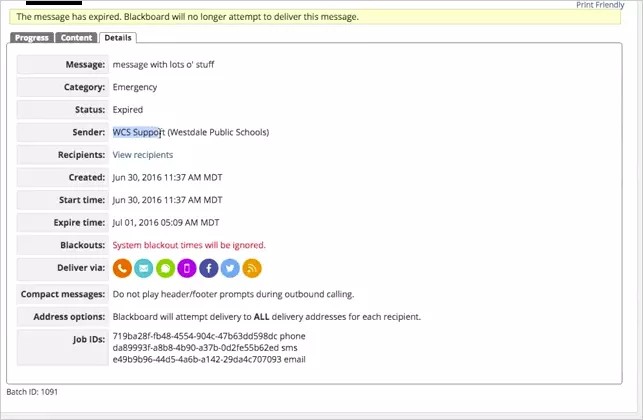
The Details tab includes the sender of the message, the recipients, the delivery methods, and the time the message was sent and expired.
- Select the Recipients to view the list of intended recipients.
Up to five (5) minutes before the message is set to be delivered, you can removed the recipients from this list.
Message Trends Report
Use the Message Trends report to graph the amount of messages being sent during a specific date range to view the message trends.
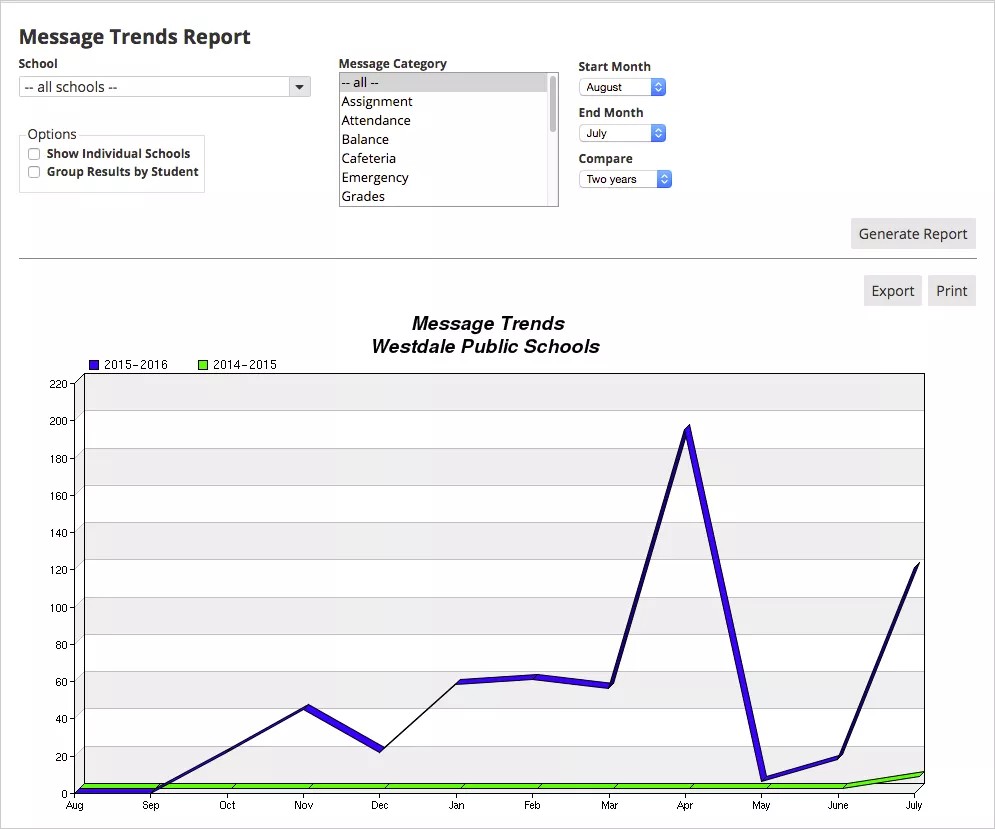
- Select Reports > Message Trends.
- Set your report criteria:
- Select the School to track a specific school's messages.
- Select the specific Message Category to track, such as Grades or Cafeteria Balance.
- Select the specific time frame of messages to track by select a Start Month, an End Month, and the number of years to Compare.
- Select any additional Options to include - Show Individual Schools and Group Results by Students.
- Select Generate Report.
The report will display the graph comparison of message trends for the specific time frame.
Message Utilization Report
Use the Message Utilization report to see the breakdown of messages by category. This report provides you with a better understanding of the types of messages being sent from the school and school district.
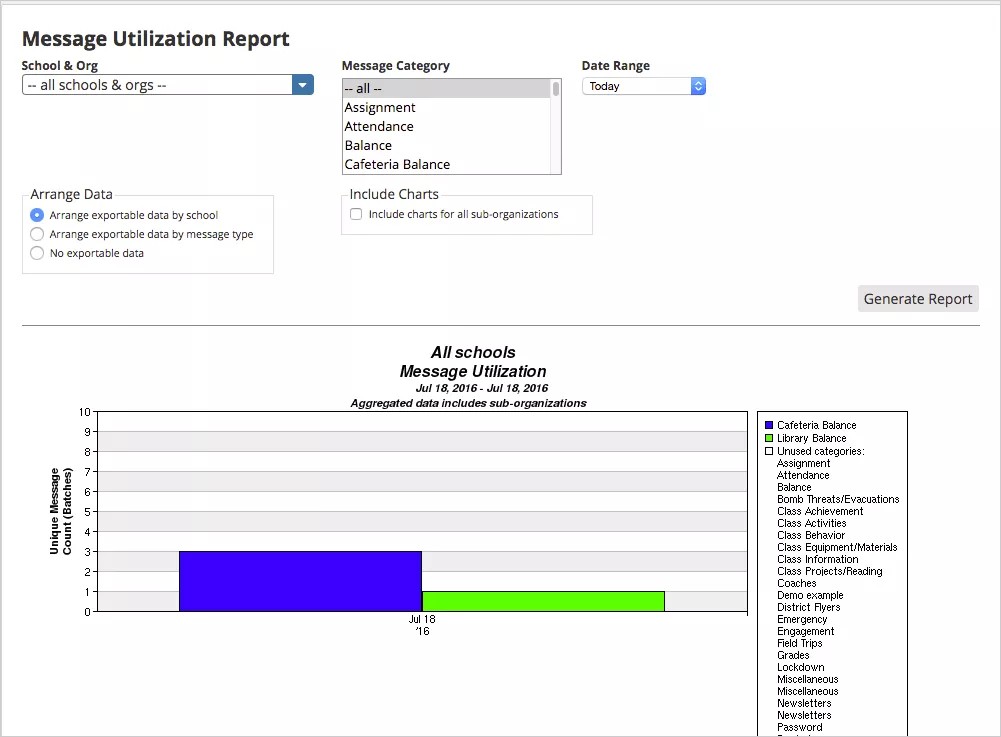
- Select Reports > Message Utilization.
- Set your report criteria:
- Select the School to track a specific school's messages.
- Select the specific Message Category to track, such as Grades or Cafeteria Balance.
- Select the specific Date Range to track the messages during a specific time frame.
- Select how you want to Arrange the numeric data - Arrange exportable data by school, Arrange exportable data by message type, or No exportable data.
- To view the charts for individual schools, from the Include Charts area select Include charts for all sub-organizations.
- Select Generate Report.
The report will display the chart based on the types of messages that have been sent during the time frame. Under the bar chart, the report will also display the breakdown of message types by school, number of messages, and contacts with those message types.
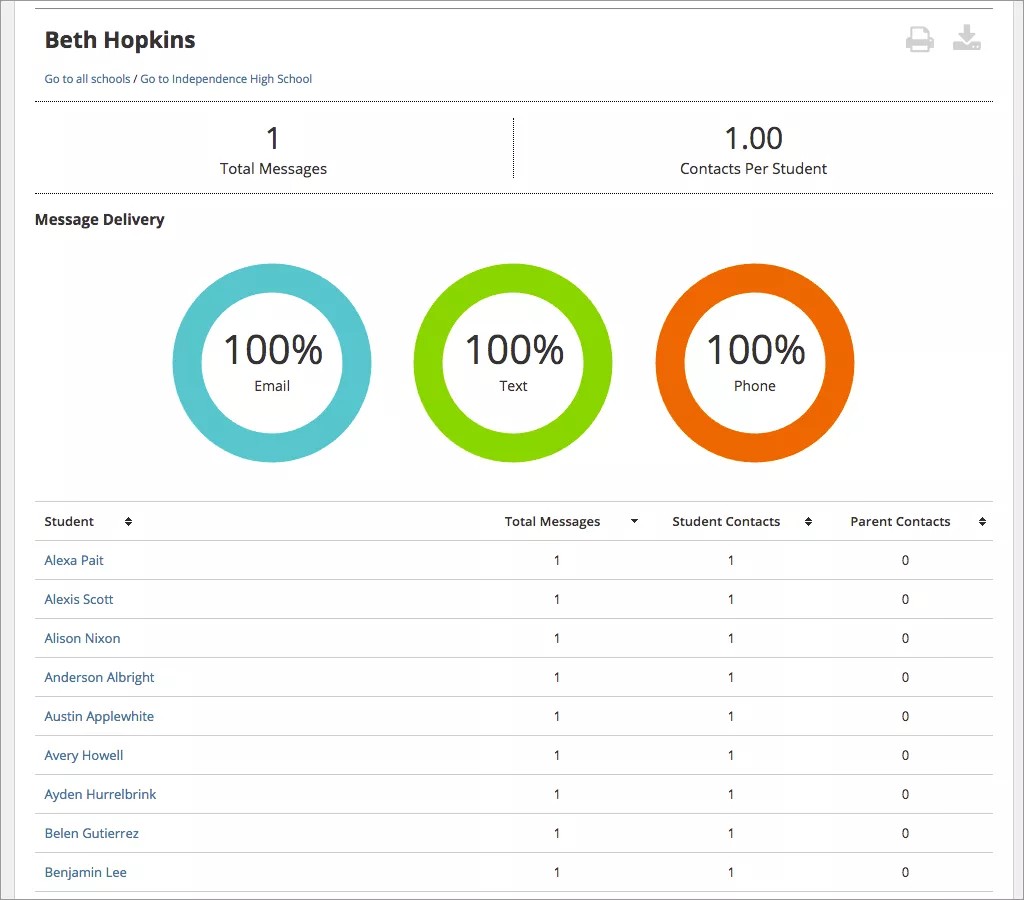
Teacher Messaging Report
Use the Teacher Messaging report to see a breakdown of messages sent by teachers. The report displays the breakdowns of message types and the number of students and parents contacted.
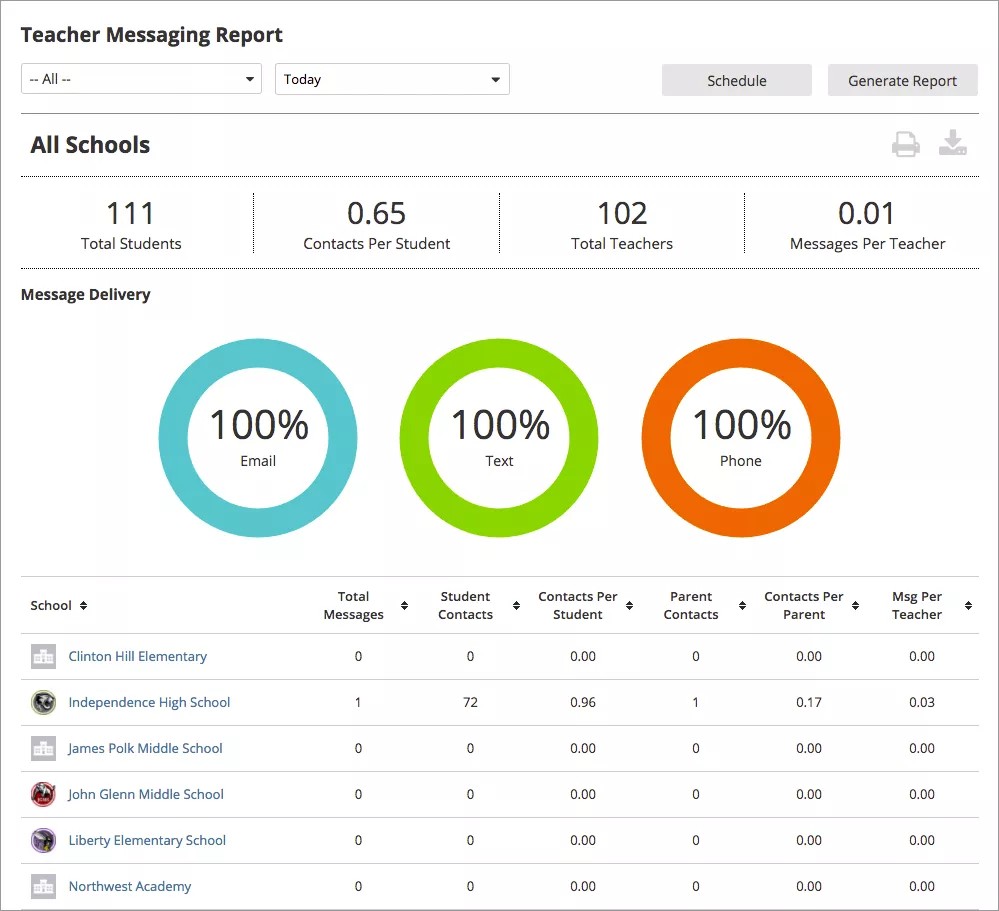
For district administrators, this report will allow you to drill down into the school details. For all administrators, the school report will allow you to drill down into the individual teacher details.
You can schedule this report on a regular basis!
- Select Reports > Teacher Messaging.
- Set your report criteria:
- Select the School to track a specific school's messages.
- Select the specific Date Range to track the messages during a specific time frame.
- Select Generate Report.
The report will display the pie charts of the messages sent by the teachers in the different message categories. The messaging details will include the school, total messages, total students, total teachers, and percentages of messages per student and messages be teacher.
- To view the school chart, select the name of the School.
- To view a specific teacher's chart, select the name of the Teacher.