Accessibility Options
You can change settings and chose your preferences to improve accessibility in Blackboard Collaborate.
Change chat text size
You can set the font size of the text in the conversation pane anywhere from 7 points to 109 points, in increments of 2 points. The default value is 13 points, which may be influenced by your system-wide font defaults.
- In the Tools menu, click Chat and click Increase Font Size or Decrease Font Size.
- In the Chat Options menu, click Increase Font Size or Decrease Font Size.
Change notes text size
You can change the size of the text in the notes editor. The font size of the entire document will change and any changes that you made with the decrease and increase keyboard shortcuts are overridden.
- Select the font size from the text Size drop-down list on the toolbar of the Notes window.
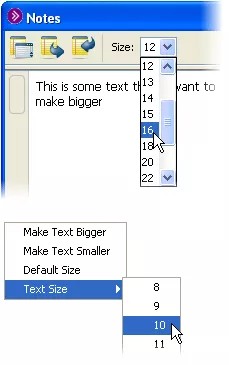
- Right-click (Control-click on Mac) anywhere in the notes editor and select one of the options:
- Make Text Bigger: Increase the text size to the next larger size.
- Make Text Smaller: Decrease the text size to the next smaller size.
- Default Size: Set the text size back to the default setting of 12. This value may be different for non-English implementations of Blackboard Collaborate.
- Text Size: Select a text size from the sub-menu.
Audible notifications
Audible Notifications
Audible notifications are system messages sent as sounds to notify users when certain important events occur in a session.
Enable and Disable Audible Notifications
In the Preferences window, you can hear each notification sound. You can also enable or disable the built-in sets of audible notifications, Basic and All.
- Open the Preferences window:
- From the Edit menu, click Preferences (Windows).
- From the Blackboard Collaborate menu, click Preferences (Mac OS X).
- In the left panel of the Preferences window, click Audible Notifications in the General section.

- To hear a notification sound, click its preview icon.

- Enable and disable the notifications for the various events:
- To create a custom set of notifications, select the Enabled check boxes for the appropriate notifications.
- Click Basic at the bottom of the panel. This is the default setting and includes the Hand Raised Alarm, Recording in Progress, Start Recording, Stop Recording, and Timer Alarm events.
- Click All at the bottom of the panel. Note that all events are selected.
Blackboard Collaborate remembers your settings for all sessions you join on the same computer.
Visual notifications
Visual Notifications
Visual notifications are system messages sent to notify users when certain important events occur in a session. The notifications appear in a floating window. Multiple notifications are added to a queue. The first one appears until it times out or you dismiss it. Then, the next one appears, and so on.
Visual Notifications Example

- Timeout indicator
- Number of notifications in the queue
- Dismiss All and Dismiss
You can use the timeout indicator to judge how long a message will remain open. You can either click Dismiss to close a notification manually or wait for it to close automatically when the time runs out. Click Dismiss All when you want to close all of the notifications.
Enable and Disable Visual Notifications
In the Preferences window, you can enable or disable visual notifications. By default, all notifications are enabled.
When you configure preferences, Blackboard Collaborate remembers your settings for all sessions you join on the same computer.
- Open the Preferences window:
- From the Edit menu, click Preferences (Windows).
- From the Blackboard Collaborate menu, click Preferences (Mac OS X).
- In the left panel of the Preferences window, click Visual Notifications in the General section.

-
Select or clear the check boxes to enable and disable the notifications for the various events.
The changes you make in the Visual Notifications Preferences panel do not affect what appears in the event panel of the activity window.