This information applies only to the Original experience.
Create Courses Using the Wizard
The course creation wizard guides you through the process of creating courses.
Only two steps are required: create the course information and create the course materials. All other steps are optional.
Blackboard Learn uses the default course settings for any setting you don't define. After you create the course, you can change course settings on the course Control Panel.
When you open the wizard, the Welcome page displays a sample course. The Progress Tracker shows which page you are on. The Progress Tracker is view-only and lists the steps in the wizard. It is not a navigation menu.
Course Creation Wizard
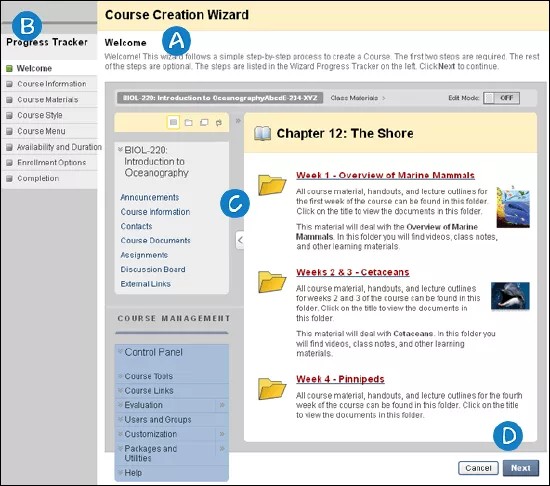
- The course creation wizard opens to the Welcome page.
- The Progress Tracker shows which page of the wizard you are on.
- The Welcome page displays a sample course. This sample course is read-only.
- Select Next to start creating a course.
The wizard creates courses only. You can't create organizations using the wizard.
Create a course using the wizard
- On the Administrator Panel, in the Courses section, select Courses.
- Point to Create Course and select Wizard.
- If the wizard does not open automatically, select Launch the Course Creation Wizard. The wizard does not open if your browser is blocking pop-up windows. Blackboard suggests setting your browser to allow pop-up windows within Blackboard Learn.
- Use the buttons at the bottom of each wizard page to navigate within the wizard: Cancel, Back, Next, and Finish. Do not use your browser's back or forward buttons.
- To get started, select Next.
- On the Course Information page, provide at least a Course Name and Course ID. These fields are required.
The following table describes the available fields. [r] indicates a required field.Course Information Available Fields Field Description Course Information Course Name [r] Provide a name for the course. The course name does not have to be unique. For example, you can have three courses called "Beginning Composition." You can change course names at any time. This field is searchable.
Course ID [r] Provide a course ID. The course ID must be unique within Blackboard Learn. For example, if you have three courses with course names of "Beginning Composition," create three different course IDs, such as comp01, comp02, and comp03. Course IDs can contain numbers, letters, hyphens (-), underscores (_), and periods (.). All other characters, including spaces, are prohibited.
You cannot change course IDs after they have been set.
This field is searchable.
Description Provide a description of the course. Include a course summary and enrollment instructions. The description appears in the course catalog listing. This field is searchable. Include keywords that users would be likely to use when searching for a course.
- Select Next.
- On the Course Materials page, select the materials to use as the basis for this course. Course materials are required. You can add more course materials after you create the course.
The following table describes the available fields. [r] indicates a required field.Course Materials Available Fields Field Description Create a New Course Select this option to create a course that is not based on an existing course or template. Use a Template Select this option to create a course using a course template in the system. Then select a template from the drop-down list. When you use a template, Blackboard Learn copies all of the course content in the template to the new course. You can change the course settings and course content in the destination course after you complete the wizard.
Copy an Existing Course Select this option to create the course by copying an existing course. Type the course ID directly into the Course ID box.
If you do not have the correct course ID, select Browse to launch the search dialog. Select the course and select Submit to use it as the source course. Blackboard Learn copies the course content, not the user enrollments or user records, into the new course.
- To continue using the wizard to create this course, select Next.
-OR-
Select Save and Exit to close the wizard. Blackboard Learn creates the course with the basic course information and materials you provided. You can edit the course outside of the wizard. - On the Course Style page, view the current course style and content view. If you copied another course or used a template, the course style and content view match the source. To accept these, select Next to continue.
Any changes you make to the style and content view affect only the course you are creating. No changes are made to the template or source course.
The following table describes the available fields.Course Style Available Fields Field Description Select Menu Style Preview You can design the course to have text-only navigation links or to use images from the Blackboard Learn button library. Each time you change the text or button style, the preview updates to show the current design. Style (Text) Select Text to create text navigation links for the course. To define colors, open the menu for Background Color or Text Color. Select a swatch to select a color or provide a Color Value in hexadecimal format (for example, 00FF00 for bright green). If you provide a hexadecimal code or select Skip, the swatch selection closes. Select Preview to view the color you provided. Select Apply.

- Provide a color value in hexadecimal code.
- Select a swatch to select a color.
- View a preview of the selected color.
Style (Buttons) Select Buttons to create image navigation links for the course. If necessary, select the plus sign (+) to expand the Button Library. Use the drop-down lists to filter the buttons by Button Type such as Pattern or Solid and by Button Shape such as Rectangular or Rounded Corners.
To filter by Button Color, provide a search term and select Search. For example, type "blue" to find all buttons with "blue" in their names. You can also search by partial word. For example, type "bl" to find all buttons with "bl" in their name, such as Lace Black or Solstice Blue.
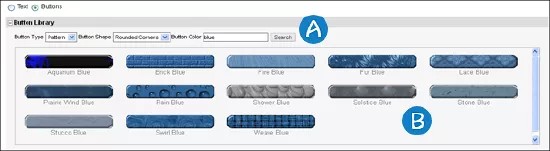
- Use the drop-down lists and search box to filter the button library.
- View buttons that match the filter criteria.
Default Content View Content View This setting controls how course files appear. Select Icon Only to show only a file type icon, Text Only to show only the file name, or Icon and Text to show both icon and file name. - To continue using the wizard to create this course, select Next.
-OR-
Select Save and Exit to close the wizard. Blackboard Learn creates the course with the basic course information and materials you provided. You can edit the course outside of the wizard. - On the Course Menu page, edit the course menu if you are creating the course from scratch. If you used a template or source course as the basis for this course, this page is view-only. You can edit the course menu after the course is created from the course Control Panel.
- Point to the Add button to add content areas, pages, links, and dividers to the course. You can make an item available to enrolled users by selecting the Available to Users check box. Make the item unavailable by clearing the check box.
- Open the item's menu to rename, hide, or delete the item.
- Select and drag the item's sort button to move the item up or down in the list.
- To continue using the wizard to create this course, select Next.
-OR-
Select Save and Exit to close the wizard. Blackboard Learn creates the course with the basic course information and materials you provided. You can edit the course outside of the wizard. - On the Course Availability and Duration page, set who can enroll in this course and whether enrollment is continuous or limited to a defined time period. The following table describes the available fields. [r] indicates a required field.
Course Availability and Duration Field Description Guests Access To allow unauthenticated users to enroll in the course, select Permit Guests. To prohibit unauthenticated users from enrolling in the course, select Restrict Guests.
Availability Select Yes to make the course available. Select No to make the course unavailable. Users cannot enroll in unavailable courses. Duration Define the time period that the course will remain available. To place no date restrictions on a course, select Continuous.
To limit the course availability to specific dates, select Select Dates and provide a Start Date and End Date in the appropriate fields.
To limit the course availability to a specific number of days after a student enrolls, select Days from the Date of Enrollment and enter the number of days.
The following table describes what type of access different user roles have to a course that is unavailable.
Role Access When Course Is Unavailable Course Role Access when Course is unavailable Students Courses set to unavailable will not appear at all in the student's My Courses module on the My Institution tab, or in the student's Course List on the Courses tab. Students cannot access a course that is set to unavailable. Instructors Courses set to unavailable will appear in the Courses you are teaching section of the My Courses module and in the Course List on the Courses tab. The course will be indicated as unavailable, but will still be accessible by the instructor. Course Builders and Teaching Assistants Courses set to unavailable will appear in the Courses in which you are participating section of the My Courses module and in the Course List on the Courses tab. The course will be indicated as unavailable. The Course is still accessible by course builders and teaching assistants. Graders Courses set to unavailable will appear in the Courses in which you are participating section of the My Courses module and in the Course List on the Courses tab. The course will be indicated as unavailable to others but is accessible by graders. - To continue using the wizard to create this course, select Next.
-OR-
Select Save and Exit to close the wizard. Blackboard Learn creates the course with the basic course information and materials you provided. You can edit the course outside of the wizard. - On the Course Enrollments page, set the rules for enrolling in this course.
Course Enrollment Rules Field Description Enrollment Options Instructor/System Administrator Select Instructor/System Administrator to require an instructor or administrator to handle all enrollments. Select the Allow Students to Email Enrollment Requests to the Instructor check box to enable students to email enrollment requests for approval. Clear the check box to disable email enrollment requests. Self Enrollment Select Self Enrollment to allow users to enroll themselves in the course. To limit enrollment to a specific time period, select the Start Date and End Date check boxes and enter the dates and times between which users can enroll in the course
To limit enrollment to users with an access code, select the Require an Access Code to Enroll check box. Provide the text to use for the access code.
- Select Save and Exit to close the wizard. Blackboard Learn creates the course with the basic course information and materials you provided. You can edit the course outside of the wizard.