Content Moderation
Approve or decline content before it is posted to your website.
Users with the Manage moderated groups in Content Moderation privilege can create groups of workspaces that require review. Users who edit apps on these moderated workspaces are required to submit their changes for moderation. Moderators then review and approve or decline the content before it is posted to your website.
If approved, the content is posted and the editor is informed. If declined, the editor is informed and the content isn't posted.
Moderators get emails when new content is ready for approval. Editors are emailed the approval decision.
What is moderated?
Not all changes to a moderated workspace require approval. Only changes made to apps that allow moderation are sent for approval.
This means that editors can add, remove, and reorganize channels, sections, pages, and apps without needing approval. It is only when they update a moderated app that they need to submit it for approval.
For example, a user can add the Announcement app to a page in a moderated workspace. The app is added without needing approval. If the user then wants to post a new announcement on the website from that app, they need to send the announcement content for approval.
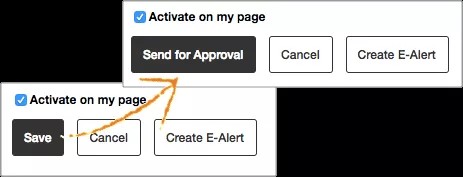
If content is being moderated, the app's Save button changes to Send for Approval.
Not every app is moderated. For example, custom apps are not moderated.
| App | Moderated | Not Moderated |
|---|---|---|
| About Teacher | YES | |
| Alumni Director | YES | |
| Announcements | YES | |
| Assignment | NO | |
| Blog | YES | |
| Book List | YES | |
| Calendar | NO | |
| Content | YES | |
| Discussion | YES | |
| Document Viewer | YES | |
| Embed Code | YES | |
| File Library | YES | |
| Heading | YES | |
| Headlines & Features | YES | |
| Image | YES | |
| Link Library | YES | |
| Lunch Menu | YES | |
| Maps & Directions | YES | |
| Minibase | NO | |
| Photo Galley | NO | |
| Podcast | YES | |
| Premium Video | NO | |
| Q&A | YES | |
| School Directory | YES | |
| Site Shortcuts | NO | |
| Staff Directory | YES |
Set up content moderation
Only users with an administrative passport that has the Manage moderated groups in Content Moderation privilege can manage content moderation.
Before you can moderate content you must decide what content you want to moderate. Identify the workspaces. These workspaces should have apps that allow content moderation. For example, if you want to moderate announcements posted to the district home page, you moderate the district site workspace.
More on the apps that allow content moderation
You also need to decide who you want moderate. You can moderate all editors or specific users.
In Site Manager, create moderated content groups of the workspaces. Identify the editors you want to moderate.
Finally, you must decide who do the moderation. You need to add moderators. Moderators review and approve or decline content added or updated in the moderated workspace.
Without workspaces, editors, and moderators identified, nothing is moderated.
Create a moderated content group
- From Site Manager select CONTENT MODERATION.
- Select Moderated Groups.
- Select New Content Group.
- Type a name for the content group.
- Optionally, select Moderate All Editors.
You must moderate at least one editor for content moderation to work. If you don't select Moderate All Editors, you must identify specific editors you want to moderate under Moderated Users. If you don't, nothing is moderated.
- Select Save.
- Select the content group name to add workspaces to the group.
You must moderate at least one workspace for content moderation to work. If you don't add a workspace, nothing is moderated. You can't add a workspace to more than one content group.
- Select the content group name to add more moderators.
You must add at least one moderator for content moderation to work. If you don't add a moderator, nothing is moderated. Moderators can be added to as many groups as you want.
Add workspaces to content group
You must moderate at least one workspace for content moderation to work. If you don't add a workspace, nothing is moderated.
You can't add a workspace to more than one content group.
- From Moderated Groups, select the content group name.
- Select Workspaces.
- Select Add Workspace.
- Select the site, channel or section you want to add to the group.
- Select Add and Save.
Add moderators
Moderators review and approve or decline content added or updated in the moderated workspaces.
You must add at least one moderator for content moderation to work. If you don't add a moderator, nothing is moderated.
Moderators can be added to as many groups as you want.
- From Moderated Groups, select the content group name.
- Select Moderators.
- Select Assign User or Assign Group.
- Select the groups or users you want to assign.
- Type all or part of the group or user name.
- Select Search.
- Select the group or user you want.
- Repeat until you assign all groups or users.
- Select Add.
- Select Save.
Add editors you want to moderate
You must identify at least one editor to moderate. If you don't, nothing is moderated.
Moderate all editors
- From Moderated Groups, select the content group name.
- Select Moderate All Editors.
- Select Save.
Moderate individual editors
- From Moderated Groups, select Moderated Users.
- Select Assign User or Assign Group.
- Select the groups or users you want to assign.
- Type all or part of the group or user name.
- Select Search.
- Select the group or user you want.
- Repeat until you assign all groups or users.
- Select Add.
Approve or decline content
Moderators are emailed when someone changes content on a moderated workspace. The content must be approved in the Approval Queue before it is posted to the website.
Select the link to Approval Queue in your email or from Site Manager select CONTENT MODERATION and Approval Queue.
- View: Preview the content before you approve or decline it.
- Approve: Post the content on the site. An email is sent to the editor letting them know it is approved.
- Decline: Don't post the content on the site. An email is sent to the editor letting them know it was declined. You can give feedback in the Declined Content Comment area.