Before you create a portfolio, take some time to set a goal for the portfolio and think about the story you want to tell. Create an outline of the points you want to highlight in your portfolio. Then, make sure that you have sufficient supporting material.
You can use artifacts to add content to your personal portfolio. Artifacts link to items that are evidence of your work, knowledge, and skills. You can create artifacts before or during the portfolio creation process. If you have a good outline of what you want to accomplish, create your artifacts first.
When your artifacts are ready, create a shell for the portfolio. The shell includes a name and description. Use the description for your own organization. After you create the shell, build out the portfolio and add pages and content.
The process of creating a portfolio is easy:
- Create a portfolio.
- Add pages and artifacts.
- Design the appearance.
- Choose settings.
Create a portfolio
On the My Portfolios page, select Create Portfolio.
The first time you create a portfolio, you have the option of taking a brief guided tour of the portfolio authoring canvas. If you choose to skip or replay the tour, you can access it later from the orientation bar. Choose the tour's compass icon next to help.
You can customize your portfolio's header and footer. After creation, select the pencil icon to edit the header and footer.
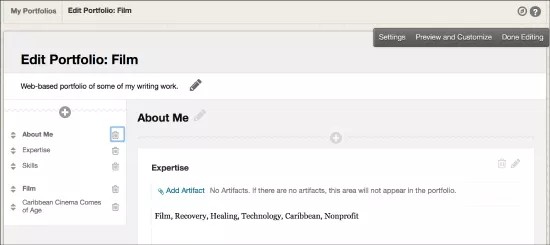
A portfolio consists of pages and sections. Pages provide structure to the portfolio. Each page must have at least one section.
The menu on the left shows all of the portfolio's pages and sections, which you can use to manage them. Select the plus icon at the top of the menu. To delete pages, select the trash can icon to the right of a page. Use the drag-and-drop function to rearrange pages and sections in the menu.
Deleting a page also deletes all of the sections and content on that page. Artifacts associated with a section remain in the My Artifacts repository, and you can reuse them.
Tips:
- When you're authoring, use the menu to move among pages to edit them.
- After you create a page or section, select the pencil icon next to a section title to edit it. Each section has an editor for creating freeform content. The editor appears dynamically when you click in the editor box. You can associate one or more artifacts with each section. Typically, you add artifacts to a section and use the editor to reflect on those artifacts.
- The Settings option allows you to change the settings' decisions made when creating the portfolio, such as the portfolio title and description.
- The Preview and Customize option allows you to see how the portfolio will look, and make layout and color palette decisions that affect the final design of the portfolio.
- The Done Editing option allows you to exit the portfolio authoring canvas. If you try to exit without saving new and updated content, you are warned of unsaved changes.
- Share your portfolio with others at your school or elsewhere. Each time you share a portfolio with other users, you create a static snapshot of that portfolio at that point in time. If you make edits that you want to share, you need to share the portfolio again.
Share your portfolio
- On the My Portfolios page, select More after a portfolio's name.
- Select Share.
- Point to Share a Snapshot with and select one of the user types. Use this table to determine which sharing option to choose.
| Who? | What Happens? |
|---|---|
| Blackboard Learn Users | The portfolio is listed in the user's Shared with Me. |
| External Users | A URL is created and emailed to the specified users so that they can access your portfolio. |
| Courses or Organizations | The portfolio is listed in the portfolios tool in the course or organization. Members of those courses and organizations can search for your portfolios. |
| Institution Roles | All users with that role may search for your portfolio. |
| All System Accounts | Any user on the system may search for your portfolio. |
Manage comments
Comments are used to provide feedback from peers and instructors.
The Comments page includes columns displaying the date posted, the author who posted the comment, and the comment text. You view, add, and delete comments on this page. Only the author of a comment can delete it.
Select the comment's title to open the comment text. To sort the comments, select the column title.