Enable journal grading
To motivate students to post insightful contributions, you can make a journal count for a grade. When you enable grading for a journal, a column is created automatically in the gradebook.
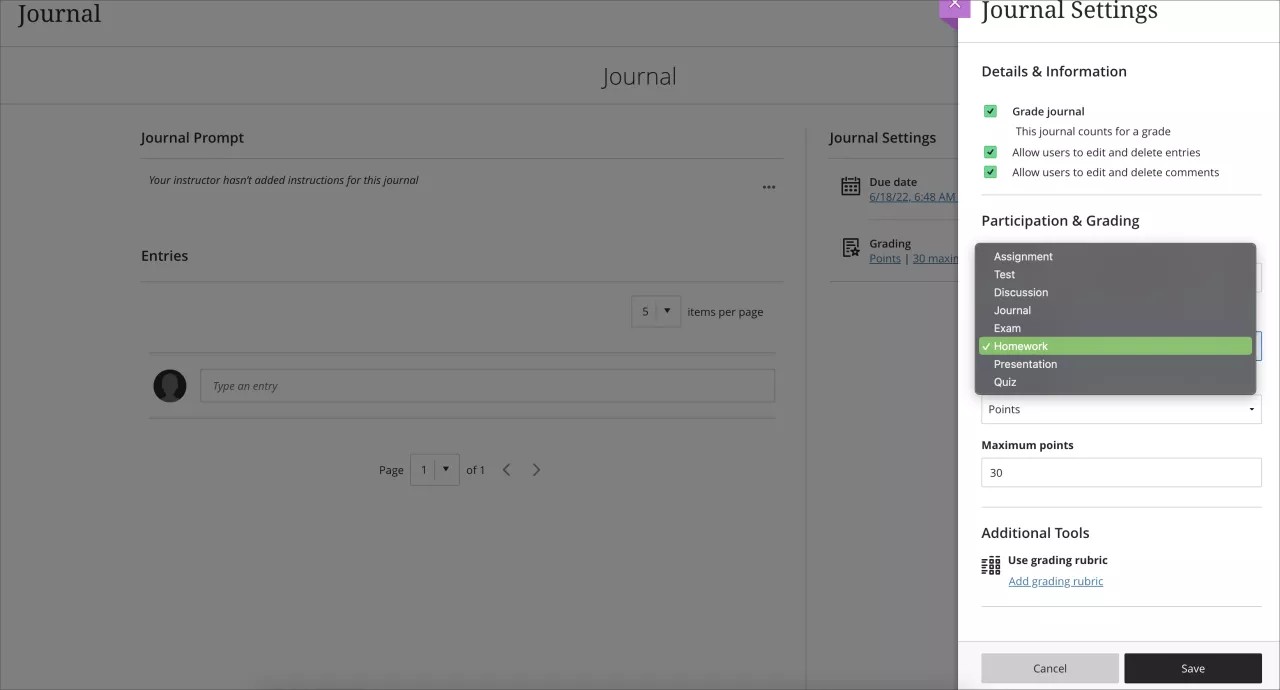
Select the gear button to open the Journal Settings panel. Select the option for Grade Journal. When you choose to grade a journal, more options appear such as the due date and maximum points.
Provide a due date. Due dates appear on the calendar and in the activity stream. Encourage students to review what’s due now and what’s ahead so they can ask questions as soon as possible.
Provide the maximum points. The points apply to one or more entries made by a student.
Choose the grade category. A best practice in course design is to use a variety of assessments. Categorizing assessments is important to instructors who assign weight to categories in the overall grade calculation.
Select the grading schema. From the Grade using menu, select an existing grading schema such as Points. You can change the grading schema at any time and the change will show to students and in your gradebook.
Add a grading rubric. Rubrics can help you evaluate student submissions based on key criteria that you define. You can create or add an existing rubric so students can view the requirements of the graded work. You may associate only one rubric to each journal.
Basic journal grading workflow
When a graded journal's submissions are ready to grade, you're notified in the activity stream. Select the link to open the journal in a new layer to review the entries.
You can also open the journal from the Course Content page and use these steps to grade submissions.
- After you review a student's journal entries and comments, close the journal layer and select Gradebook on the navigation bar.
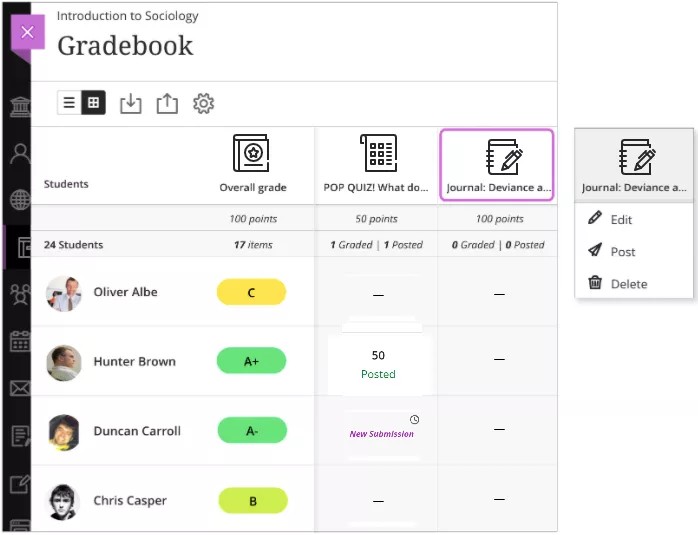
- On the Gradebook page in Gradable items view, you can view how many students have made entries. Switch to the Grades view to start grading.
- Go to the journal's column. New Submission appears in cells for students with entries that need to be graded. Select the cell and select View to read the submission. Click anywhere outside the grade area to save.
You can also use grading tools, including feedback and rubrics, to create and post grades. Both participation and submission journal views link to the gradebook for easy grading.
Post grades
When you're ready to release grades to students, select the Post option in the column header. All grades you've assigned for this column are posted for students to see. If you want to post one at a time, click within a student's cell and select Post in the menu. Posted grades are labeled Posted.
After you post journal grades, students can view their scores on their grades pages or in the activity stream. They can also access their journal contributions and their grades from the journal link on the Course Content page.
Change a graded journal to ungraded
When you change a graded journal to ungraded, the grades are deleted but the journal remains on the Course Content page. The journal is removed from the gradebook.
Delete a graded journal
If you delete a graded journal, the journal is removed from the Course Content page and the gradebook.


